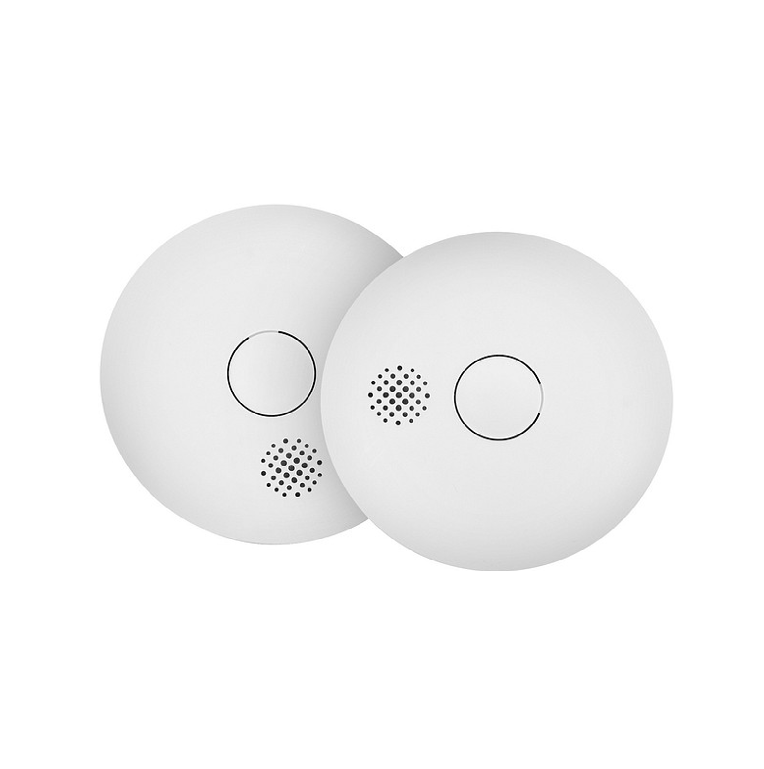
Housegard SA750 LUMA Optical Smoke Alarm User Manual
USER MANUAL OPTICAL SMOKE ALARM LUMA
Congratulations on the purchase of your new smoke alarm device. We recommend that you spend some time reading this instruction manual in order to fully understand all the operational features. You will also find some hints and advice to help you resolve any issues. Read all the safety instructions carefully before use and keep for future reference.
The Housegard smoke alarm is designed to detect smoke particles, to reduce the number of false alarms and to give an early warning if a fire occurs. Its operation depends on correct positioning and maintenance.
FEATURES
- IF ONE ALARMS, THEY ALL SOUND.
- Early warning, no matter where the fire starts.
- Long life battery, 10 years, safe and economic.
- Both adhesive 3M tape and screws included.
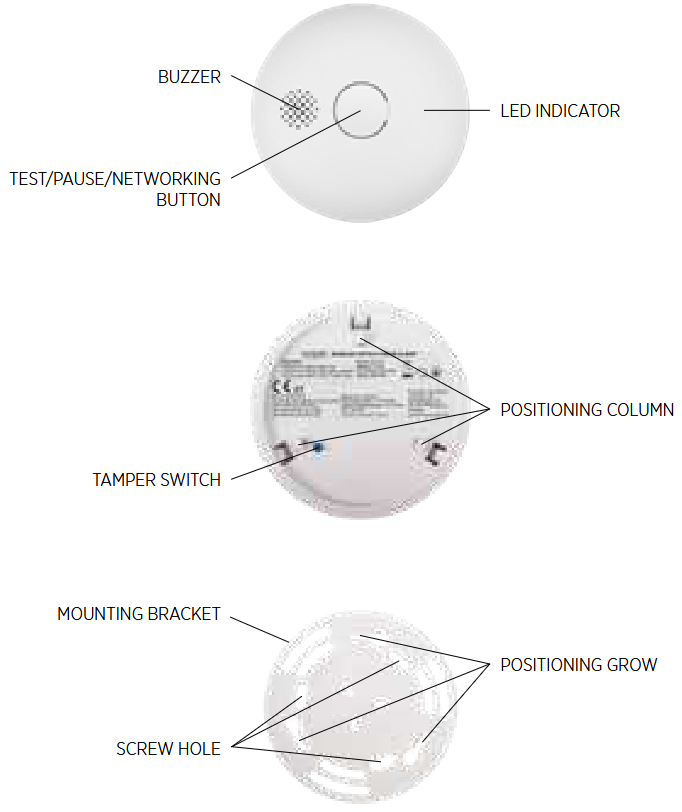
- Test and pause button.
- Malfunction warning signal.
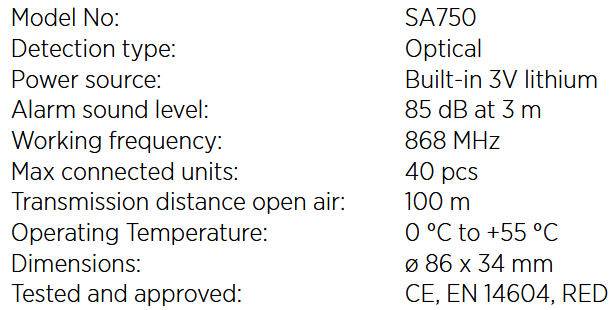
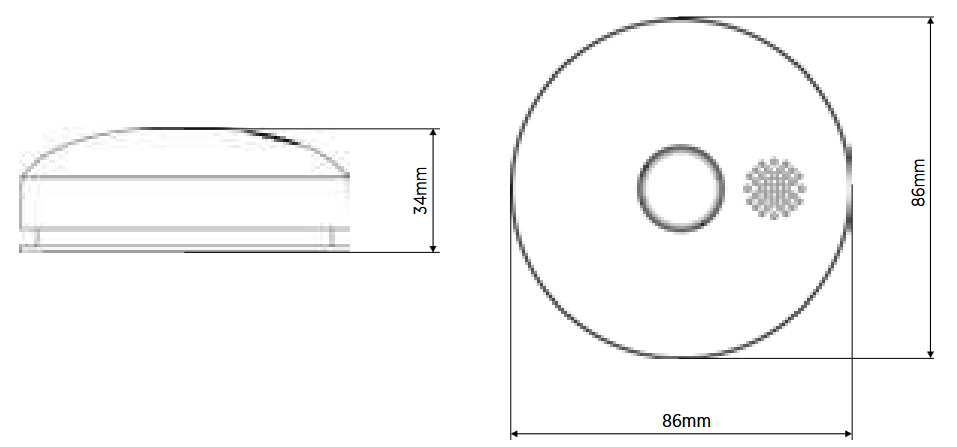
TECHNICAL SPECIFICATIONS
IMPORTANT SAFETY INFORMATION
- The smoke alarm device is battery-powered. It will not work without battery, or if the battery is dead, removed or not correctly connected. Use only the specified type of battery. DO NOT connect the smoke alarm device to any type of detector or equipment other than what is stated in this manual.
- The test button provides a full test of all the smoke alarm’s functions. No other test methods are required. Test smoke alarm devices every week to check that they are working properly.
- Do not remove or disconnect the battery to stop false alarms, as this will cause the smoke alarm to lose important functionality. Open a window or ventilate the air around the smoke alarm device to stop the alarm and/or press the pause button.
- The smoke alarm device must be installed in line with all local and
national rules and regulations on installation. - The smoke alarm device is intended for use in houses. In apartment blocks, each apartment should be fitted with its own smoke alarm device. This smoke alarm device is not suitable for use in non- residential buildings. The smoke alarm device is not a replacement for a complete alarm system as required under law or by the fire safety authorities.
- There may be reasons why a person in a household might not hear the alarm (e.g. noise, deep sleep, impaired hearing). If you suspect that a person in the household will not react to the smoke alarm device, specialist alarms should be installed.
- The smoke alarm device detects combustion particles (smoke) in the air. It does not react to flames or gas. The smoke alarm device is designed to give off an audible alarm if a fire is developing.
- No smoke alarm devices are entirely reliable and they cannot give a 100% guarantee to protect life and property against fire. The smoke alarm device is no replacement for insurance. Homeowners and tenants should take out life and home insurance.
The smoke alarm device should be tested regularly and replaced after ten years
POSITIONING THE SMOKE ALARM DEVICE
In order to give an early warning, the smoke alarm needs to be installed where the fire occurs. Housegard therefore recommends that you install a smoke alarm device in every room and on every floor.
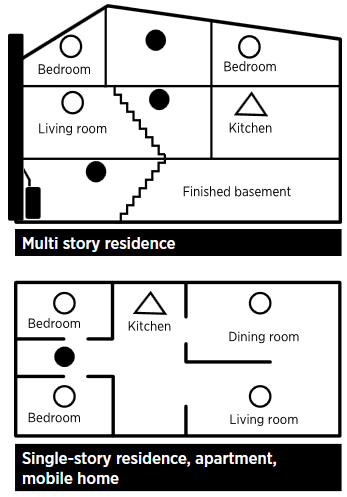
KEY:
 Minimal protection
 Recommended/more substantial protection
 Smoke alarm devices with a pause function are recommended
- Install a smoke alarm device in all separate bedrooms and in rooms commonly occupied.
- In homes with several storeys, a smoke alarm device should be installed atthe top of every staircase between each storey.
- In the basement, a smoke alarm device should be installed in the ceiling at the foot of the stairs.
- In bedrooms where people sleep with closed doors, there should always be a smoke alarm fitted in the bedroom.
- Install a smoke alarm device in every room where there is a potential risk of fire.
- If you install the smoke alarm in a passageway whose width is less than 3 m, install it in the middle and install one unit every 12 m.
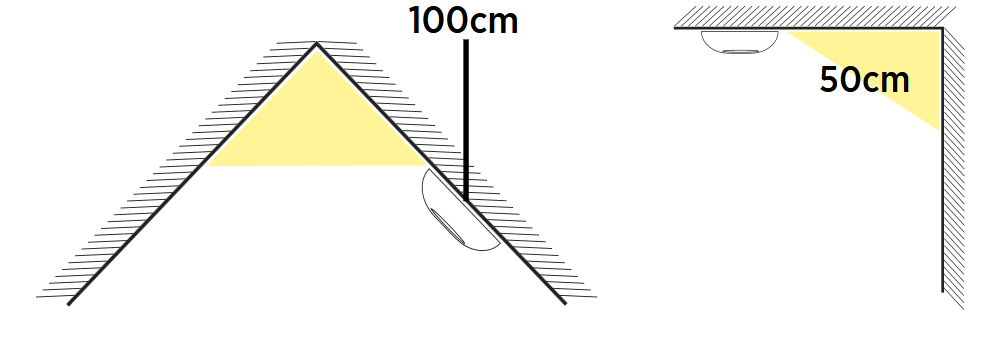
- Install the smoke alarm device in the middle of the ceiling. If you can’t, install it at least 0,5 m from the wall (wall mounting not recommended).
- If you install the smoke alarm on sloped or peaked ceiling, the installation position shall be at least 1 m from the highest point (see image below).
- At least 1,5 m from fluorescent lamp or neon lamp. (In case of electronic interference).
- At least 3 m from the bathroom.
- At least 6 m from the kitchen or stove.
- At least 30 cm from the lamps.
SMOKE ALARM DEVICES SHOULD NOT BE PLACED IN THE FOLLOWING LOCATIONS
- In the kitchen, near the cooker, where smoke from cooking could cause false alarms.
- In areas of high air humidity, such as bathrooms or near dishwashers or washing machines, where steam and moisture could cause false alarms.
- Near fans and ventilation ducts, where air flows may prevent smoke from reaching the smoke alarm device.
- Near light sources and electrical equipment that emit an electromagnetic field.
- Near a fireplace or stove with an open fire.
- At the top of a V-shaped ceiling, where air pockets could stop the smoke from reaching the smoke alarm.
- In a garage, where exhaust fumes could cause false alarms.
- In dusty and dirty areas, where the dust and dirt could damage the smoke alarm device.
- In rooms where the temperature may fall below 0 °C or rise above +55°C, or in rooms with large temperature variations.
- Areas that have large metal surfaces that could block the RF signal between units.
WARNING: Incorrect positioning may lead to reduced reliability and false alarms.
PREPARING AND PROGRAMMING
Important: The SA750 smoke alarms are equipped with transmitters and receivers, so they can communicate with each other. For this function to work, the smoke alarms must be programmed to link up.
Important: The signal range may vary depending on position, the design of the building and its materials. Make sure that all the installed smoke alarms are within signal range.
Important: Protect your hearing. Smoke alarm devices emit a loud audible signal. We recommend that you always use earplugs or other hearing protection when testing your smoke alarms.
ACTIVATE BATTERY
We suggest that you interconnect the alarms before you install the product to the ceiling, to make your operation more efficient.
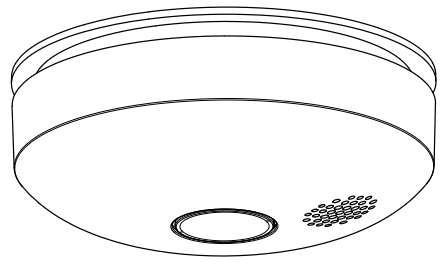
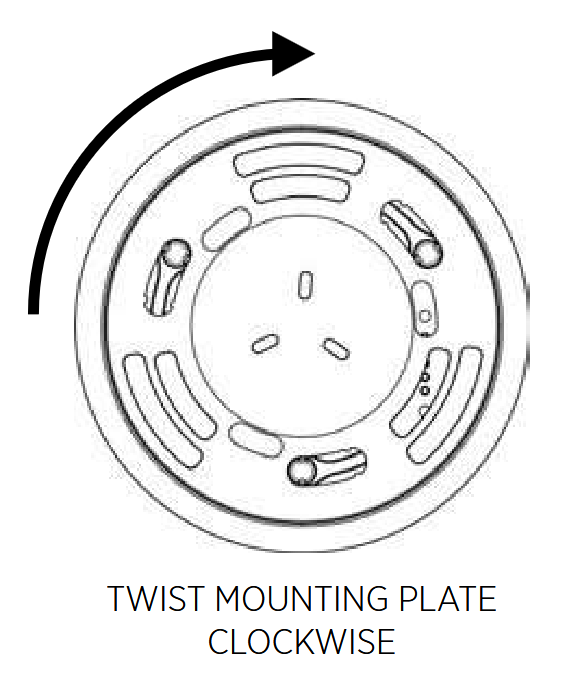
Mount the smoke alarm to the mounting plate and twist mounting plate clockwise. To activate the battery and turn on the smoke alarm, press the test button once. Then the smoke alarm enters standby condition. Note that the smoke alarm is not interconnected with other units now.
CONNECT THE ALARMS
Choose one of the smoke alarms as the Host unit. The Host unit is used to send the radio code to the other alarms, so they all connect up.
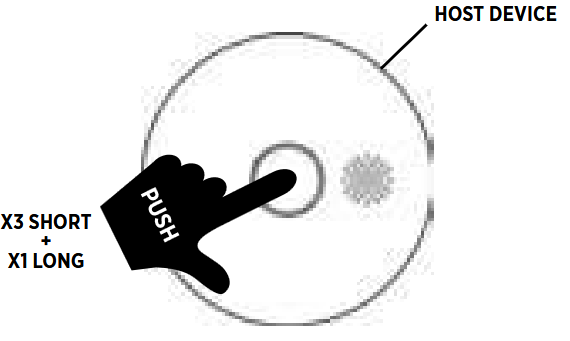
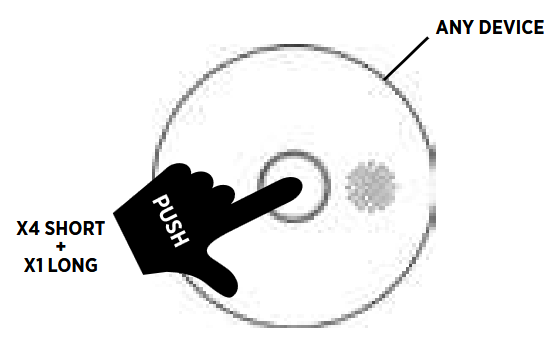
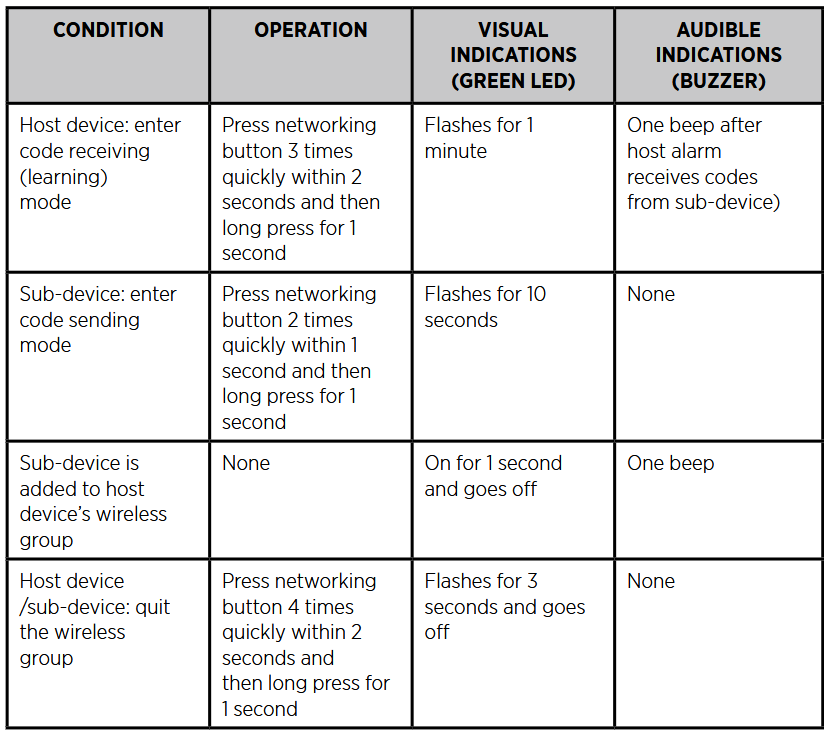
- On Host unit, press the network button 3 times quickly within 2 seconds and then press 1 time again and hold it down until the green LED indicator starts flashing. That means this unit will be set in learning mode. Learning mode last 1 minute.
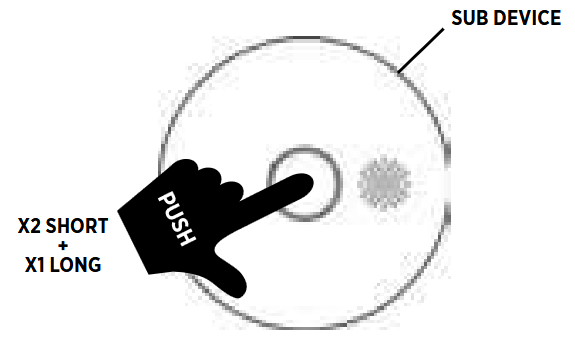
- On any Sub unit, press the network button 2 times quickly within 1 seconds and then press 1 time again and hold it down until the green LED indicator starts flashing. The sub-device flashes green, beeps once, and pairs successfully with Host. Code sending mode lasts 10 seconds.
- Learning of interconnection is completed.
TEST THE CONNECTED ALARMS
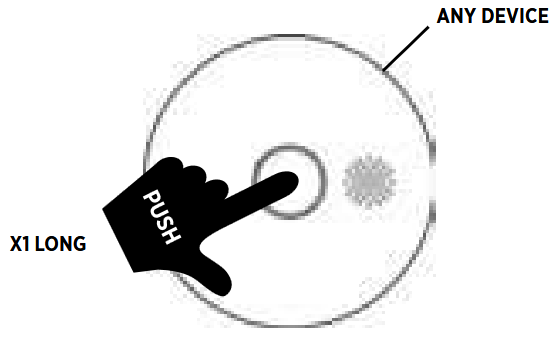
Hold the test button on any interconnected smoke alarm until it beeps, about 1 second, then release. All interconnected unit will go into alarm mode, red LED flashes and the buzzer beeps. On the other interconnected alarms the green LED flashes and the buzzer beeps.
INTERCONNECT ADDITIONAL SUB UNITS
You can use any interconnected device as the host device.
- Follow above instruction to interconnect additional Sub units into the systems.
- After successful interconnection, test the system again by holding the test button on any interconnected smoke alarm until it tests, about 1 second, then release.
DELETE PROGRAMMING (RE-SETTING)
Press the networking button 4 times quickly within two seconds and then press 1 time again and hold it down until the green LED indicator starts flashing. It will flash for three seconds (twice per second) and then go off. This will delete the programming for that alarm.
NETWORKING STATUS INDICATION
INSTALLATION WITH SCREWS
- Remove the mounting plate on the back of the smoke alarm by twisting it anti clockwise.
- Hold the mounting plate against the selected installation position on the ceiling, mark the centre of the holes with a pencil. Drill a hole through the pencil marks and use the enclosed screws and anchors to secure the mounting plate.
- Place the smoke alarm device against the mounting plate and twist the smoke alarm device clockwise until it clicks into place.
- Press the test button to test the smoke alarm device.
EASY INSTALLATION WITH TWO-SIDED ADHESIVE TAPE
Make sure that the installation surface is flat and clean. If the surface is rough, we recommend that you install the smoke alarm with the help of the screws.
- Remove one side of the 3M tape protection.
- Attach the tape on the base plate on back of the smoke alarm. Press for 5 seconds.
- Remove the second side of the 3M tape protection.
- Place the smoke alarm according to the manual. Press the smoke alarm for five seconds against the ceiling to make sure that it is well attached.
- Press the test button to test the smoke alarm device.
OPERATION
Start Up Mode
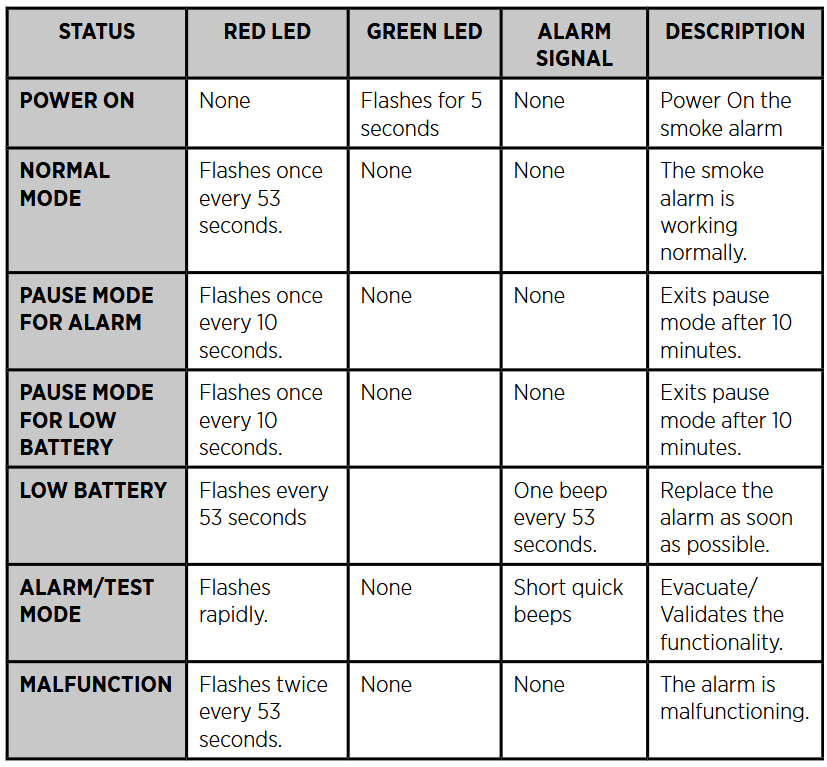
After correctly installing the alarm on the mounting bracket, press the test button once to power it on. The green LED will flash for 5 seconds. If the test button is not pressed within 10 minutes, the alarm will automatically power on and enter the normal operation mode.
Normal operation mode
In standby condition the red LED indicator flashes once every 53 seconds to indicate that the smoke alarm is operating properly. The smoke alarm detects smoke every 10 seconds. When it senses smoke, the alarm sounds, short quick beeps and the red LED flashes rapidly at the same time, until the air is clear.
Test mode
By pressing the test button the smoke alarm will enter alarm mode. The unit will make short quick beeps and red LED flashes rapidly.
Low battery warning
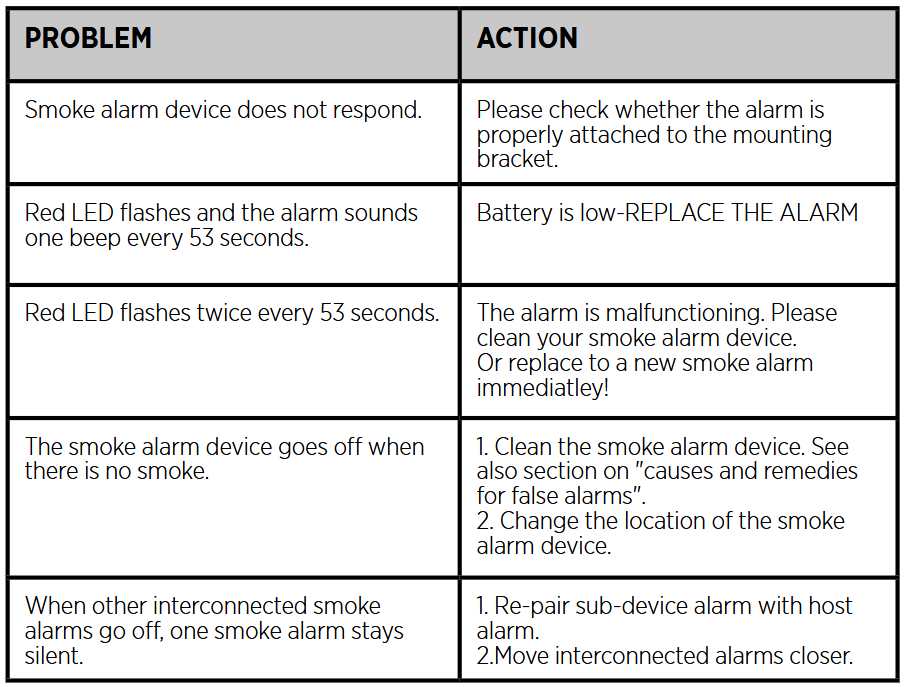
This will indicate when the voltage is too low. The device will flash red and beep once every 53 seconds.
Malfunction warning
This warning indicates that the alarm is malfunctioning. The device will flash red twice every 53 seconds.
Pause mode alarm (Low sensitivity)
The smoke alarm is desensitized by pushing the pause button. The red LED flashes once every 10 seconds and no audible sound will be heard during 10 minutes, unless smoke becomes denser. If the smoke becomes denser, the alarm will override the pause mode. The pause mode will end automatically after 10 minutes.
Pause mode low battery
The smoke alarm low warning can be paused by pushing the pause button. The red LED flashes once every 53 seconds and no audible sound will be heard during 12 hours. The pause mode will end automatically after 12 hours.
MEANING OF THE DIFFERENT LED AND ALARM SIGNALS
CAUSES AND REMEDIES FOR FALSE ALARMS
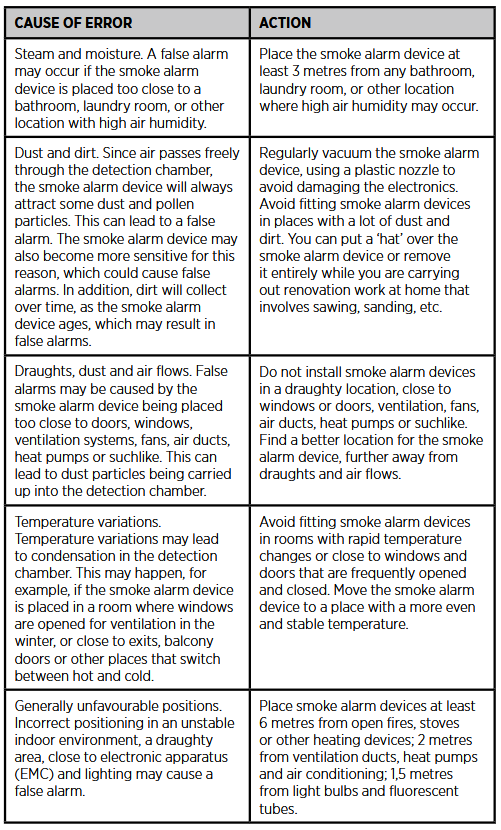
A smoke alarm device detects and reacts to smoke particles in the air. The smoke particles set off the smoke alarm device. This function means that the smoke alarm device will also react to dust particles, moisture or other particles in the form of pollen, insects etc. These factors are usually the cause of a false alarm.
TESTING THE SMOKE ALARM DEVICE
The smoke alarm is tested by pressing and holding the test button. The smoke alarm responds by sounding the alarm. The alarm signal stops when you release the test button. Never use an open flame to test the smoke alarm device, it can destroy the smoke alarm device.
- Always test all devices after installation to ensure that they are functioning properly.
- The test button performs a full test of all functions.
- Test your smoke alarm device routinely once a week.
- Always test your smoke alarm device after a long period of absence from home.
- Always stand at arm’s length when testing your smoke alarm device to avoid damage to your hearing.
FOR YOUR SAFETY! NEVER IGNORE A SMOKE ALARM DEVICE THAT HAS GONE OFF. WHEN YOU HEAR THE ALARM SIGNAL, YOU MUST GIVE IT YOUR FULL ATTENTION AND ACT ACCORDINGLY.
TROUBLESHOOTING
TYPE OF BATTERY
Voltage: DC3V
Type: 1 x CR123A / CR17335 (Sealed for life)
Battery life: Approx. 10 years
Warning: This smoke alarm device is equipped with a sealed-in battery. Do not remove the battery from the smoke alarm device to end an unwanted alarm.
CLEANING AND MAINTENANCE
The smoke alarm device should be cleaned regularly. Clean your smoke alarm device by vacuuming or use compressed air externally along the opening to the detection chamber to remove dust and dirt.
IMPORTANT: Do not try to open the cover to clean inside the smoke alarm device. This will negate the warranty.
WARRANTY
This smoke alarm device comes with a 5-year limited warranty against manufacturing defects. (Valid from date of purchase.) The battery is not covered by the warranty. Liability under the warranty is limited to the value of an equivalent smoke alarm device. Defective smoke alarm devices should be returned to the retailer, along with a description of the problem. If the claim is approved, the faulty goods will be replaced with a new smoke alarm device of the same or an equivalent type. Any claim must be accompanied by a receipt confirming the date of purchase.
EC DECLARATION OF CONFORMITY
Sunmatic The Safety Company AB
Sörredsvägen 113
SE-418 78 Göteborg
Hereby declare under our sole responsibility that the product:
Housegard model smoke alarm SA750
To which this declaration relates is in conformity with the following standards and/or other normative documents: EN 14604:2005+AC:2008
Technical file held by: Sunmatic The Safety Company AB
Göteborg 2023-11-17

Frank Willy Ottesen
Technical Manager

2531-CPR-CSP11350
Sunmatic The Safety Company AB
DOP: 601178-CPR-1123
EN 14604:2005+AC:2008
DISPOSAL
In accordance with the WEEE Directive 2012/19/EU, waste electrical products should not be disposed of with regular household waste. The battery should be removed before disposal of the smoke alarm and both should be disposed of in line with local regulations.
WARNING: Do not open the alarm. Do not burn.
Sunmatic The Safety Company AB hereby declares that Housegard model SA750 complies with the essential requirements and other relevant provisions of RE-Directive 2014/53/EU. info@gpbmnordic.se
LIMITATIONS OF RADIO COMMUNICATIONS
This product use a category 3 radio receiver, which is used in cases where loss of communication cannot cause critical situations, and that it can be avoided by following the instructions in the user manual. Radio communication can be disturbed by other systems, especially near the 4G mobile system operating in neighboring frequencies.
SA750 radio communication systems are very reliable and are tested to high standards. However, due to their low transmitting power and limited range (required by regulatory bodies) there are some limitations to be considered:
- Radio transmitter equipment, such as the wireless smoke alarm, should be tested regularly (at least weekly). This is to determine whether there are sources of interference preventing communication. The radio paths may be disrupted by moving furniture or renovations, and so regular testing protects against these and other faults.
- Receivers may be blocked by radio signals occurring on or near their operating frequencies, regardless of the house coding.
The wireless smoke alarm SA750 has been tested to EN300 220-1 V2.4.1 in accordance with the requirements of EN300 220-2 V2.4.1. It is designed to provide reasonable protection against harmful interference in residential installations. This equipment generates uses and can radiate radio frequency energy and, if not installed and used in accordance with the instructions, may cause interference to radio and television reception.