GVM-520LS Photography Lights Instructions
CONTENTS
IMPORTANT SAFETY INSTRUCTIONS
First and foremost: this product is professional lighting and staging equipment and should be used by a professional lighting technician or under the guidance of a professional. When using this product, you must always follow the cautions below:
- Read the product manual carefully before use.
- This product is only suitable to use in a temperature range of -10℃ to 40℃.
- Do not place the equipment near flammable and volatile solvents such as alcohol and gasoline.
- Before storing the device, make sure it has cooled down completely. When being stored, unplug the power cord from the device. The equipment should be stored in its carrying case or a well-ventilated and dry place.
- This lighting fixture is not for general illumination and should not be used as such. Individuals with eye injuries or sensitivity should avoid using this lighting fixture.
- This is a professional light and children are prohibited from using it. Parents or guardians must closely supervise children when they are near the equipment to prevent personal injury caused by colliding with or misusing the equipment.
- Before using the equipment, please remove the protective cover.
- When the lighting fixture is on, it is forbidden to stare directly at the light source under any circumstances. High-intensity lighting should only be used under the guidance of a professional lighting technician. Avoid staying in a high-intensity light environment for a long time. If feeling any discomfort, please immediately turn off the lighting fixture, and seek medical attention.
- When the lighting fixture is on, use it carefully and avoid contacting high-temperature components such as LED light sources to prevent being burnt.
- Do not use damaged equipment or accessories. Wait for a professional repairman to inspect and repair it before it is confirmed that the equipment can function normally.
- If the light source is damaged or deformed due to heat, please stop using it and contact the manufacturer, service agents, or qualified repairman promptly to replace the light source to avoid accidents.
- If the product is cracked due to falling, squeezing, or strong impact during use, please stop use it to avoid being electrically shocked by touching internal electronic components.
- Do not disassemble the product by yourself. If the product malfunctions, it must be checked and repaired by the manufacturer or authorized repair personnel.
- Before cleaning and maintenance, be sure to unplug the power To unplug never pullsupply. on the cable but always pull the plug itself. This device shall only operate with earthed power outlets or emergency power generators.
- When cleaning the device, do not wipe it with a wet cloth. Use a dry and soft cloth to wipe off the dirt.
- If an extension cord is required, it needs to have the necessary capacity to power the respective unit. Using an extension cord with a lower current capacity than the devices need may cause overheating.
- For some products with long power cords, please place the power cords properly and avoid contact with overheated surfaces that may damage or trip personnel. Please use the original power cords of our manufactory. The damage caused by using non-original power cords is not covered by our repair service.
- Do not use product accessories that are not recommended by our brand to avoid fire, electric shock, or personal injury. \
- Some products use batteries for power supply. Do not use any batteries, power sources, or accessories that are not specified in the user manual. Please keep batteries and other accessories out of reach of children and infants. If a child or infant swallows a battery or accessory, seek medical attention immediately. If the battery leaks, changes color, deforms, smokes, or emits an odor, remove it immediately. Be careful not to get burned during the removal. Continued use of such batteries may cause a fire, electric shock, or skin burns. Do not use any deformed or modified batteries. Do not disassemble or modify this product or the battery. Do not heat the battery or solder it. Do not let the battery come into contact with fire or water, or subject it to strong external force. Do not insert the battery’s positive and negative ends incorrectly, or mix and use old and new batteries or different types of batteries.
- For some products with built-in lithium batteries, please use a dedicated charger for charging, and following the correct operating instructions within the prescribed voltage and temperature range.
- The warranty last for one year. Consumables like batteries, adapters, power cords, and other accessories are not covered by the warranty.
- The one-year warranty will be invalidated if the equipment is found to have been repaired privately. The related repair costs will be charged.
- Equipment malfunctions caused by non-standard operations are not covered by the warranty.
- The safety instructions are based on our factory’s strict testing. If there are any changes in the equipment’s design and specifications, we reserve the right not to notify you. Customers can visit our official website to check the latest digital version of the instructions and learn about the newest product information.
Keep these instructions!
 WARNING:
![]() High-power LED lights are strictly prohibited from being directly viewed or shining into other people’s eyes.
High-power LED lights are strictly prohibited from being directly viewed or shining into other people’s eyes.
![]() Do not unplug the power cord or connecting wires while the light is on to avoid personal injury.
Do not unplug the power cord or connecting wires while the light is on to avoid personal injury.
![]() Do not cover the heat dissipation port when the lamp is in operation.
Do not cover the heat dissipation port when the lamp is in operation.
![]() Keep children away from touching or using this light.
Keep children away from touching or using this light.
![]() As professional lighting equipment, please make sure to operate it correctly according to the user manual
As professional lighting equipment, please make sure to operate it correctly according to the user manual
PRODUCT INTRODUCTION
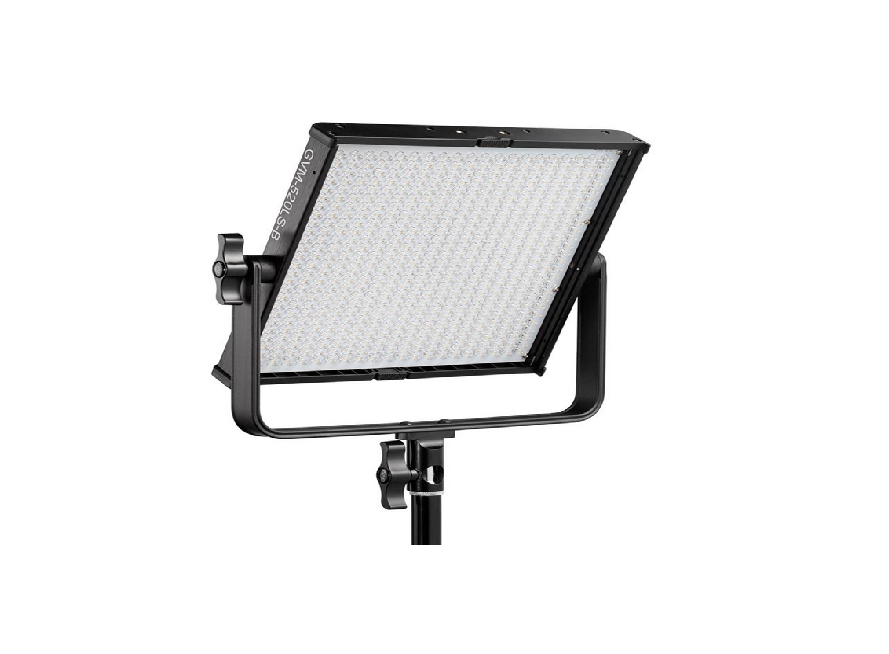
Thank you for purchasing our “GVM-520LS”. This product is specially designed for senior photography enthusiasts. The product is suitable for live / outdoor / studio photography, and also for youtube video shooting.
The main features of the product are:
- Step-less adjustable dual color temperature feature, color range 3200K ~ 5600k, with 528 LED bulbs, which is helpful to restore and enrich the color of objects and provide you with natural and vivid shooting effect.
- LCD screen display and stable system, which can support 360 ° rotation and effectively control the light Line. You can also install folding and external soft light board to avoid redundant light and make the light softer. You can customize the control of fill light, so that you can easily shoot the desired results.
We firmly believe that the correct use of this product will definitely help your shooting work. Before using the product, we strongly recommend that you carefully read the following user guide.
DISCLAIMERS
- Before using this product, please read the text carefully to ensure that the correct operation of the product has been carried out. Failure to follow and not following the instructions and warnings in this document may cause harm to you and others around you, or even damage the product or other surrounding items.
- By using this product, you are deemed to have carefully read the disclaimer and warning, understand and acknowledge all the terms and contents of this statement, and promise to take full responsibility for the use of this product and the possible consequences.
- Design and specifications are subject to change without notice.
PRODUCT PARAMETER
![]() Brand : GVM
Brand : GVM
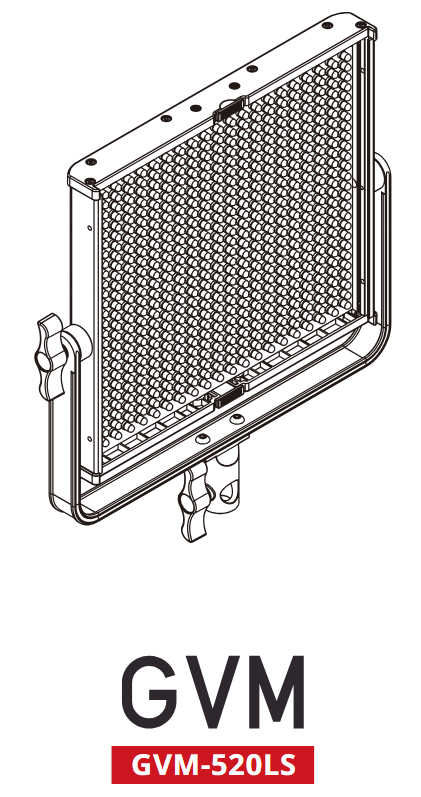
![]() Product Model : GVM-520LS
Product Model : GVM-520LS
![]() Product Name : Photography Lights
Product Name : Photography Lights
![]() Product Type : Photography Fill Light
Product Type : Photography Fill Light
![]() Features : Joint Control, High Color-Rendering Index Light Beads
Features : Joint Control, High Color-Rendering Index Light Beads
![]() Light Adjustment Method : Stepless Adjustment
Light Adjustment Method : Stepless Adjustment
![]() Lamp Beads Quantity : 528
Lamp Beads Quantity : 528
![]() Color Rendering Index : ≥97
Color Rendering Index : ≥97
![]() Color Temperature : 3200K~5600K
Color Temperature : 3200K~5600K
![]() Lumens : 5960lux/1m ; 18800lux/0.5m
Lumens : 5960lux/1m ; 18800lux/0.5m
![]() Power : 30W
Power : 30W
![]() Product Weight : 1.87KG
Product Weight : 1.87KG
![]() Product Size (mm) : 310×320×55
Product Size (mm) : 310×320×55
![]() Power Supply Mode : DC Input & Battery
Power Supply Mode : DC Input & Battery
![]() Power Supply : DC15V/3A
Power Supply : DC15V/3A
![]() Battery Capacity : 7.4V-4400mAh×2 (To be purchased separately)
Battery Capacity : 7.4V-4400mAh×2 (To be purchased separately)
![]() Voltage : AC:100-240V
Voltage : AC:100-240V
![]() Cooling : Natural Heat Dissipation
Cooling : Natural Heat Dissipation
![]() Product Material : Aluminum Alloy
Product Material : Aluminum Alloy
![]() Commodity Origin : China. Huizhou
Commodity Origin : China. Huizhou
PRECAUTIONS
- Please use the matching power adapter or lithium battery with the same specification to power the product. Do not use power adapter with different output voltage parameters.
- The product is not waterproof, please use it in a rainproof environment.
- The product is not anti-corrosion, therefore do not let the product touch any corrosive liquid.
- When using the product, make sure the product is put firmly and prevents falling and damage.
- If the product will not be used for a long time, please switch off the power to reduce energy loss.
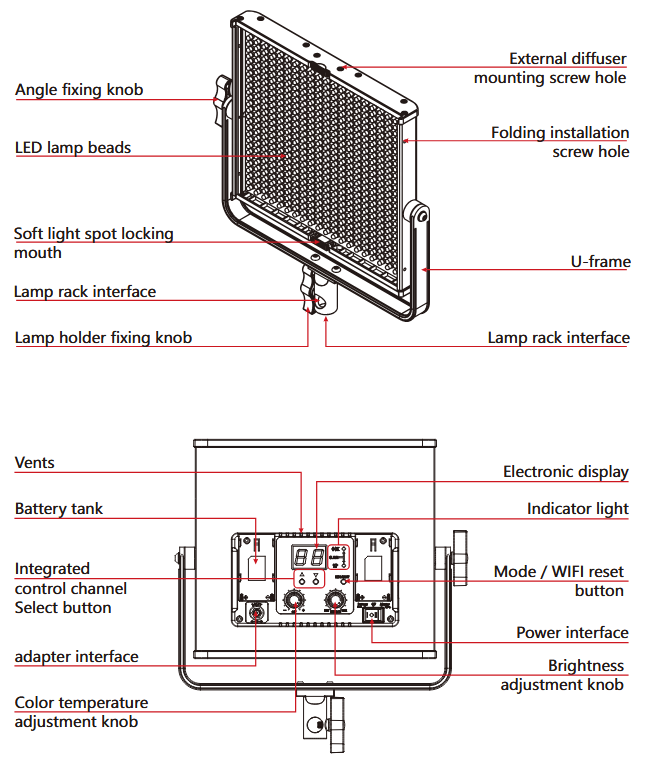
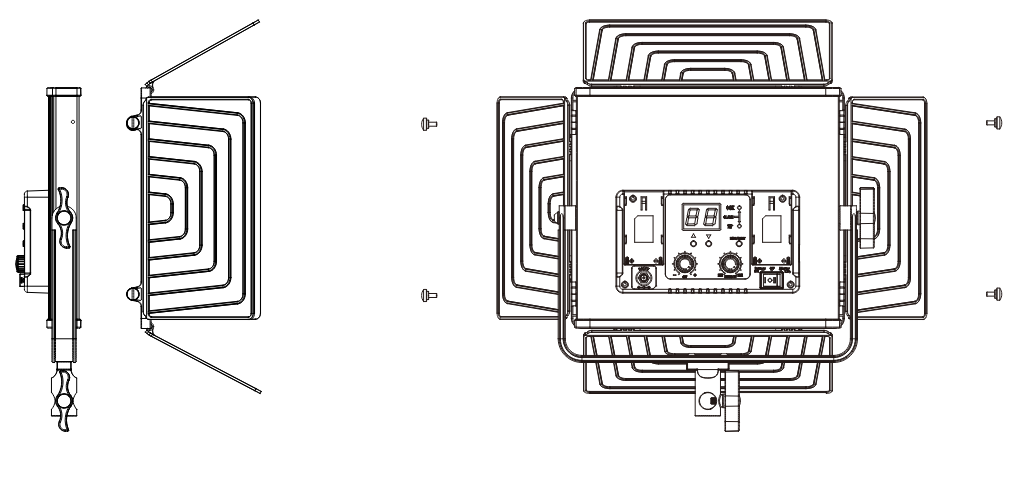
PRODUCT STRUCTURE ANALYSIS
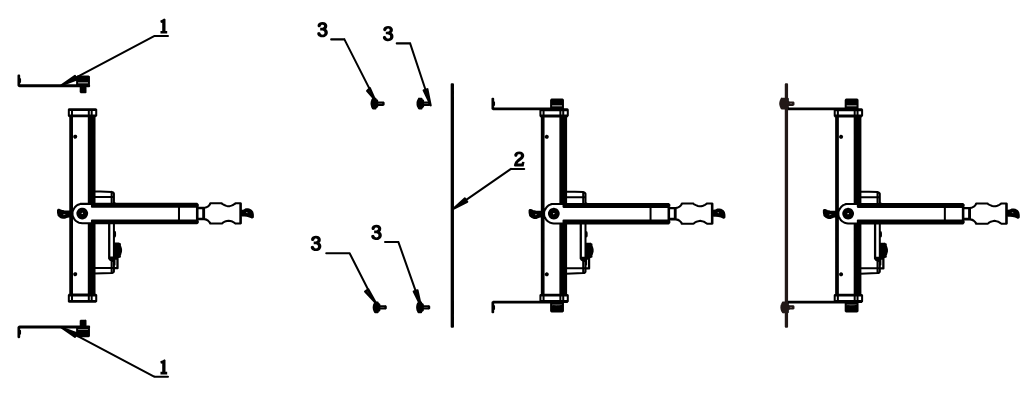
INSTALLATION METHOD
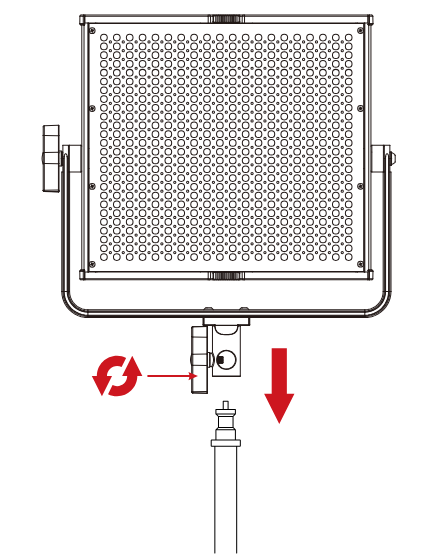
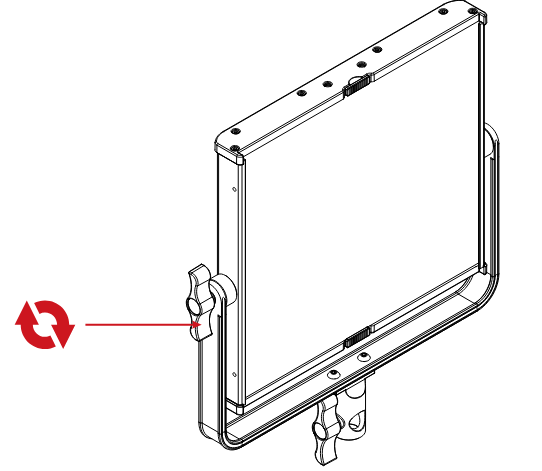
1. The lamp can be installed and fixed on the bracket by rotating the knob clockwise, and unloaded by rotating in the counterclockwise direction.
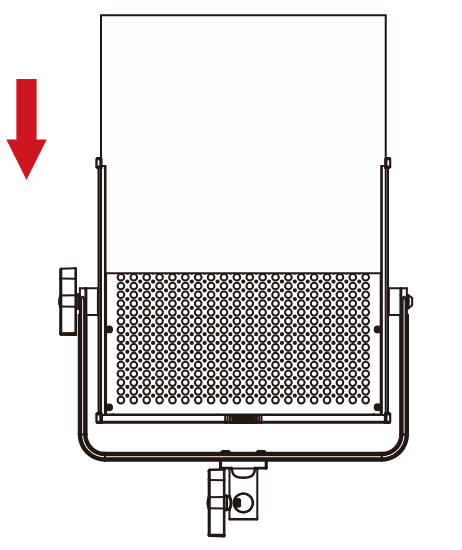
2. Insert the Subdued light board from the top of the light panel.
3. Loosen the adjustment knobs on both sides of the U-bracket, adjust the angle of the panel you need, and then tighten the adjustment knobs on both sides of the U-bracket.
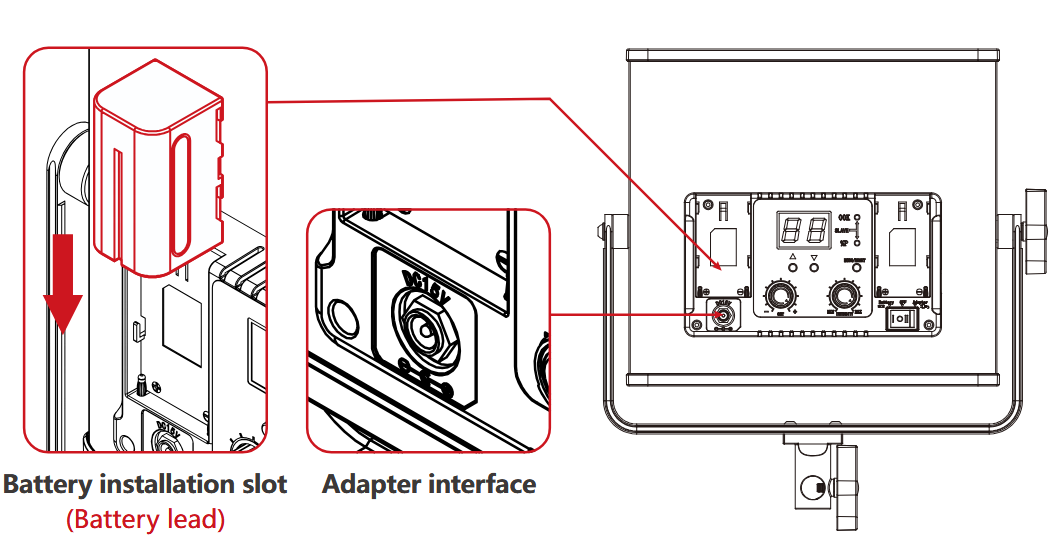
4. There are two power supply modes to choose.
- connect the power cord and adapter for power supply.
- purchase two other suitable lithium batteries and use them for power supply. ( both battery cells must be plugged in to power )
ACCESSORIES INSTALLATION METHOD
Light control folding :
You can buy a set of light control folding to control the angle of light.
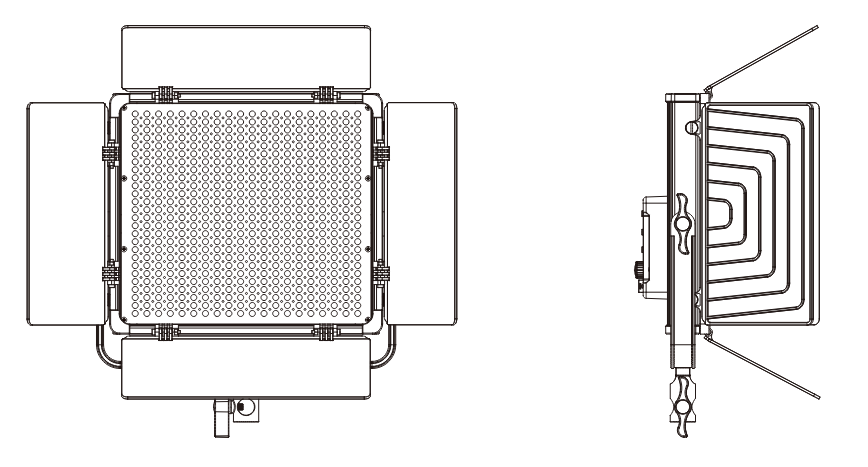
Install the hinge: align the front mounting hole with the screw hole of the hinge, and lock the door latch with the screw.
External soft-board (Purchased separately):
Make the light softer and achieve the effect of soft light box
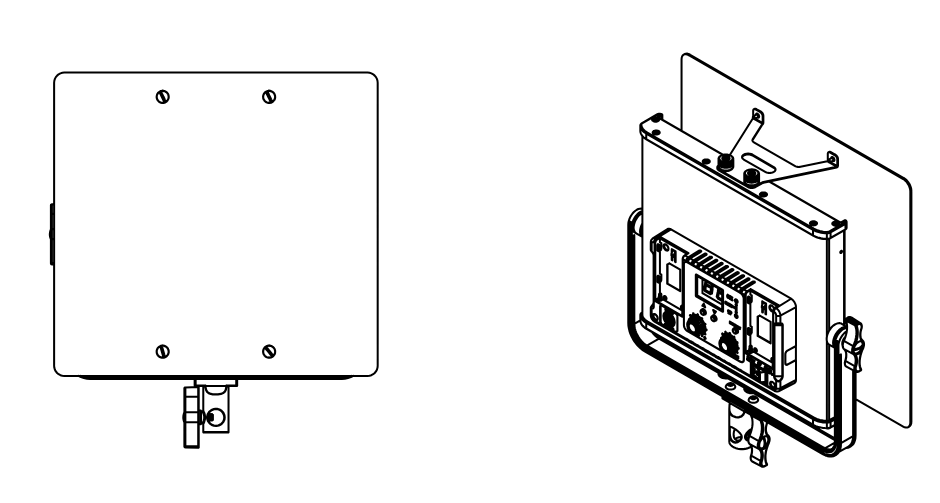
Install the external Diffuser: install the diffuser support frame to the lamp, align the diffuser with the screw hole, and lock the diffuser with the screw.
DESCRIPTION OF PRODUCT CONTROL KEYS
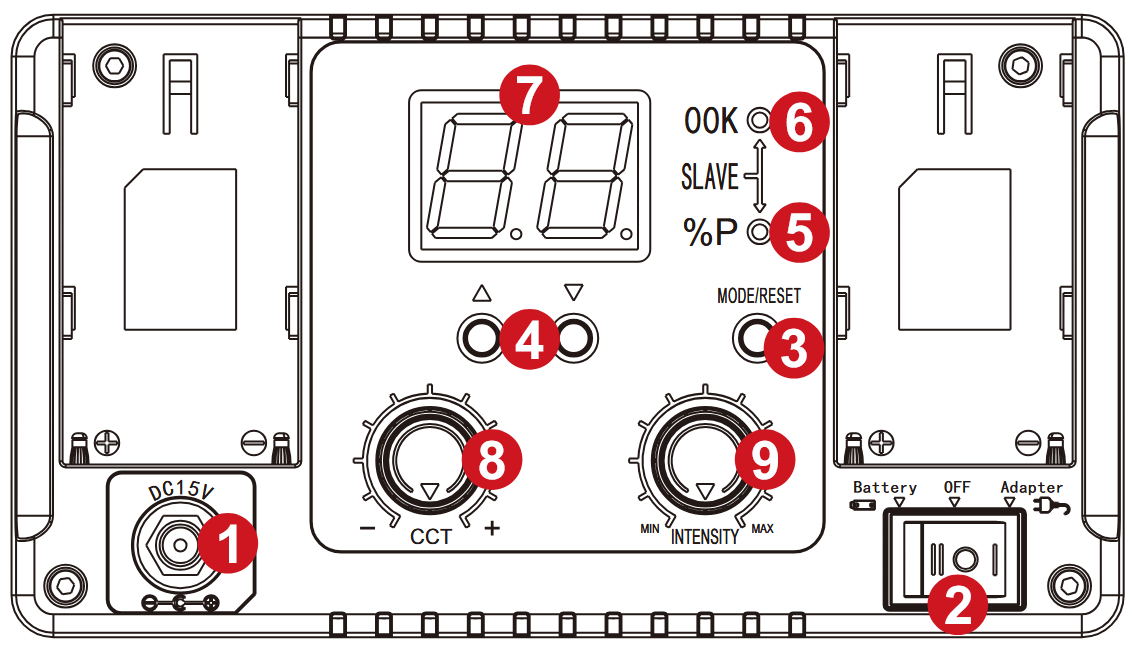
- DC15V power input interface
- Power switch
- Mode button/WIFI reset button: Modes include master mode and slave mode; WIFI username and password reset button.
- Channel addition and subtraction key: adjust channel.
- Brightness indicator: when adjust the brightness knob, the indicator is on.
- Color temperature indicator: when adjust the color temperature knob, the indicator is on
Note: indicator ⑤ and indicator ⑥ will be on simultaneously when in slave mode. - Nixie tube: show value including lightness, color temperature and channel.
- Color temperature adjustment button: adjust the color.
- Brightness adjustment button: adjust the brightness.
FUNCTION INSTRUCTION & INSTRUCTION FOR USE
1. Mode selection:
The mode is divided into master mode and slave mode. Tap the mode key to switch (default master mode for startup).
Master mode: Adjust brightness, color temperature and channel through knobs and buttons, and slave computers of the same channel can also be adjusted synchronously.
Slave mode: Brightness and color temperature cannot be adjusted, only channel values can be set.
2. Regulation channel
Set channel value using channel addition and subtraction key.
3.Adjust brightness (BRG):
In the master mode, brightness can be adjusted by rotating brightness level knob.
4. Adjust color temperature (CCT):
In the master mode, color temperature can be adjusted by rotating brightness level knob.
5. Indicator light:
- Master mode: when the brightness is adjusted by brightness level knob, the brightness indicator light is on,and the color temperature indicator light is off; When the color temperature is adjusted by the color temperature adjusting knob, the color temperature indicator will be on,and the brightness indicator will be off.
- Slave mode: color temperature indicator and brightness indicator are always on.
6. On-line control (Joint control between lamps and lanterns):
Prepare more than two photographing lights, set one to the master mode, set the rest to the slave mode, and set the channel of the master / slave through the add / subtract key. When the channels of the master and the slave are the same, the brightness and color temperature of the slave in the same channel can be controlled synchronously by adjusting the brightness and color temperature knobs of the master.
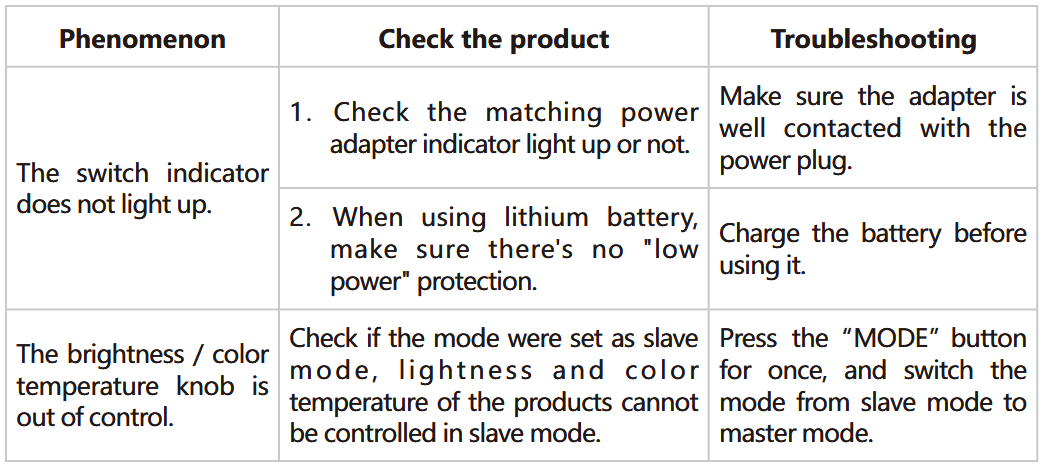
QUICK TROUBLESHOOTING
USE AND PRESERVATION
Do not place the product in a high humidity, strong electromagnetic directfield, sunlight, or high-temperature environment. If the product will not be used for a long time, please disconnect power and remove the battery.
Clean: Before cleaning, disconnect the power plug. And use a damp cloth instead of any detergent or soluble liquids to avoid damaging the surface layer.
Power: Make sure the power is within the demanded range, not too high or too low. Correctly load the battery, in order not damage to the machine.
Repairing: If there is a fault or performance degradation, do not unpack the shell by yourself, avoiding damage to the machine and losing the right of maintenance. When there is a fault, do not hesitate to contact us, and we will do our best to deal with the problem.
Accessories: Please use the accessories provided by the manufacturer and approved ones, to maximize the performance.
Warranty: Do not modify the product, or you will lose the right to maintenance.
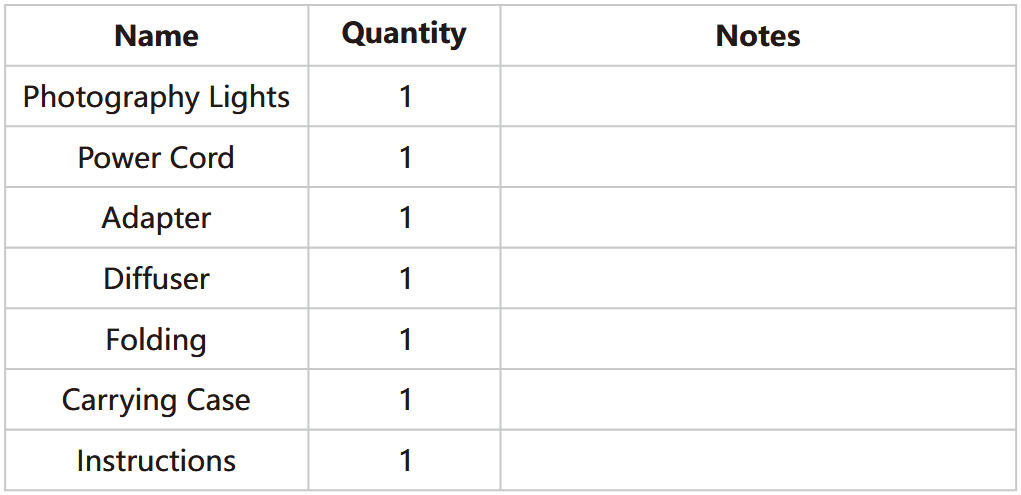
PACKING LIST
PRODUCT WARRANTY
Dear user, this warranty card is important proof for applying for warranty service. Please cooperate with the salesperson to fill it out and keep it properly. Thank you!
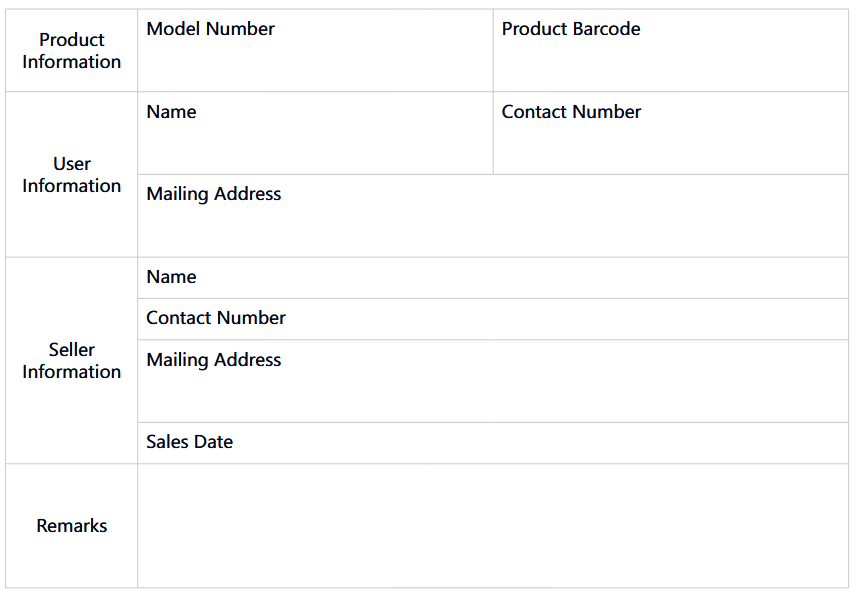
Note: this form should be confirmed by the salesperson’s stamp.
Applicable Products
This document applies to the products listed in the relevant “Product Warranty Information” (see instructions below). Other products or components that do not fall within this scope (such as promotional products, gift items, and other components added after the factory) are not covered by this warranty promise.
Warranty Period
The corresponding warranty period for products and components shall be executed according to the relevant “Product Warranty Information”. The warranty period starts from the first day of purchase of the product, and the date of registration on the warranty card at the time of purchase shall prevail.
How to Obtain Warranty Service
You can directly contact the product salesperson or authorized service agency, or call GVM’s after- sales service hotline to contact us and have our service personnel arrange service for you. When applying for warranty service, you should provide a valid warranty card as a warranty certificate to be eligible for warranty service. If you cannot provide a valid warranty card, we may also provide you with warranty service under the circumstance that our products or components are confirmed to be within the warranty scope, but this is not our obligation.
Cases where warranty does not apply:
If the product meets the following conditions, the warranty and service under this document will not apply:
- The product or parts have exceeded the corresponding warranty period.
- Malfunctions or damages caused by incorrect or improper use, maintenance, or storage, such as improper handling, use for purposes other than the reasonable expectations of the product, incorrect insertion or removal of external devices, falling or crushing due to external force, or exposure to inappropriate temperature, solvents, acids, alkalis, water immersion, or damp environments.
- Malfunctions or damages caused by unauthorized installation, repair, modification, addition, or disassembly by institutions or personnel not authorized by GVM.
- Modifications, changes, or removals of the original identification information of the product or its parts.
- Lack of valid warranty card.
- Malfunctions or damages caused by the use of unauthorized, non-standard or non-publicly released software.
- Malfunctions or damages caused by force majeure or accidents.
- Other malfunctions or damages not caused by quality issues of the product itself. In such cases, you should seek solutions from the relevant responsible parties, and GVM will not be held liable. Malfunctions or damages caused by components, accessories, or software not covered by the warranty or beyond the warranty scope that renders the product unable to function properly are not covered by the warranty. Fading, wear, and consumption that is normal during the product usage process are not covered by the warranty.
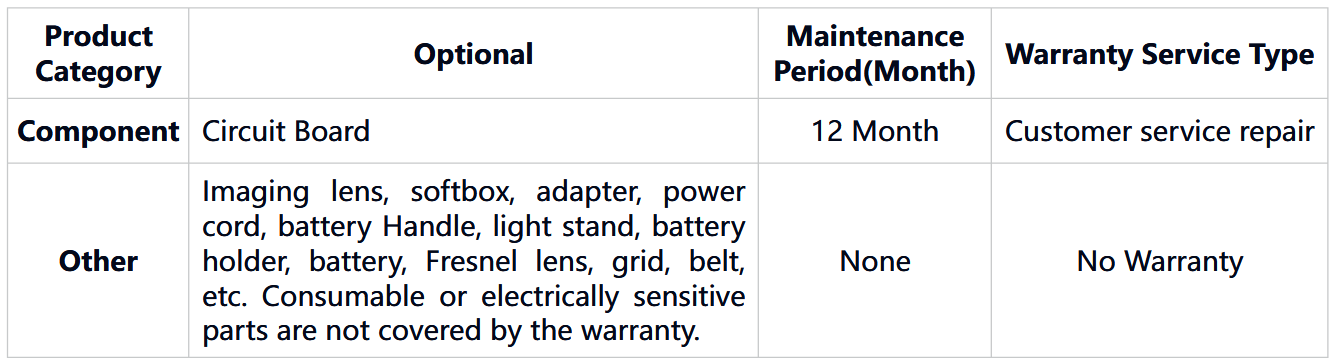
Product Warranty and Service Support Information
The product warranty period and service types are implemented according to the following “Product Warranty Information” for each product category, component, and optional equipment:


GVM Official Website: https://gvmled.com/

Facebook: https://www.facebook.com/GVMLED/
Huizhou Latu Film Equipment Co., Ltd.
Web: www.gvmled.com
B&H Email: bh@gvmled.com
GVM Email: support@gvmled.com
Amazon Email: amazonsupport@gvmled.com
Warehouse Address: 12285 MCNULTY RD, STE 105 PHILADELPHIA, Pennsylvania 19154, USA