VITEK VT-1888 Steam Vacuum Cleaner Instruction

STEAM VACUUM CLEANER VT-1888
Multi-functional vacuum cleaner with 3 cleaning modes for different surfaces: vacuum cleaner with «cyclone» technology, steam disinfection of the floor and surface treatment with a portable steam cleaner.
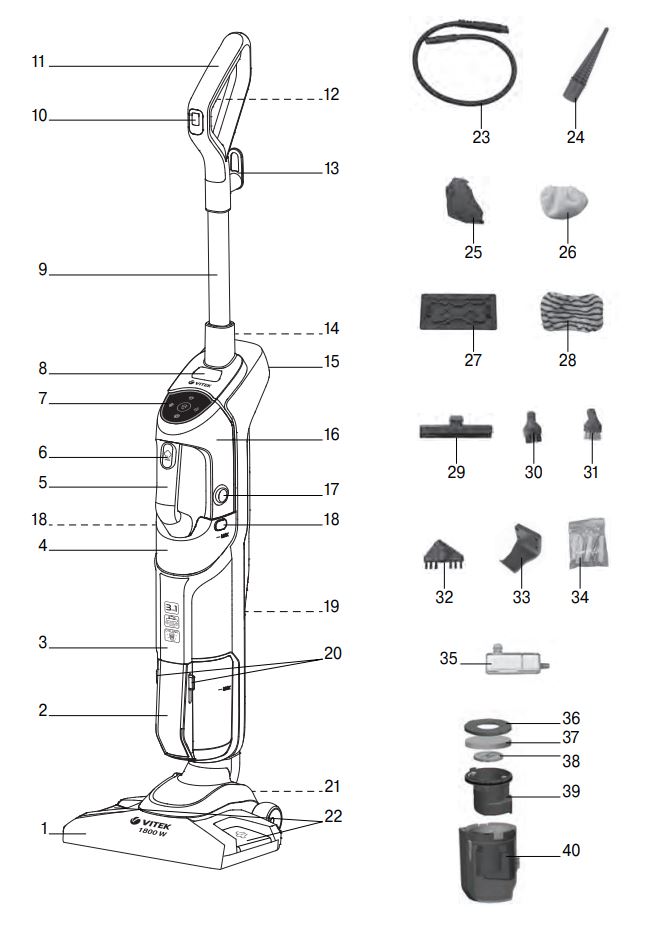
DESCRIPTION
- Universal brush
- Dust container
- Body
- Water tank
- Handle for handheld steam cleaner
- Steam delivery button
- Control panel
- Handheld steam cleaner release button
- Extension pipe
- Vacuum cleaner power switch (I/0)
- Vacuum cleaner handle
- Steam delivery button
- Upper hook for cord winding
- Handle fixing screw
- Carrying handle
- Handheld steam cleaner
- Handheld steam cleaner power switch (I/0)
- Water tank clamp buttons
- Lower hook for cord winding
- Dust container locks
- Universal brush removal button
- Mop nozzle removal pedals
- Flexible steam hose
- Hard-to-reach concentrator nozzle Steaming accessories:
- Steaming nozzle
- Fabric steaming nozzle cover Floor cleaning accessories:
- Mop nozzle
- Fabric mop nozzle cover
- Window cleaning nozzle
- Small round brush with nylon bristle
- Small round brush with brass bristle
- Grouting seams nozzle
- Storage hook
- Hook attachment kit
- Additional anti-scale filter Dust container
- filter
- Foam filter
- Cyclone filter lid
- Cyclone filter
- Dust container canister
ATTENTION!
For additional protection it is reasonable to install a residual current device (RCD) with nominal operation current not exceeding 30 mA, to install RCD, contact a specialist.
SAFETY SYMBOLS:
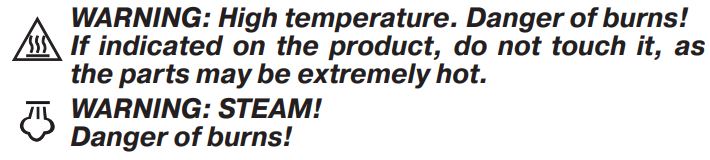 The unit reaches very high temperatures.
Improper use of the unit can result in burns.
SAFETY MEASURES AND OPERATION RECOMMENDATIONS
Before using the unit, read this instruction manual carefully and keep it for future reference.
- Use the unit for its intended purpose only, as specified in this manual. Mishandling the unit may lead to its breakage and cause harm to the user or damage to his/her property.
- Make sure that the operating voltage of the unit indicated on the label corresponds to your home mains voltage.
- The power plug has a grounding contact, connect it to the socket with reliable grounding contact.
- Unwind the power cord completely before connecting the unit to the mains and before use. Always use the product with the power cord completely unwound.
- To avoid fire, do not use adapters for connecting the unit to the mains.
- Do not touch the unit body, the operating surface, the power cord and the power plug with wet hands.
- Switch the unit off and unplug it from the mains when the water in the tank of the portable steam cleaner runs out.
- Never leave the unit connected to the main unattended.
- Steam should not be directed towards equipment containing electrical components, such as the interior parts of ovens.
- Do not use the unit near heating appliances, heat sources or open flame.
- Do not use the unit in proximity to the kitchen sink, in bathrooms, near swimming pools or other containers filled with water.
- If the unit is dropped into water, unplug it immediately, and only then you can take the unit out of water. Apply to the service center for testing or repairing the unit.
- Do not use the unit in places where aerosols are used or sprayed, in proximity to inflammable liquids and in places where such liquids are stored and where there is the danger of explosions or in the presence of toxic substances.
- Do not fill the reservoir with toxic substances, acids, solvents, detergents, corrosive substances and/or explosives or perfume additives.
- Do not vacuum and do not direct the steam jet towards toxic substances, acids, solvents, detergents or corrosive substances. Hazardous substances must be handled and disposed of in accordance with the instructions of the manufacturers of these substances.
- Do not vacuum and do not direct the steam jet towards explosive powders or liquids, hydrocarbons, open flames, or very hot objects.
- Keep all parts of your body away from the suction nozzle and from any moving or rotating parts.
- Do not use the suction function on people and / or animals.
- Use the special carrying handle. Do not pull on the power cord. Do not use the power cord as a handle. Do not lift the unit with the power cord or steam / vacuum hoses.
- Do not place the unit near heat sources such as fireplaces, stoves and ovens.
- Do not install the unit near electromagnetic fields such as induction hobs.
- Wind the power cord back onto the winding hooks when you do not intend to use the unit.
- Do not block openings and grills on the product.
- When cleaning stairs, place the unit on the steps below the user’s level.
- Do not direct the steam jet at any part of the body of people or animals.
- Do not direct the steam jet towards clothing while wearing it.
- Items and cloths that have been deeply steam treated reach very high temperatures – over 100°C. Wait a few minutes and make sure they have cooled down before handling them. Therefore, avoid contact of such items with skin if they have just been steamed.
- Place the steam cleaner vertically on an even, dry, moisture- and heat-resistant surface, do not place it horizontally and do not turn it over during the operation.
- Use only the attachments supplied.
- Before using the unit, make sure that the attachments are set and fixed properly.
- It is recommended to fill the water tank with tap water which was additionally cleaned with domestic filters. Do not use carbonated water or any perfume additives.
- Ensure that water level is not above the maximum level mark «MAX».
- Do not block the steam release openings and do not insert any foreign objects into the openings.
- During the operation the upper part of the unit body and the operating surface of the steam cleaner become very hot, do not touch the operating surface and the upper part of the unit body to avoid getting burns.
- Avoid getting burns by hot steam.
- Unplug the unit after usage or before cleaning.
- When unplugging the unit hold the power plug and remove it from the mains socket, do not pull the power cord this can lead to its damage and cause short circuit.
- For child safety reasons do not leave polyethylene bags used as packaging unattended. Attention! Do not allow children to play with polyethylene bags or packaging film. Danger of suffocation!
- The unit is not intended for usage by children.
- Do not leave children unattended to avoid them using the unit as a toy.
- Do not allow children to touch the operating surface, unit body, power cord or power plug during operation of the unit.
- Be especially careful if children or disabled persons are near the operating unit.
- During the unit operation and breaks between operation cycles, place the unit out of reach of children.
- The unit is not intended to be used by people with physical, sensory or mental disabilities (including children) or by persons lacking experience or knowledge if they are not under supervision of a person who is responsible for their safety or if they are not instructed by this person on the usage of the unit.
- From time to time check the power cord integrity.
- If the power cord is damaged, it should be replaced by the manufacturer, a maintenance service or similar qualified personnel to avoid danger.
- Do not use the unit if the power cord or the power plug is damaged, if the unit works improperly and after it was dropped.
- Do not repair the unit by yourself. Do not disassemble the unit by yourself, if any malfunction is detected or after it was dropped, unplug the unit and apply to any authorized service center at the contact addresses given in the warranty certificate and on the website www.vitek.ru.
- To avoid damages, transport the unit in the original package only. · Keep the unit in a dry cool place out of reach of children and disabled persons.
THIS UNIT IS INTENDED FOR HOUSEHOLD USE ONLY. ITS COMMERCIAL USE AND USE IN PRODUCTION AND WORKING AREAS ARE PROHIBITED.
BEFORE THE FIRST USE
After unit transportation or storage at low temperature keep it for at least three hours at room temperature.
- Unpack the unit and remove any packaging materials and advertising stickers.
- If there is a protective film on the operating surface, remove it.
- Keep the original package.
- Read the safety measures and operating recommendations.
- Check the delivery set.
- Examine the unit for damages; if the unit is damaged, do not plug it into the mains.
- Make sure that the indicated specifications of the power supply voltage of the unit correspond to the specifications of your mains. When the unit is used in the mains with an alternating current frequency of 60 Hz, it does not need any additional settings.
- To remove dust clean the unit with a slightly damp cloth, and then wipe it dry.
PROPER USE OF THE UNIT
The unit is intended for indoor household use, for sucking up dust, for removing of dry dust (dirt) from surfaces using steam in accordance with the descriptions and instructions given in this manual. Please read these instructions carefully and save them. This manual can be viewed and/or downloaded from the website www.vitek.ru. Vacuum only the household dirt. Regularly check the fill level of the dry and wet dirt trap, making sure that the maximum levels haven’t been exceeded. Do not use on chalk, cement or other debris from construction or masonry. Do not use on earth and sand / soil, etc. Do not use on ash, soot and combustion residues (fireplaces, barbecues, etc.). Do not use on printer, copier or fax (toner and ink powder).
Do not vacuum sharp or rigid objects. The manufacturer reserves the right to make aesthetic, technical and design changes without prior notice. Before leaving the production, all products are thoroughly tested. This is why your unit may contain some water in the tank. The correct use of the product is described only in this instruction manual. Any other use may damage the unit and void the warranty.
WHAT WATER TO USE
The unit has been designed to work with normal tap water between 8°C and 20°C. If your tap water contains a lot of limescale, use a commercially available mix of 50% tap water and 50% demineralized water. Replace the anti-scale filter periodically as described in section 13. Never use rainwater or water containing perfume additives (such as perfume), or water produced by other household appliances, water softeners or filters. Do not add chemical or natural detergents or descaling agents, etc. Before using bottled drinking water, find out its total mineralization (usually indicated on the label) and compare it with indicators for tap water (they can be found on the water supply organization’s website, or by the Internet search). Typically, bottled water salinity is 100-400 mg / l. It may turn out that the water from the tap has a salinity several times lower, so that the use of bottled water will increase the formation of scale. With constant use of the vacuum cleaner, it is periodically recommended to completely refresh the water in the tank and rinse the tank itself in order to avoid stagnation of water and the appearance of an extraneous smell.
ATTENTION! If the scale forms in the boiler, this case will be recognized as a non-warranty.
Steam vacuum cleaner VT-1888: 3 PRODUCTS IN 1 It is a handy vertical steam unit that combines three products in one, as it can be used as a vacuum cleaner, steam mop, and portable steam cleaner. It can perform many cleaning functions and treat a variety of surfaces: floors with various finishes (tiles, porcelain stoneware, parquet), kitchen work surfaces, hoods, bathrooms, taps, grouting, windows and mirrors, upholstery, sofas, armchairs, mattresses, cushions, car interiors), interior doors and cabinet doors, heating radiators and roller shutters, curtains and clothes, green plants. Third party tests, conducted by an independent laboratory, confirm that the steam cleaner removes 99.9% of germs and bacteria when used according to the instructions included in this manual with a microfiber cloth attached for a 30 second runtime.
1. ASSEMBLING THE UNIT AS A VACUUM CLEANER / STEAM MOP
1.1. Remove the unit from the packaging making sure the product is not damaged and that all parts are included in the package.
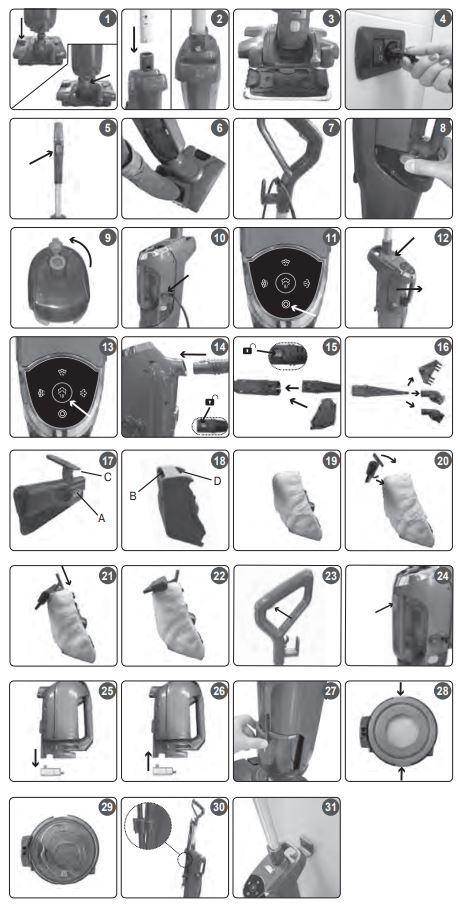
1.2. Connect the unit body (3) to the universal brush (1) (fig. 1). To remove the universal brush, place your foot on the brush, press the button (21) and pull the device straight up by the carrying handle (15). NOTE: before assembling the device, please note that the screw (14), when packing the device, can be screwed into the extension tube (9).
1.3. Unscrew the screw (14) on the extension tube (9) with a slotted screwdriver. Place the extension tube into the seat on the unit body and tighten the screw (fig. 2).
WARNING: check from time to time to see if the screw is tightened. 1.4. Place the fabric cover (28) on the mop nozzle (27) and connect it to the bottom of the universal brush (1) so that the clamps on the mop nozzle fit into the corresponding grooves of the universal brush (fig. 3) (for steam cleaning only). NOTE: to remove the mop nozzle (27) from the universal brush (1), press one of its two side pedals (22) and pull the device vertically upwards by the handle (15).
2. USING THE UNIT AS A VACUUM CLEANER
Verify that section 1 requirements are met
2.1. Unwind the power cord completely and connect it to an electrical outlet that has a reliable earthing connection (fig. 4). Always use the product with the power cord completely unwound.
2.2. Move the button of the power switch (10) located on the handle of the vacuum cleaner (11) to position (I) (fig. 5). Move the universal brush (1) to the working position from the parking position, for this place your foot on the brush and tilt the vacuum cleaner by the carrying handle (15) (fig. 6). Vacuum cleaner is ready for operation. To keep the power cord out of the way during cleaning, pass it through the upper hook (13) (fig. 7).
3. PREPARATION FOR USE OF THE UNIT AS A MOP AND A HANDHELD STEAM CLEANER
3.1. Remove the water tank (4), to do this press the side buttons of the clamps (18) and pull it towards you (fig. 8). Turn the water tank over and open the rubber stopper by pulling the tab upwards (fig. 9). Fill the water tank with clean water.
Do not add other substances or additives to the water tank. 3.2. Close the plug of the water tank tightly and reinstall it. Always carry out this operation with the power cord unplugged.
WARNING: make sure the water tank (4) is installed correctly to avoid leakage.
3.3. Place the fabric cover (28) on the mop nozzle (1) and connect it to the bottom of the universal brush (fig. 3).
3.4. Unwind the power cord completely and connect it to an electrical outlet that has a reliable earthing connection (fig. 4). Always use the product with the power cord completely unwound.
3.5. Press the button of the power switch (17) of the steam cleaner located on the side of the unit (fig. 10). The power indicator on the control panel (7) will blink ( ) green. Wait 30 seconds until the indicator on the control panel glows continuously (fig. 11). The unit is then ready for use.
HANDHELD STEAM CLEANER (16)
3.6. For separate use of the handheld steam cleaner (16), detach it from the unit body (3) by pressing the upper button (8) and pulling it outwards by the handle (5) (fig. 12).
4. ADJUSTING THE STEAM OUTPUT INTENSITY
The unit has 3 levels of steam output intensity. By successively pressing the button ( ) of the steam regulator (fig. 13) located on the control panel (7) set the intensity of the steam output depending on the intended use. The indicator of the selected intensity level will glow constantly. Here are some guidelines for choosing the level of steam output intensity:
- Maximum level ( ): for removing scale, stains, grease;
- Medium level ( ): for washing windows and floors.
- Minimum level ( ): for cleaning parquet and laminate, delicate fabrics, upholstery, sofas, mattresses, etc.
5. CONNECTING THE ACCESSORIES
Accessories can be connected directly to the handheld steam cleaner (16) or to the flexible hose (23) for more freedom of movement.
5.1. Flexible hose (23)
Connect the flexible hose (23) to the portable steam cleaner (16) until you hear the clamp click (fig. 14). To remove the flexible hose, press on the release button located at the base of the flexible hose and pull it out (fig. 14).
5.2. Concentrator nozzle (24)
The concentrator nozzle (24) can be connected directly to the handheld steam cleaner (16) or to the flexible hose (23). To remove the nozzle, press the release button located on the base of the nozzle and pull it out. Connect the flexible hose (23) to the handheld steam cleaner (16) until you hear the clamp click (fig. 15). The brushes (30, 31) and the grouting nozzle (32) can be attached to the concentrator nozzle (24). Insert them at the end of the concentrator nozzle (24) all the way in (fig. 16). Pull them out to remove.
5.3. Steaming accessories (25, 26)
Connect the steaming nozzle (25) directly to the handheld steam cleaner (16) by pressing lightly until it snaps into place. For greater freedom of movement, the nozzle can be connected using the flexible hose (23) (fig. 15). To clean sofas, cushions, armchairs and mattresses, slide the fabric cover (26) over the nozzle (25) (fig. 19). 5.4. Window cleaning nozzle (29) Attach the window cleaning nozzle (29) to the steaming nozzle (25) by inserting hook A (fig. 17) under slot B (fig. 18, 20), then turn the nozzle (fig. 21) so that hook C (fig. 17) fits into slot D (fig. 18, 22).
Before attaching the window cleaning nozzle to the steaming nozzle, put the fabric cover over the nozzle.
Do not install the nozzle without the cover!
6. CLEANING OF THE FLOORS
Before using the unit on delicate or glossy surfaces, make sure that the surface of contact area is free from foreign bodies that could cause scratches. The steam vacuum cleaner is a combined product, it can be used as a vacuum cleaner or a steam vertical cleaner, for washing and disinfecting floors, or in combination with a suction action to save cleaning time.
SUCTION ONLY
Ensure that the requirements of section 1 are met and proceed as described in section 2.
STEAM ONLY
Ensure that the requirements of section 1-3 are met. 6.1. Adjust the intensity of the steam output depending on the type of the floor (fig. 13); · for hard floors (tiles, porcelain stoneware, etc.), a medium steam level is recommended; · for delicate floors (parquet, laminate, ceramic tiles, etc.) a low steam level is recommended. 6.2. Move the universal brush (1) to the working position from the parking position, for this place your foot on the brush and tilt the unit by the carrying handle (15) (fig. 6). Vacuum cleaner is ready for operation. Then press the steam button (12) (fig. 23) located on the handle (11) and start cleaning by moving the brush back and forth. To stop dispensing steam, release the button (12). 6.3. The brush (1) has a flexible connection making it easy to clean corners and edges of furniture and walls.
COMBINED MODE: STEAM / SUCTION
The combined use of steam and suction allows you to remove dust and disinfect the floor at the same time. Proceed as described in sections 1-2-3. To keep the power cord out of the way during cleaning, pass it through the upper hook (13) (fig. 7). During cleaning operations, the use of the fabric cover (28) allows the floors to be washed and disinfected so that the steam softened dirt is collected by the cloth. Wait a few minutes to allow the fabric to cool before removing the mop nozzle (27) with the fabric cover (28) from the universal brush (1). Then place your foot on one of the two side pedals (22) of the mop nozzle (27) and pull the unit straight up using the handle (15).
WARNING: for steam cleaning, do not use the mop nozzle without the fabric cover.
WARNING: for added safety, before using test for exposure to steam on a hidden part, wait to be sure that there is no discoloration or deformation.
7. CLEANING OF WINDOWS, MIRRORS AND TILE WALLS
WARNING: to clean windows in cold weather, preheat the glass, starting steaming at a distance of about 50 cm from the surface. Use only the handheld steam cleaner (16). Verify that section 3 requirements are met.
7.1. Connect the flexible hose (23) to the handheld steam
cleaner (16), then attach the steam nozzle (25), and to it, the window cleaning nozzle (29) (follow the requirements of paragraphs 5.3-5.4).
7.2. Adjust the steam output intensity as described in section 4 (fig. 13). A medium steam output is recommended for this type of surface.
7.3. To clean windows and mirrors, press the steam button (6) on the portable steam cleaner to thoroughly steam the surface and dissolve the dirt (fig. 24). Then treat across the surface again, holding the nozzle downward to remove dirt and moisture.
7.4. To clean the tiles, use the steaming nozzle (25) with the fabric cover (26) attached to the flexible hose (23). Work the steam evenly over the tile surface while pressing the steam button (6) on the handheld steam cleaner (fig. 24) to remove the dirt.
8. CLEANING UPHOLSTERED FURNITURE, ARMCHAIRS, CUSHIONS
(mattresses, sofas, car interiors, etc.) WARNING: before steam cleaning leather or fabrics, read the manufacturer’s instructions and always first conduct a test on a hidden area or sample of material. Wait for some time to make sure that there are no color changes or deformations. Use only the handheld steam cleaner (16). Verify that section 3 requirements are met. Switch the unit on according to the instructions given in paragraph 2.4 and connect the accessories as described in section 3.
8.1. Adjust the steam output intensity as described in section 4 (fig. 13). A minimum steam level is recommended for this type of surface.
8.2. Connect the steaming accessories (25, 26) to the flexible hose (23) of the handheld steam cleaner (16) as described in section 5.3. Treat the surface creating steam using the steam button (6) (fig. 24) to remove dirt.
9. CLEANING OF SANITARY WARE, GROUTING SEAMS AND KITCHEN WORKTOPS, BBQ
Use only the handheld steam cleaner. Verify that section 3 requirements are met. 9.1. Connect the concentrator nozzle (24) to the handheld steam cleaner (16) as described in Section 5.2 (the concentrator nozzle can be connected to the flexible hose for treatment of hard-to-reach places). 9.2. Connect the most suitable accessory as required:
- the concentrator nozzle (24), for treatment of hard-to-reach places and obtaining a more concentrated jet of steam.
- the small round brush with nylon bristle (30), to remove dry dirt and scale.
- the small round brush with brass bristles (31), to remove stubborn dried grease and dirt (barbecue, car or motorcycle wheels, etc.).
- the nozzle (32), for cleaning grout joints between tiles and removing dirt from very narrow surfaces.
WARNING: when using the brushes (30), (31) and the nozzle (32), do not use excessive force to avoid breaking the tip of the concentrator nozzle (24).
Attention! The tip of the concentrator nozzle heats up during use. Wait at least 5 minutes for the tip to cool down before attaching / detaching additional accessories. 9.3. Adjust the steam output intensity (fig. 13). A maximum steam level is recommended for this type of surface. 9.4. Press the steam button (6) on the handheld steam cleaner (fig. 24), then steam the surfaces.
10. CLEANING OF FURNITURE AND DELICATE SURFACES
WARNING: before steam cleaning of fabrics, read the manufacturer’s instructions and always first conduct a test on a hidden area or sample of material.
Use only the handheld steam cleaner (16). Verify that section 3 requirements are met. 10.1. Connect the concentrator nozzle (24) to the handheld steam cleaner (16) as described in section 5.2 (fig. 14).
10.2. Adjust the steam output intensity (fig. 13). A minimum steam level is recommended for this type of surface. 10.3. Press the steam button (6) on the handheld steam cleaner (fig. 24) and direct the jet towards the cloth.
WARNING: do not aim the steam jet directly at the surface. 10.4. Use a pre-steamed cloth to clean the surface, avoiding prolonged use in the same place.
11. OTHER GENERAL USES
Warning: before cleaning the surface, always do the test on a hidden area and see how it reacts.
11.1. Cleaning of curtains and drapes
Mites and dust can be removed from curtains and drapes by steaming the fabric directly from the handheld steam cleaner. The steam can remove unpleasant odors and freshen the colors, which allows to wash the fabric less often. A minimum steam level is recommended for this type of surface.
11.2. Removing stains from carpets and upholstery
WARNING: STEAM! Danger of burns!
Direct the steam directly onto the stain at the maximum possible angle (never perpendicular to the surface to be cleaned) and place cloth behind the stain to collect any dirt that has been “blown away” by the steam pressure. A minimum steam level is recommended for this type of surface.
11.3. Plant care and room humidification
To care for your indoor plants, use steam to remove dust from the leaves. Use the handheld steam cleaner with the flexible hose to easily direct the jet (to attach it, see section 3). Steam the surface at a distance of 50 cm, adjust the steam to the minimum level. Plants will breathe better and will be cleaner and brighter. Steam can also be used to freshen the air in the rooms, especially those frequented by smokers: steam the room by directing the jet towards the ceiling, evenly distributing it.
11.4. Surface disinfection
To disinfect, hold the steam jet of the concentrator nozzle (24) no more than 1.5 cm from the surface and steam it for at least 5 seconds. This treatment is the most effective in killing germs and bacteria.
PRACTICAL TIPS
Vacuum cleaner usage tips When cleaning the floor, move the vacuum cleaner in an even back and forth motion, pushing it away from you and pulling it back. When vacuum cleaner was not in use for a long time, be sure to drain all the water from the water tank. When cleaning the floor, do not hold the vacuum cleaner in one position for a long time, in order to avoid surface damage. Also, do not park the vacuum cleaner upright with a wet cloth on the floors, they can get soaked and deteriorate.
Steam mop usage tips
Before cleaning the floor, it is recommended to sweep or vacuum it to remove dust and dirt particles. When washing the floor, move the unit in an even back and forth motion, pushing it away from you and pulling it back. Move back to avoid stepping on the already washed floor. The microfiber cloth collects water when washing the floor. However, depending on the characteristics of the floor surface and the set steam intensity, some moisture may remain on the floor. In this case, it is recommended to let the floor dry naturally. Drying can be accelerated by using a fan directed to the desired area. To make the floor less damp after washing, select the minimum steam supply with the “Steam” button. Remove the mop nozzle from the universal brush after cleaning. Then the floor under the unit will not get soaked from a damp cloth.
The handheld steam cleaner usage tips Surface cleaning
The material to be cleaned must withstand moisture and high temperature. Make sure of this before starting the cleaning. Some types of floors (like tile) have grooves or cemented surfaces. For a more thorough cleaning, we recommend using the round nylon brush. Use the concentrator nozzle to clean the gaps (slots) between the tiles. It is not recommended to use pile brushes for these purposes, because they can remove grout. Bring the concentrator nozzle at an angle of 30-60° up to the slot, turn the steam supply on and slowly move it forward along the slot. After cleaning, remove any dirt from the surrounding surface with a cloth. In the same way, clean the gaps between the floor tiles, as well as any other crevices and narrow spaces. The closer the steam nozzle is to the dirty area, the better the cleaning effect, since the highest steam temperature is obtained at the outlet of the steam nozzle. Therefore, when cleaning, try to position the steam nozzle of the nozzles as close as possible to the surface to be cleaned. When cleaning with steam, wipe the steam-treated surface with a cloth or sponge to remove loose dirt. It is recommended to wipe the surface while it is still wet. Be careful when wiping metal surfaces as they can be hot after steam treatment. To remove stubborn dirt, the force of the steam jet alone may not be enough; use the bristle brush or brass brush to enhance the mechanical effect. When using the brushes, do not use excessive force to avoid breaking off the tip of the concentrator nozzle. Heavy scale can be sprinkled with vinegar before steam cleaning. Let the vinegar work for about 5 minutes, and then steam the surface. When cleaning clothes or upholstered furniture, put a rag on the steaming nozzle, then the dirt will be absorbed into the rag, and not into clothes or upholstery. You can use the steaming nozzle to remove old wallpaper from the walls.
The steam will swell the wallpaper glue and make the wallpaper easier to remove.
Cleaning of windows and mirrors
When using the window cleaning nozzle, first thoroughly clean the entire window or mirror with steam, then turn the steam off. Then press the rubber scraper of the nozzle against the top of the window or mirror and gradually lower the nozzle downward. Move from one side of the surface to the other to clean the entire window or mirror. Place a rag or tissue underneath the window frame or mirror stand to collect the scraped water. Dealing with negative temperatures outside (in winter), before cleaning the window glass, warm it up so that it does not crack from a sharp temperature drop. After warming it up, you can easily steam the entire surface.
Steaming of clothes
To steam your clothes, hang them on a stainless steel hanger. Connect the steaming nozzle to the handheld steam cleaner. Take the steam cleaner in one hand, with the other hand, hold the bottom of the garment, creating a slight tension. Bring the nozzle to the surface of the fabric, lightly pressing the working part to it, and start steaming in a reciprocating motion (from top to bottom). We recommend starting with the areas with the most wrinkles, as well as with items of clothing that are denser (collar and sleeve cuffs).
12. WATER LEVEL
The water level is always visible thanks to the transparent water tank (4). When the water is used up, steam will no longer be generated. To resume operation, refill the water tank with water as described in section 3.
WARNING: this operation should always be performed after disconnecting the unit from the mains.
13. REPLACING OF THE DESCALING FILTER
The unit has a filter containing special resins that can stop the lime scale and extend the life of your product. It is recommended to change the filter once a year.
13.1. Disconnect the unit from the mains.
13.2. Remove the water tank (4) from the handheld steam cleaner (16) by pressing the side release buttons (18) and pulling it out (fig. 8).
13.3. Remove the old filter (fig. 25) by pulling it down.
13.4. Insert a new filter (35), press gently and make sure it is perfectly seated (fig. 26), then fit the water tank.
NOTE: The filter may darken, become brown or rusty during use, this is normal and not a malfunction.
14. CLEANING OF THE DUST CONTAINER AND FILTERS
14.1. Turn the unit off completely, to do this, move the power switch (10) located on the handle of the vacuum cleaner (11) to position (0) and press the power switch (I /0) of the steam cleaner (fig. 10), then remove the power cord plug from an electrical outlet.
14.2. Remove the dust container (2) from the unit body (4) by pressing the two lock buttons of the dust container (20) (fig. 27).
14.3. Remove the HEPA filter (36) with the inserted foam filter (37) from the dust container, by the side guides (fig. 28), remove the cyclone filter (39) (fig. 29) by pulling it upwards using the folding metal handle.
14.4. Remove the cyclone filter cover (38) by turning it counter clockwise, then clean the cyclone filter (39) from dust.
14.5. Clean the dust container canister (40) from dirt.
14.6. Assemble the dust container and reinstall it in its original place, performing the above steps in reverse order (see paragraphs 14.2-14.4). It is recommended to clean the dust container (2) after each use.
WARNING: do not use the unit without the installed dust container complete with filters.
15. GENERAL MAINTENANCE
Make sure the unit is turned off and unplugged. Use only a cloth and tap water to clean the outside of the unit. All steam cleaning accessories can be cleaned with running water and allowed to dry completely before next use. After using the brushes, allow the bristles to cool in their natural position to avoid deformation. Do not use detergents and abrasives. The fabric nozzle covers can be washed by following the instructions on the label. The filters and canisters of the dust container can be cleaned under running water to ensure they are completely dry before next use. Rinse the canisters of the cyclone filter and the dust container with running water and shake to remove excess dirt or water. Allow the filters to get completely dry naturally before installing them into the unit, away from heat sources for at least 24 hours. The HEPA filter should be completely cleaned approximately every four months.
16. STORAGE LOCATION
16.1. Switch the unit off and unplug it.
16.2. Empty the remaining water from the water tank to avoid leaks.
16.3. Before removing fabric covers from the nozzles wait a few minutes for them to cool down.
16.4. Wind the power cord around the special winding hooks (13, 19) (fig. 30). Complete the requirements of section 14. Be sure to completely unwind the power cord before using the unit again. The upper power cord winding hook (13) rotates at 180° to quickly unwind the cord.
WARNING: do not keep the unit connected to the mains with the power cord wound.
16.5. The unit storage hook (33) can be wall-mounted using 4 holes and the included hook attachment kit (34). The unit is fixed to the storage hook (33) by the carrying handle (15) (fig. 31).
17. DIAGNOSTICS OF FAULTS

PRODUCT INCLUDES
Steam vacuum cleaner with a set
of filters installed – 1 pc.
Universal brush – 1 pc.
Flexible steam hose – 1 pc.
Furniture brush – 1 pc.
Fabric nozzle cover – 1 pc.
Mop nozzle – 1 pc.
Fabric mop nozzle cover – 1 pc.
Window cleaning nozzle – 1 pc.
Concentrator nozzle (for hard-to-reach places) – 1 pc.
Small round brush with nylon bristles – 1 pc.
Small round brush with brass bristle – 1 pc.
Grouting seams nozzle – 1 pc.
Additional descaling filter – 1 pc.
Storage hook – 1 pc.
Hook attachment kit – 1 pc.
TECHNICAL SPECIFICATIONS
Power supply: 220-240 V ~ 50-60 Hz
Rated input power: 1800 W
Steam mop power: 1200 W
Vacuum cleaner power: 600 W
Suction power: 12 kPa
Warm-up time: 25-30 seconds
Steam output intensity: from 15 to 25 g/min depending
on the selected level
Steam time: 14-22 min depending on the selected level
Dust container capacity: 0.4 L
Water tank capacity: 0.5 L
Cleaning area: up to 30 m2 without adding water
Power cord length: 5 m
RECYCLING
![]() For environment protection do not throw out the unit and the batteries (if included), do not discard the unit and the batteries with usual household waste after the service life expiration; apply to specialized centres for further recycling. The waste generated during the disposal of the unit is subject to mandatory collection and consequent disposal in the prescribed manner. For further information about recycling of this product apply to a local municipal administration, a disposal service or to the shop where you purchased this product.
For environment protection do not throw out the unit and the batteries (if included), do not discard the unit and the batteries with usual household waste after the service life expiration; apply to specialized centres for further recycling. The waste generated during the disposal of the unit is subject to mandatory collection and consequent disposal in the prescribed manner. For further information about recycling of this product apply to a local municipal administration, a disposal service or to the shop where you purchased this product.
The manufacturer preserves the right to change design, structure and specifications not affecting general principles of the unit operation without a preliminary notification due to which insignificant differences between the manual and product may be observed. If the user reveals such differences, please report them via e-mail info@vitek.ru for receipt of an updated manual.
Unit operating life is 3 years
Guarantee
Details regarding guarantee conditions can be obtained from the dealer from whom the appliance was purchased. The bill of sale or receipt must be produced when making any claim under the terms of this guarantee.
![]() This product conforms to the EMC Directive 2014/30/EU and to the Low Voltage Directive 2014/35/EU.
This product conforms to the EMC Directive 2014/30/EU and to the Low Voltage Directive 2014/35/EU.
A production date of the item is indicated in the serial number on the technical data plate. A serial number is an eleven-unit number, with the first four figures indicating the production date. For example, serial number 0606ххххххх means that the item was manufactured in June (the sixth month) 2006.