User Guide of OSRAM LINEARlight
Flex Diffuse LED Strip
Please note:
All information in this guide has been prepared with great care. OSRAM, however, does not accept liability for possible errors, changes and/or omissions. Please check www.osram.com or contact your sales partner for an updated copy of this guide. This technical application guide is for information purposes only and aims to support you in tackling the challenges and taking full advantage of all opportunities the technology has to offer. Please note that this guide is based on own measurements, tests, specific parameters and assumptions. Individual applications may not be covered and need different handling. Responsibility and testing obligations remain with the luminaire manufacturer/OEM/application planner.
Product overview
1.1 General features
- Highly uniform flexible light
- Continuous light without shadows
- Excellent mechanical stability
- Extremely good optical stability over time, no yellowing effect
- Fine white binning (3 SDCM)
- Dimmable (PWM)
- Lifetime of up to 60000 hours (L90B10) at 25 °C
- Flammability: glow wire test at 650 °C – EN 60598-1
- Mixed gas corrosion test – IEC 60068-2-60
- IP67 or IP66 protection with high-performance silicone
— Encapsulated electronics
— UV-resistant
— Salt-mist-proof - Easy installation
— Adhesive tape for easy mounting
— Connectors and aluminum profiles available - Scalable system
— Cuttable every 5 cm
— 24 V system with matching OPTOTRONIC LED driver and light management system - Top-emitting and side-emitting versions:
TOP (T) and SIDE (S)
1.2 Application areas
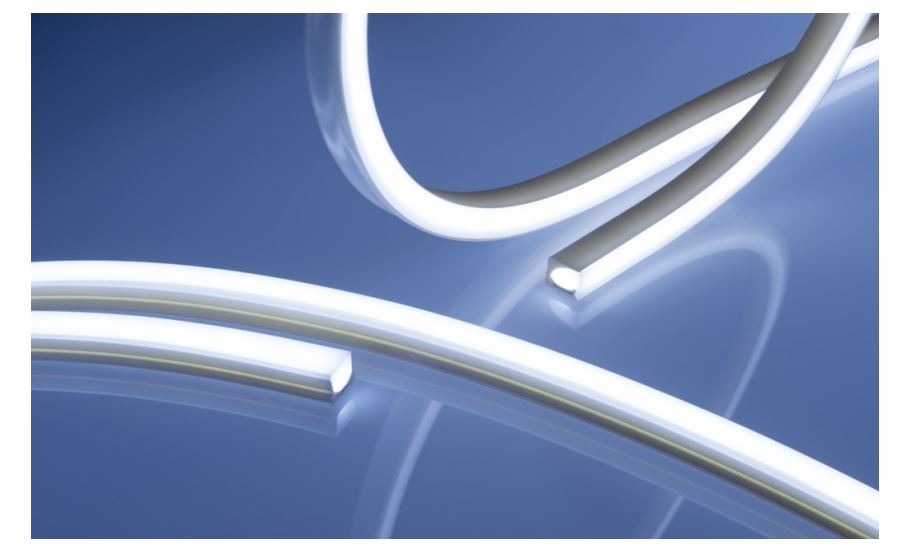
LINEARlight Flex Diffuse (LFD) are suitable for various applications that require a nice-looking, uniform light line with no dots, e.g. indoor and outdoor decoration. Together with polished architectural materials, LFD can also be effectively used for cove or high-class furniture lighting, where the indirect light is reflected by the surfaces.
Applications at a glance:
- General and cove lighting
- Marine lighting, wall integration
- Path illumination, illuminated signs
- Spa lighting
- Outdoor facade decoration
1.3 LINEARlight Flex Diffuse White TOP
Available versions: 400, 800, 1 300 lm/m
Luminous efficacy: up to 82 lm/W
Available CCT: 2 400K, 2 700K, 3 000K,
3 500K, 4 000 K, 6 500K
Available CRI : 80, 90
Available lengths: LFD400T = 10 m,
LFD800T = 6 m, LFD1300T = 4 m
1.4 LINEARlight Flex Diffuse White SIDE
Available versions: 400, 600, 1 000 lm/m
Luminous efficacy: up to 82 lm/W
Available CCT: 2 400K, 2 700K, 3 000K,
3 500K, 4 000K, 6 500K
Available CRI: 80, 90
Available lengths: LFD400T = 10 m,
LFD600S = 6 m, LFD1000S = 4 m
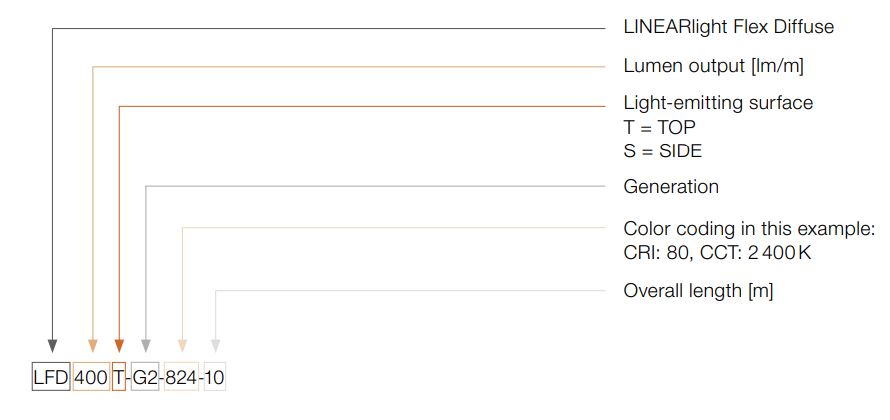
1.5 Nomenclature
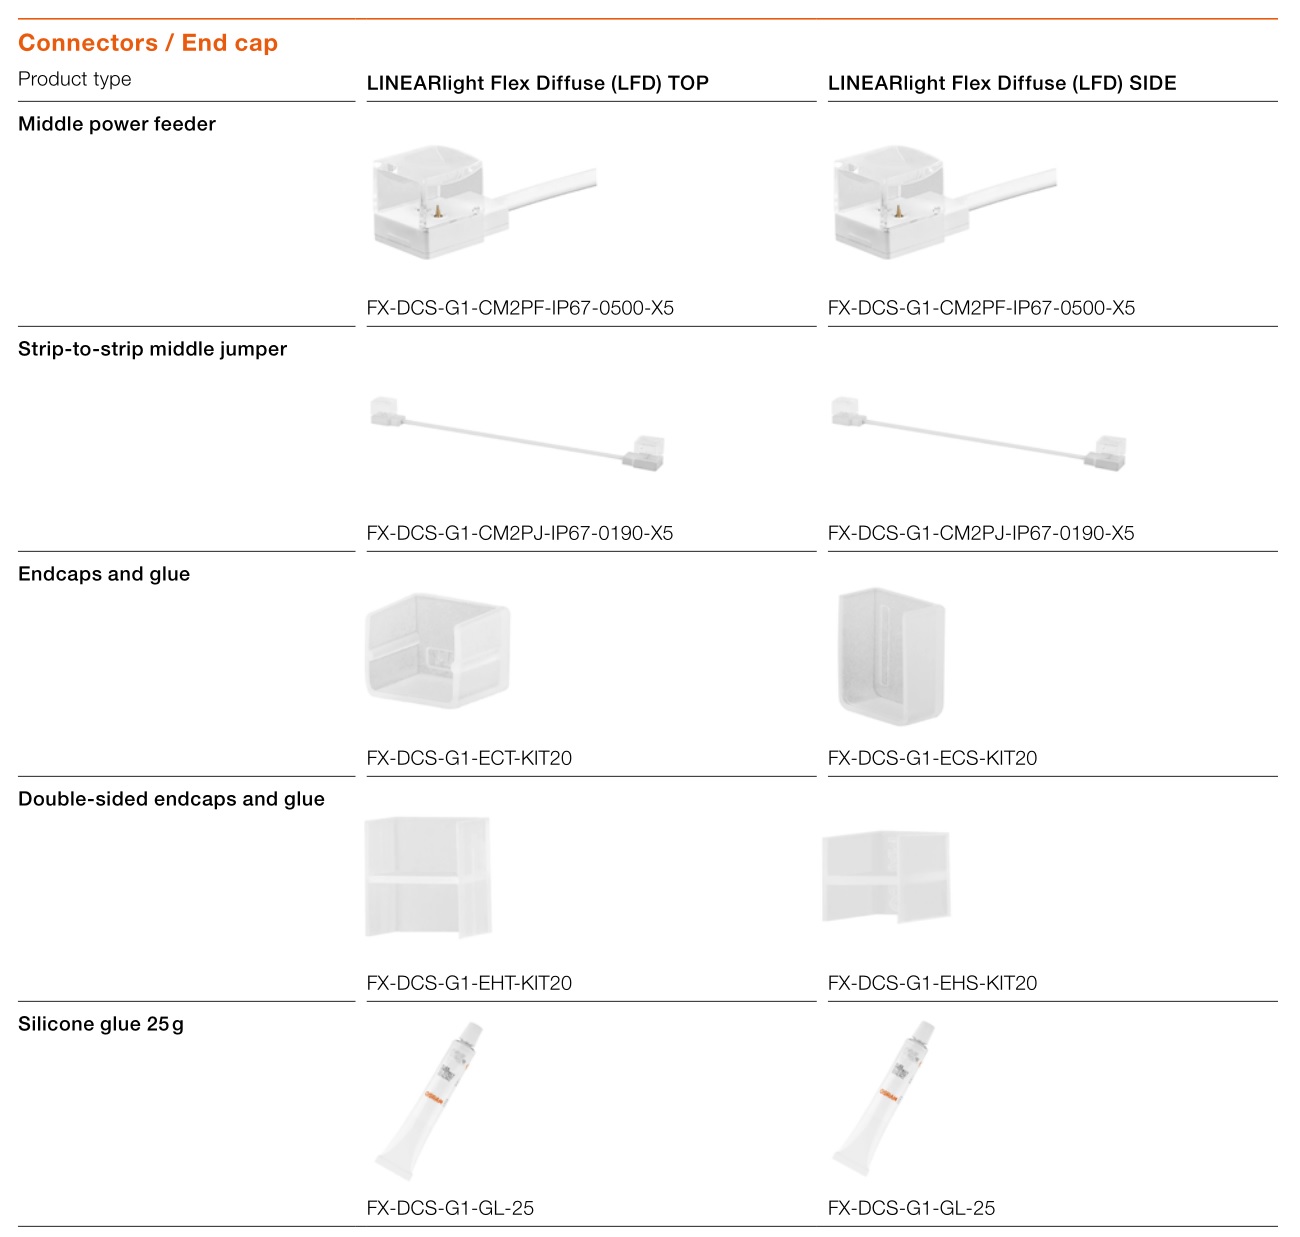
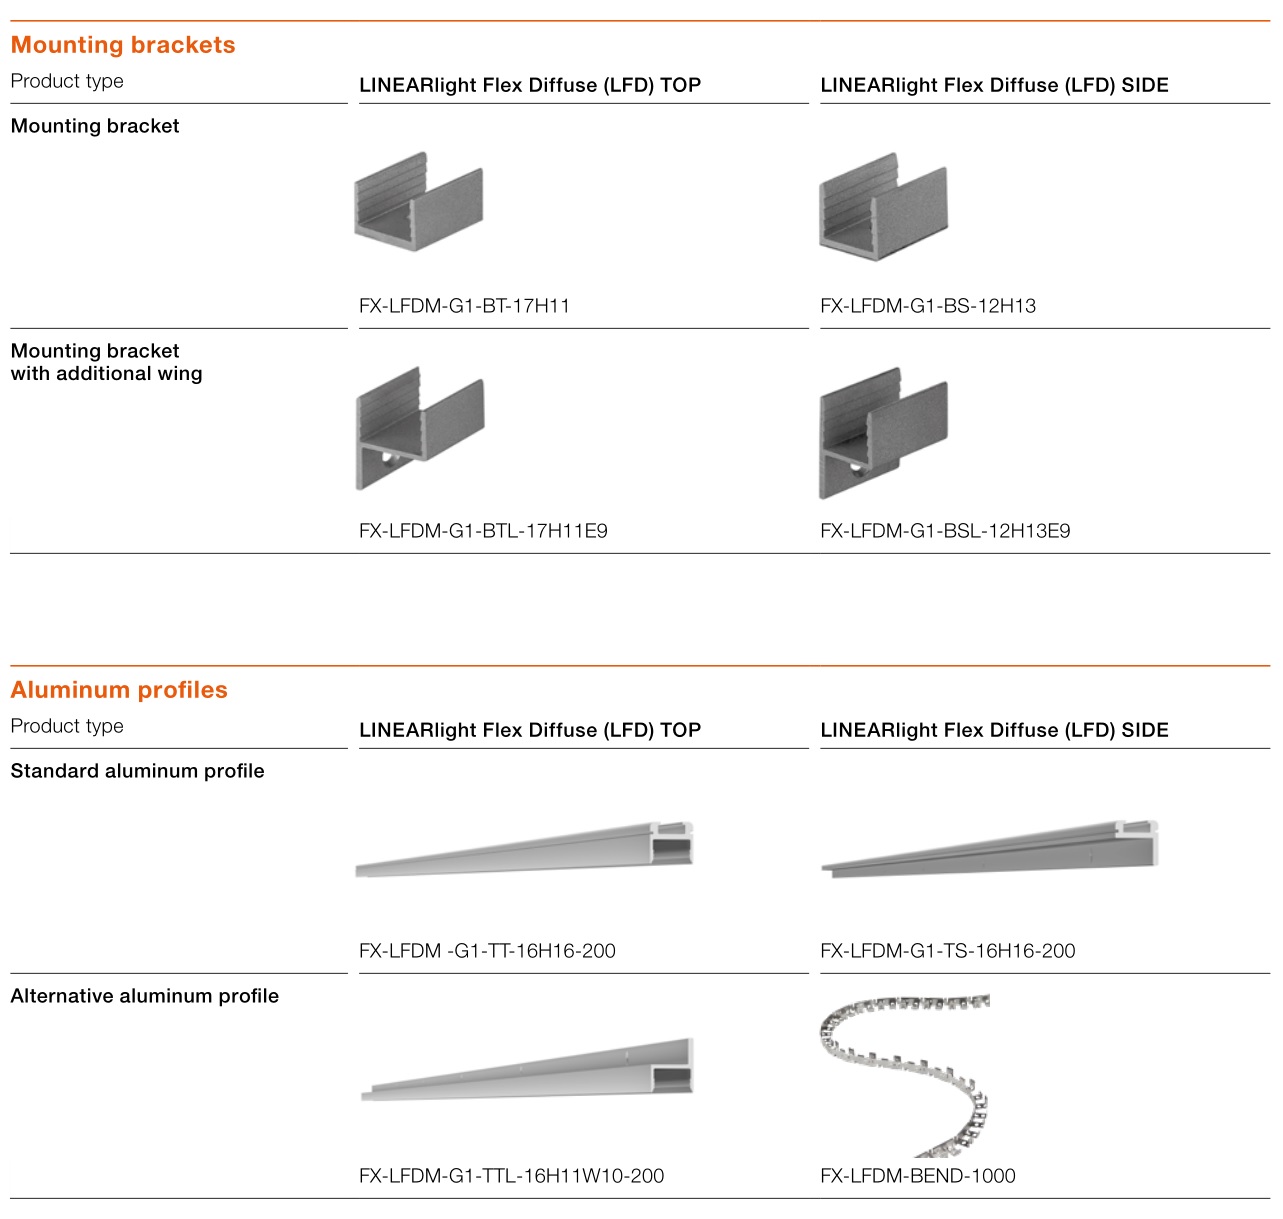
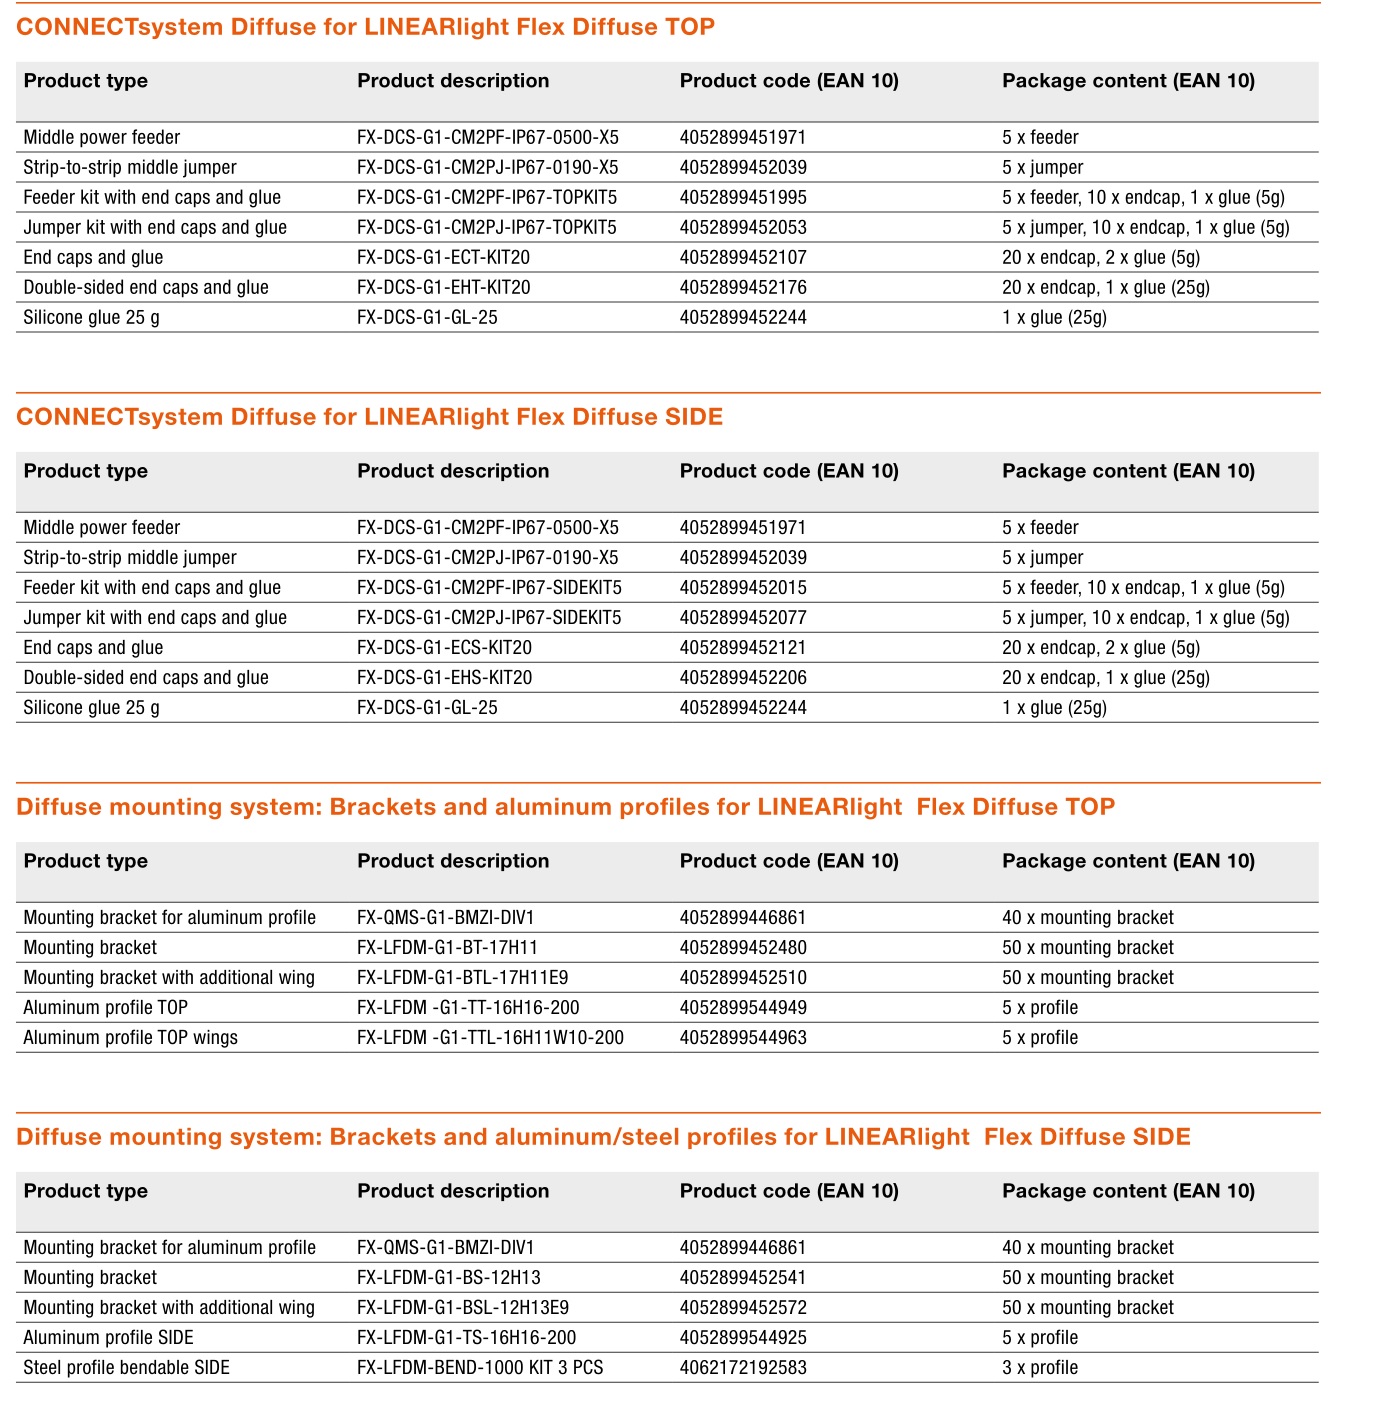
1.6 Accessories
Installation
2.1 Precautionary measures
Before installing LINEARlight Flex Diffuse, attention should always be paid to the following important issues:
ESD
Be aware that the products can be damaged by electrostatic discharge (ESD). Earthing is a very effective measure to avoid damaging effects due to electrostatic discharge. Therefore, use a personal earthing system (ESD field kit) during mounting to prevent the build-up of static charge.
![]()
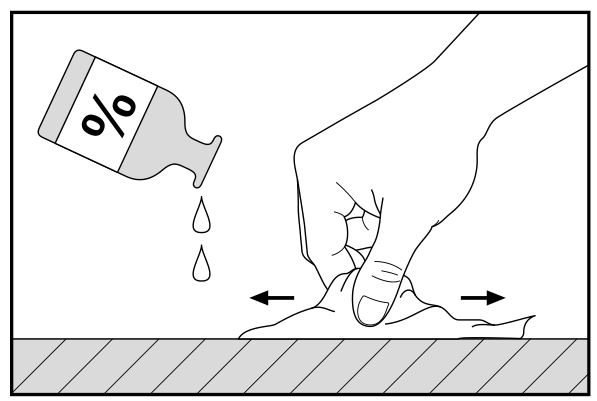
Cleaning
Depending on the surface, use a multi-purpose cleaner, such as isopropyl alcohol, to provide a clean and dry mounting surface, which is free of oils, silicone coatings and dirt particles.
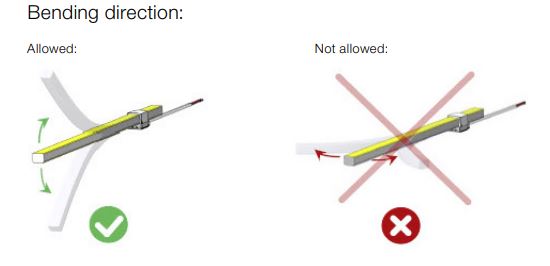
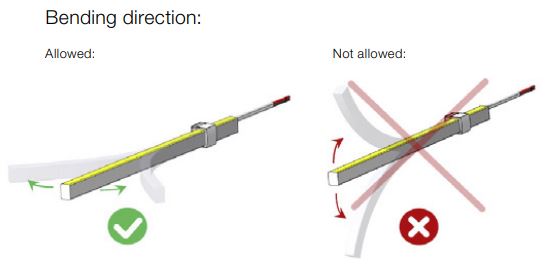
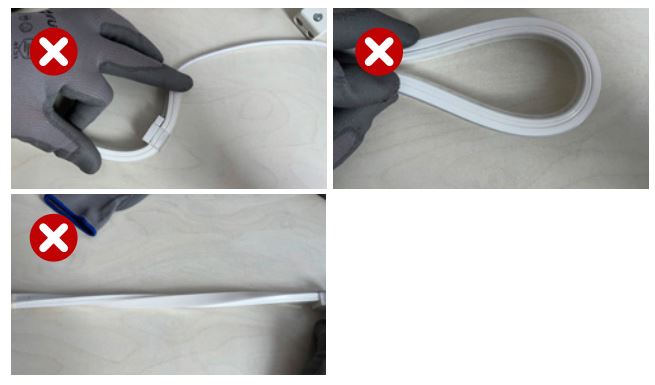
Mechanical forces
Avoid mechanical forces on the connector (feeder) and the LEDs. A strain relief is recommended. In addition, mechanical stress must not be applied to the LED module itself (e.g. no twisting or bending in excess of the allowed radius as shown in the next images from 1 to 3).
IP rating
The IP rating specifies the degree of protection against the intrusion of solid objects (including body parts such as hands and fingers), dust and water in electrical enclosures. While the first digit of the IP rating indicates the protection against foreign bodies, the second digit indicates the protection against water. For more details on IP rating, please refer to “Technical application guide – IP codes in accordance with IEC 60529 and external environment impacts” in the following OSRAM DS website section:
https://www.osram.com/ds/app-guides/index.jsp
The following IP rating applies to LINEARlight Flex Diffuse:
IP66: [6] Full protection against contact and penetration of dust
[6] Protection against ingress of water in case of powerful water jets
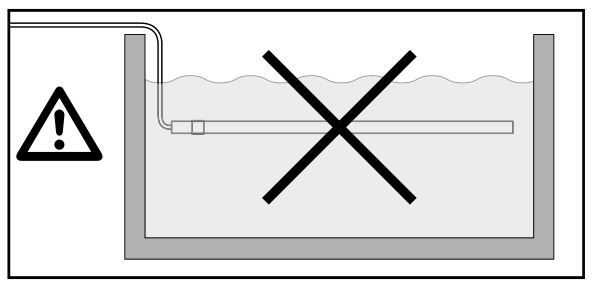
IP67: [6] Full protection against contact and penetration of dust
[7] Protection against ingress of water in case of temporary flooding
Note: Permanent submersion is not allowed.
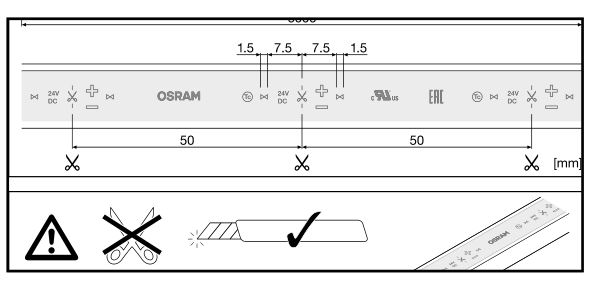
Cutting
Ensure that the LED strips are cut properly at an angle of 90° before attaching the connector!
2.2 Connection with CONNECTsystem Diffuse
2.2.1 Basics
LINEARlight Flex Diffuse LED modules (TOP and SIDE) are compatible with the connectors dedicated for this product family. There are two components that can be used to power these LED modules:
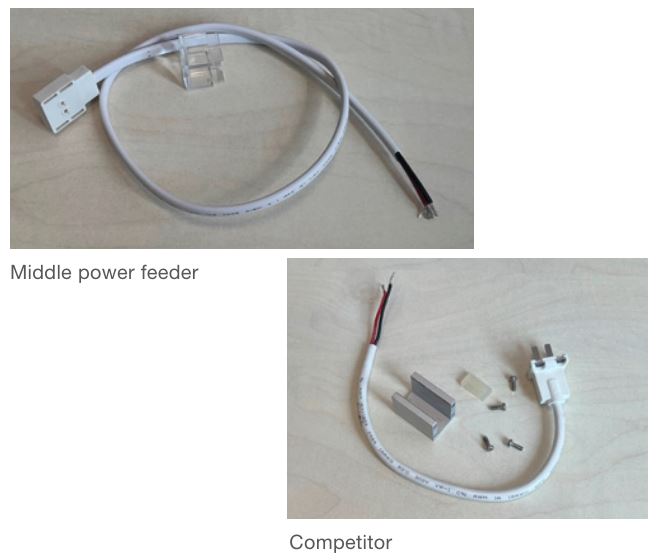
Middle power feeder
This is the connector that connects the Flex Diffuse product to an LED driver. All LINEARlight Flex Diffuse LED modules are sold with already one of these connectors installed on the product. It consists of two parts:
- The transparent cage
- The white connector
Both parts are available either with the product FX-DCS-G1-CM2PF-IP67-0500 or with the KIT FX-DCS-G1-CM2PF-IP67.
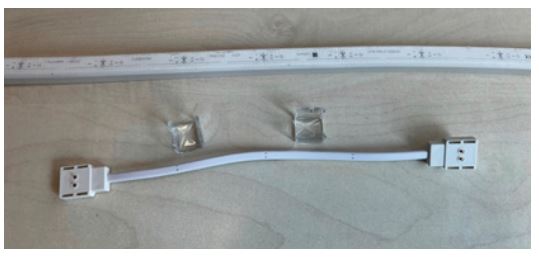
Strip-to-strip middle jumper
This is a connector that connects two Flex Diffuse products when only one of these is powered by a 24 VDC LED driver. It consists of three parts:
- Two transparent cages
- One white jumper with two heads
They are available either in the product FX-DCS-G1-CM2PJIP67-0190 and in the KIT FX-DCS-G1-CM2PJ-IP67
LINEARlight Flex Diffuse LED modules are also available with pre-mounted wires. This option is described in the chapter “2.5 Custom versions”
Specially developed for LINEARlight Flex Diffuse LED modules, these power feeders offer great advantages for your installations because:
- The installation will be easy thanks to the low number (only 2) of components (connector + cage)
- The LED modules can be cut as needed (min. segment length that can be used with this connector is 10cm)
- Highly reliable connection
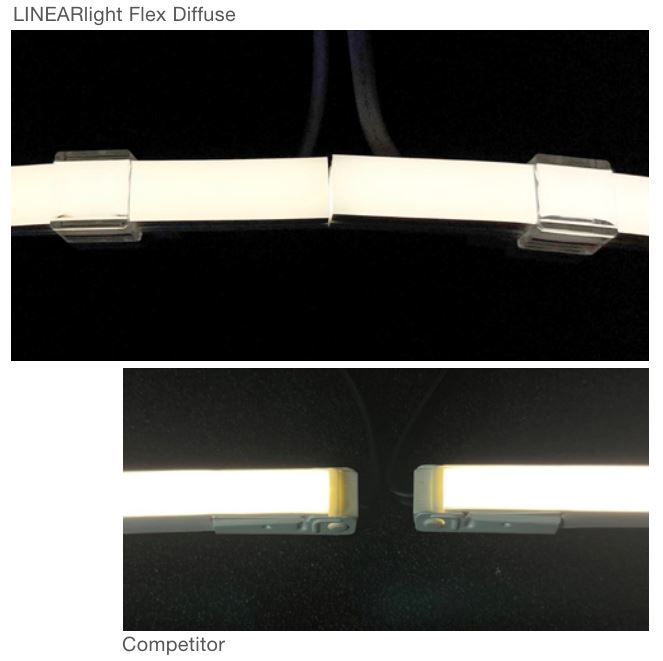
- Thanks to the transparent cage and to the special design that allows the electrical connection at the bottom of the LED module, this connector can be installed along the entire length of the LINEARlight Flex Diffuse LED module. The bottom side of each module is marked with a “scissors” symbol every 5 cm. This indicates the point where the LED module can be cut and where the connector can be installed.

- For longer installations where several LED modules have to be installed in series, the absence of a connector on the end allows to have a continuous and homogenous line of light without shadowing in between.
2.2.2 Mechanical dimensions
To have a clear indication about the space that each type of connector needs in the installation, please have a look at the images below.

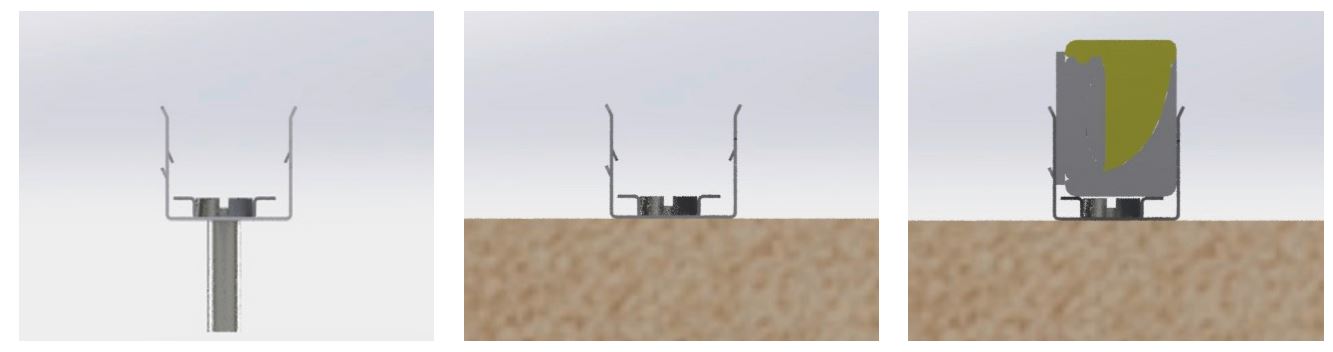
2.3 Assembly
2.3.1 Assembly with middle power feeder
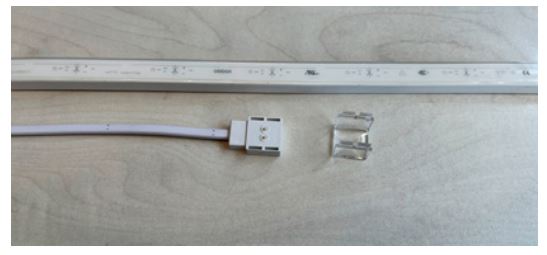
1. Components for assembly:
- LINEARlight Flex Diffuse TOP or SIDE (LFD600S)
- Connector: Middle power feeder (transparent closing cage + white connector)
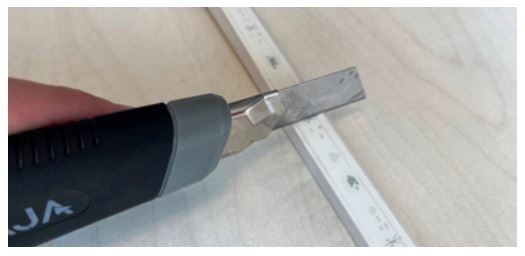
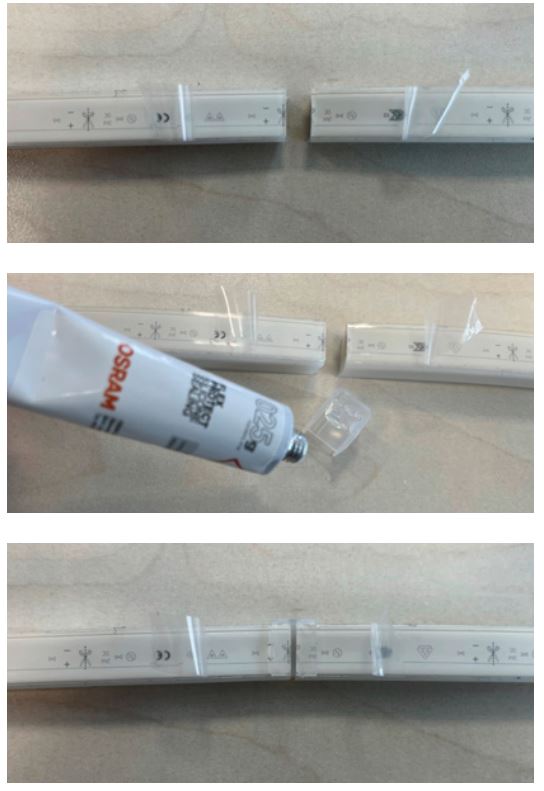
2. Use a box cutter to cut the LFD module at one of the “scissors” symbols on the bottom side.
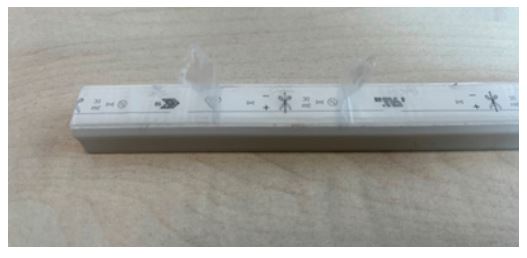
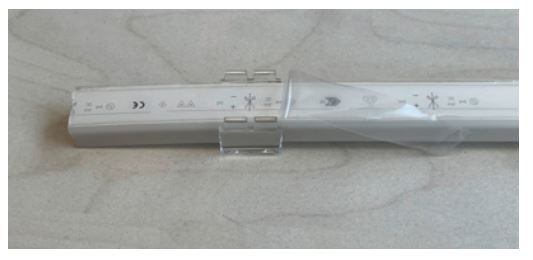
3. The connector can be installed over any “scissors” symbol along the whole module. Once you have decided on the right point, slightly incise the transparent liner over the “scissors” symbol and remove 2cm of the liner material in both directions.
4. Insert the transparent cage as shown in the picture. It has to be centered with the “scissors” symbol.
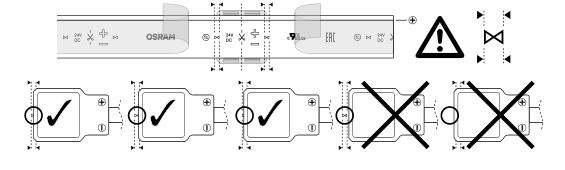
5. Take the white connector and check that its polarity is aligned with the polarity indicated on the bottom side of LED module.
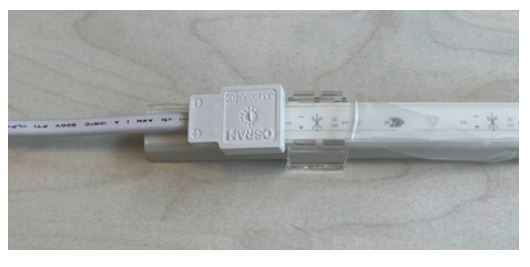
6. Hold the white connector above the transparent cage and gently press it down until you feel both sides close with a click.
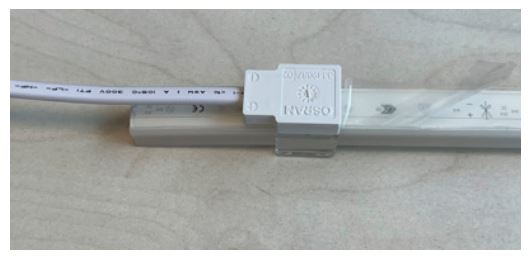
7. Ensure that the “hourglass” mark is still visible but not completely visible.
8. To install the end cap, remove the protection tape from the end of the LED module. Insert the silicone glue into the end cap and then insert the LED module. Wait 20 minutes for the glue to dry before proceding with the installation. In case of a double-sided end cap, the process is the same for both parts of the LED strip.
9. Connect the LED module to the LED driver. Observe the correct polarity (red+/black-). Perform a final operating test
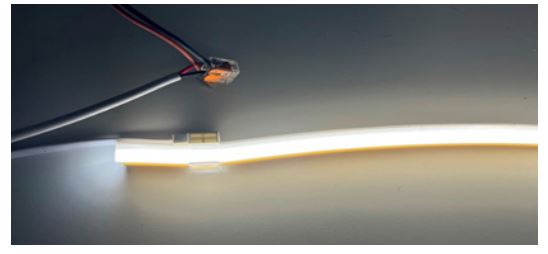
Please note: When connecting two LINEARlight Flex Diffuse LED strips with the connector, ensure that the same polarities are always properly connected to each other.
2.3.2 Assembly with strip-to-strip middle jumper
- Components for assembly:
— LINEARlight Flex Diffuse TOP or SIDE (LFD600S)
— Strip-to-strip middle jumper (transparent closing cages + white bridge connector) - Cut the LED module as described in paragraph 2.3.1.
- For each connector head of the jumper, follow the same mounting steps as described in paragraph 2.3.1, starting from point 3.
Please note: When connecting multiple LINEARlight Flex Diffuse LED strips in series, always consider the allowed power per single LED driver.
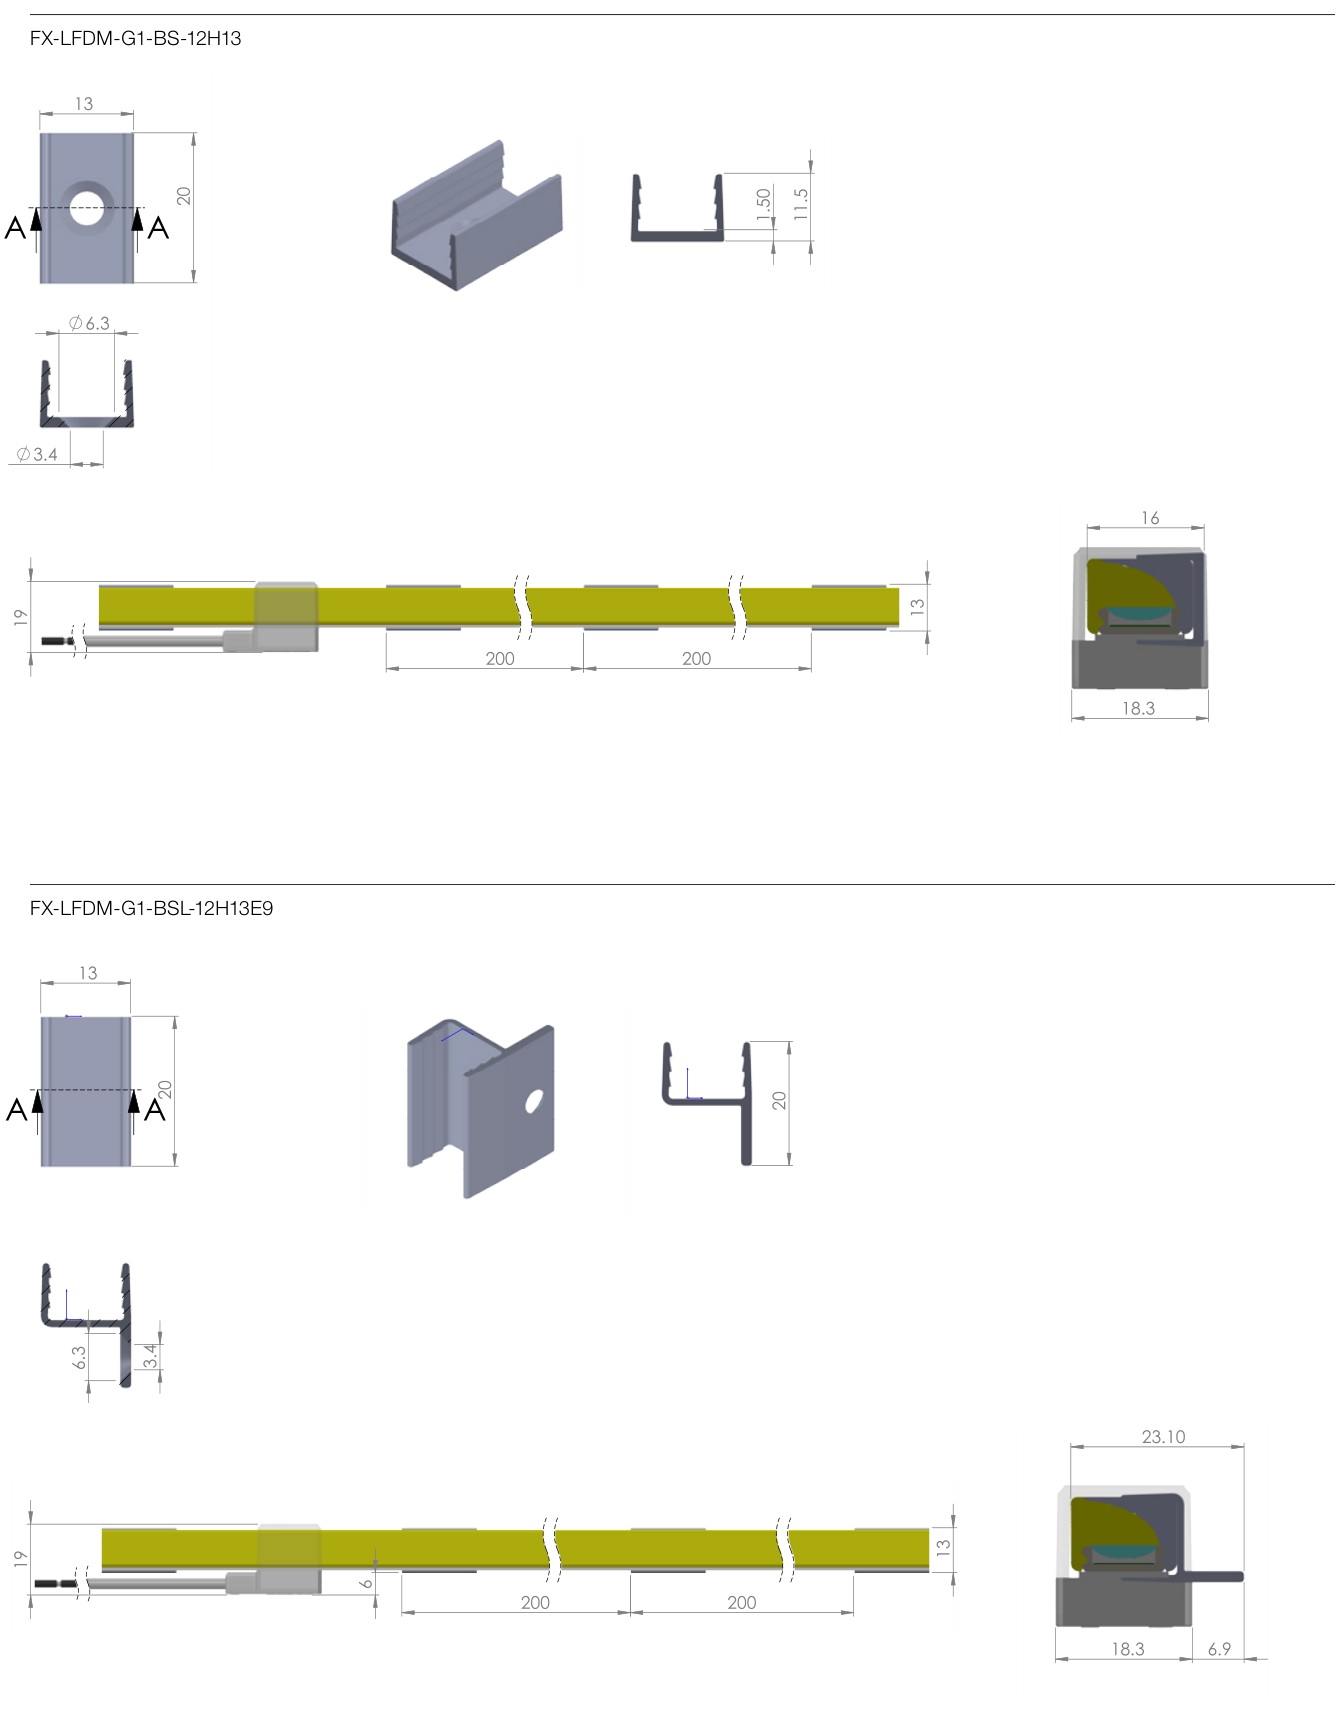
2.4 Installation with LINEARlight Flex Diffuse mounting system
The images below show the mechanical details of installations of LINEARlight Flex Diffuse LED modules with the dedicated accessories developed for this product family.
LINEARlight Flex Diffuse TOP
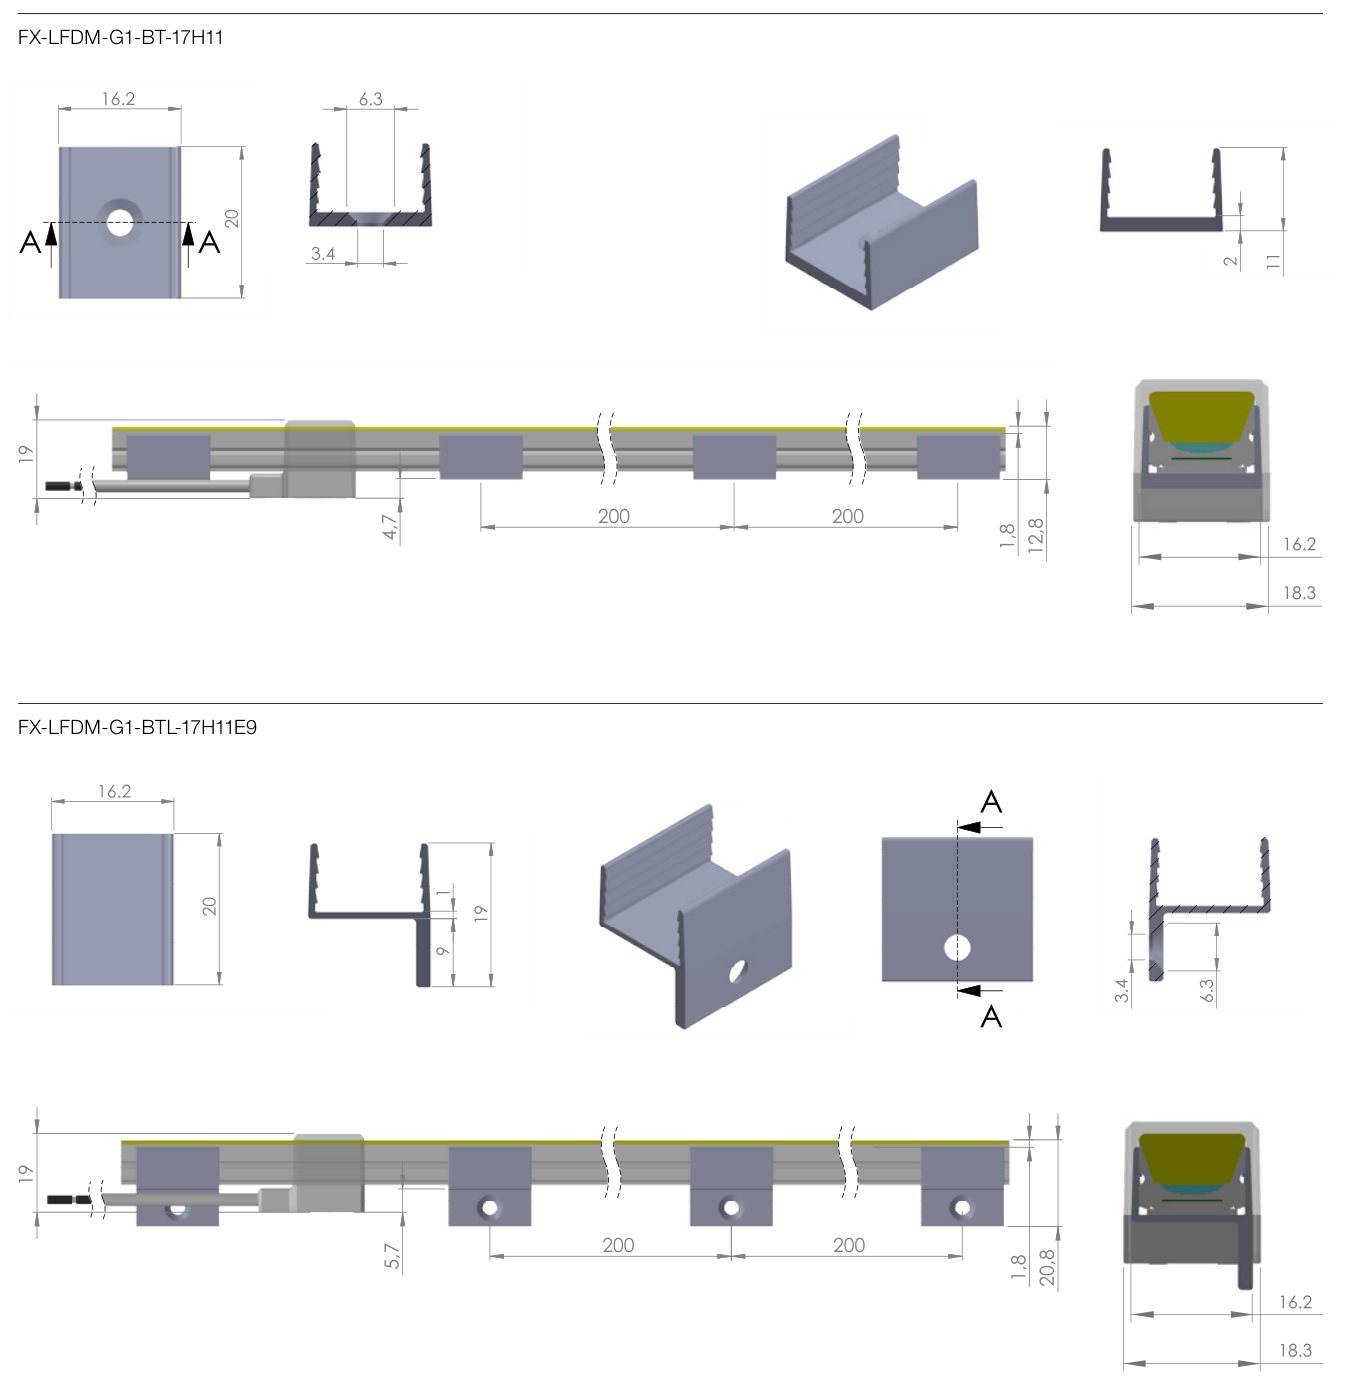
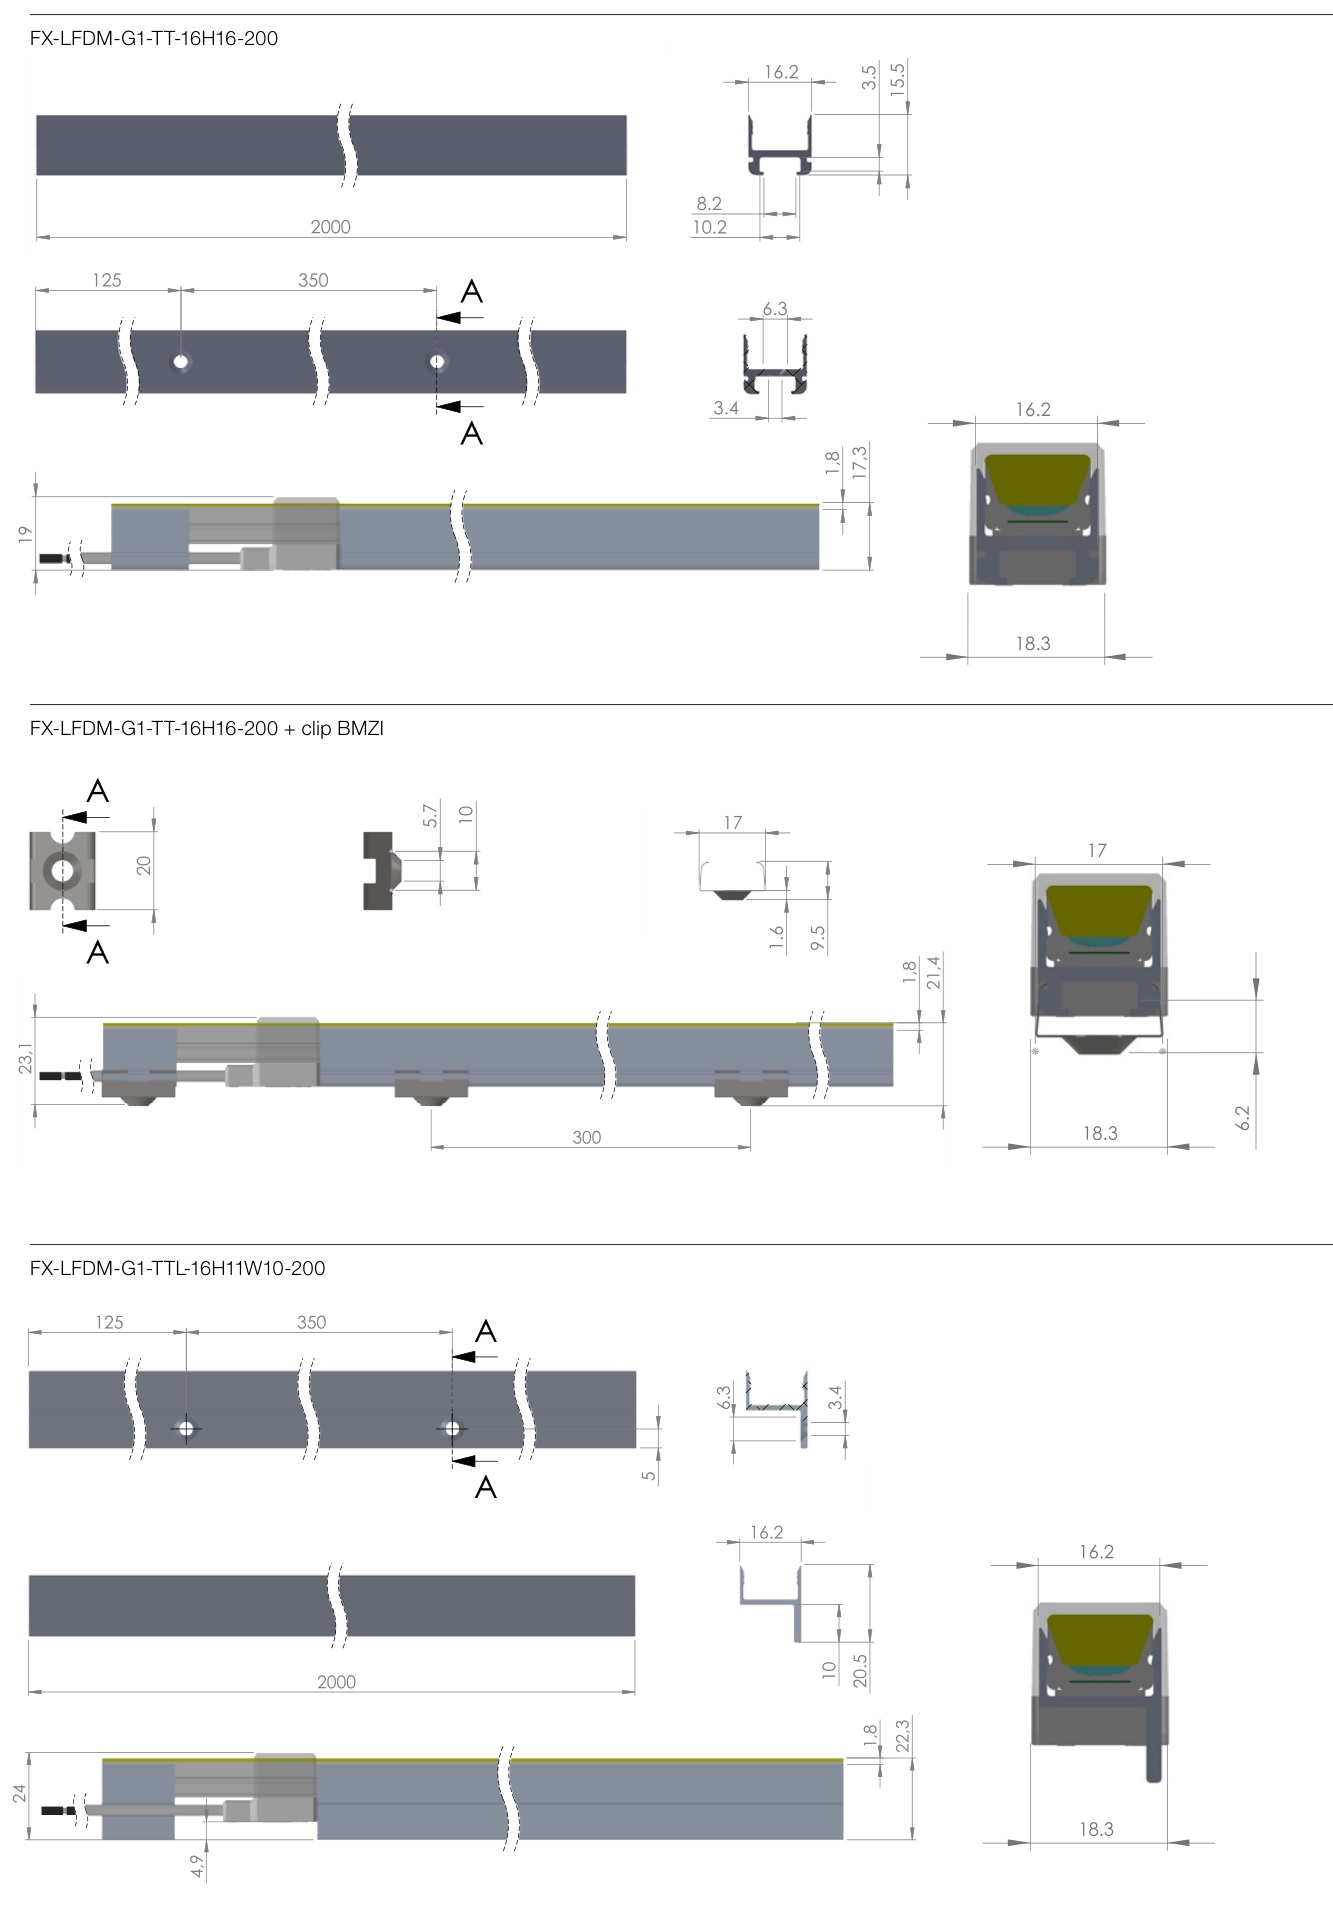
LINEARlight Flex Diffuse SIDE
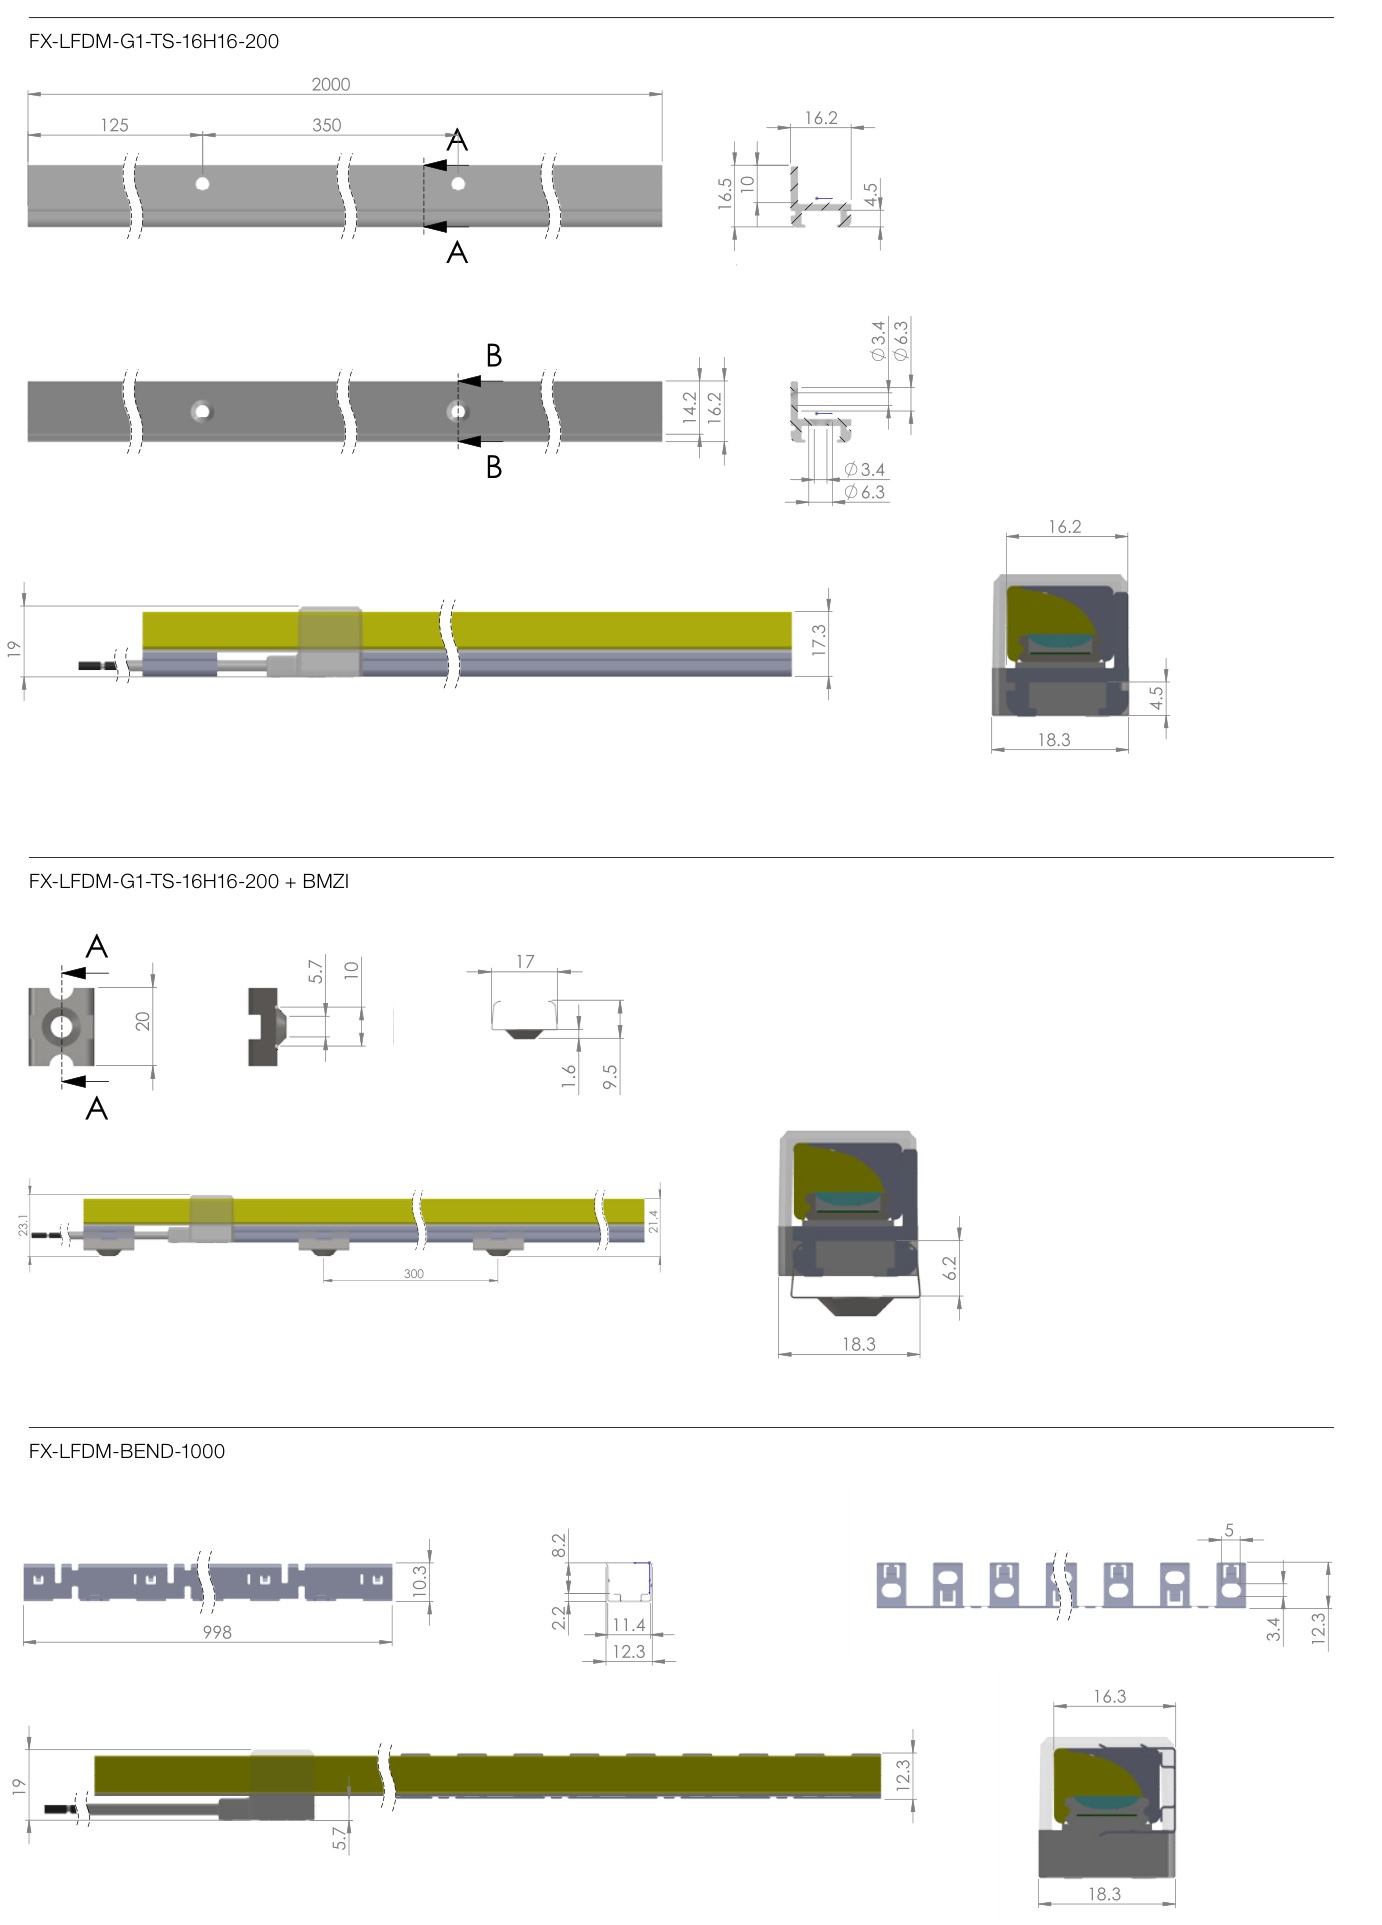
Notes for FX-LFDM-BEND-1000 installation
- To install this bendable profile correctly, it is recommended to use at least 10 screws per meter.
- The installation of this bendable profile must not be done with countersunk screws. The thickness of the screw head has to be less than 1.8mm.
- Do not remove the liner from the adhesive tape on the bottom of LINEARlight Flex Diffuse SIDE.
- During the design of the installation, please consider that the light output of LINEARlight Flex Diffuse SIDE can only have an orthogonal direction to the installation surface.
2.5 Custom versions
2.5.1 General description
The LINEARlight Diffuse product family is also available with some customizations that can be defined by using the Speaking Code Generator available via the following link:
https://www.osram.com/ds/flexible-lighting-systems/tools-and-support/ds_speakingcodegenerator_diffuse.jsp
Using a reference code as a basis, the following is a description of each field that makes up the Speaking Code:

2.5.2 Technical details
If a system connection based on soldered cables is defined in the Speaking Code, the section of LINEARlight Flex Diffuse close to the connection area is different from that defined in the previous paragraph. More details are shown in the images below.
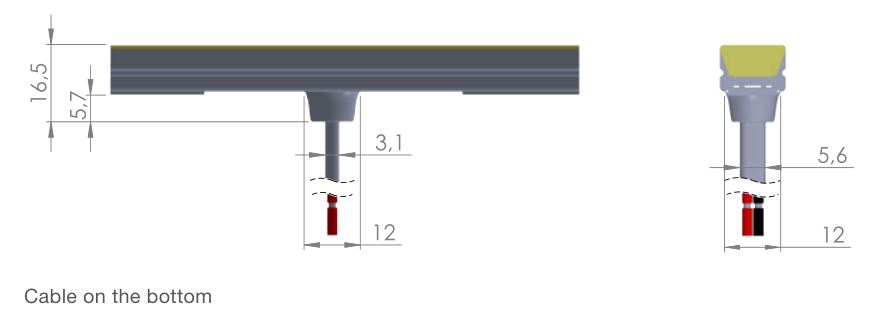
The drawing above shows the cable applied on a LINEARlight Flex Diffuse TOP. The same concept with the same dimensions is also available for LINEARlight Flex Diffuse SIDE.

The drawing above shows the cable applied on a LINEARlight Flex Diffuse TOP. The same concept with the same dimensions is also available for LINEARlight Flex Diffuse SIDE.
System connection
3.1 Basic steps of system planning
- Select the suitable LINEARlight Flex Diffuse LED module with regard to your application and its requirements (level of light output, bending direction, etc.).
- Determine the required level of control for the application (dimming, control interface, etc.).
- Determine the number of LINEARlight Flex Diffuse LED modules and total wattage to be installed.
- Consider all possible limitations of the setup: Cable lengths (for this, please have a look at the application guide for OPTOTRONIC constant-voltage LED drivers and at the technical documentation available for each OT CV device), thermal load, mechanical forces, ambient conditions and all other factors that may occur in a certain application.
3.2 Standard connection
The electrical connection between the secondary side of the OPTOTRONIC LED driver and the LINEARlight Flex Diffuse LED module must be IP-rated. Therefore, a clamp with an appropriate IP rating has to be applied.
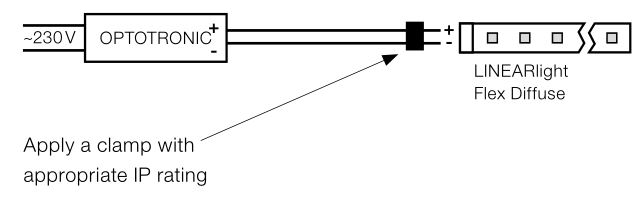
Note:
For further information, please see the datasheets of the OPTOTRONIC LED drivers.
3.3 Parallel and series connection
If multiple LINEARlight Flex Diffuse LED modules are connected to one LED driver, they must be connected in parallel as shown in the image below.
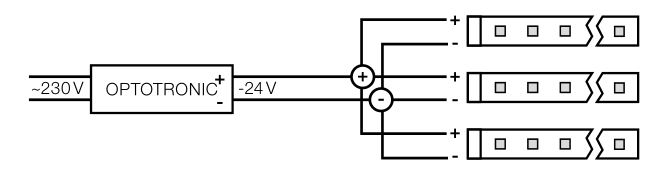
Series connection, made possible by using FX-DCS-G1- CM2PJ-IP67-0190-X5, is allowed. However, the connection of different LED modules to the ECG must be done carefully, without exceeding the maximum operable length of LED modules (the product length is a technical information available on each technical datasheet or specification sheet of each LFD product).
Example:
LFD400S-G2-xxxx-10 is a 10-m product. A section of 3m can be connected with another one of 7m (10m in total), as shown below:

However, more sections cannot be connected in series if the sum of their lengths is longer than the maximum operable length of the standard product.

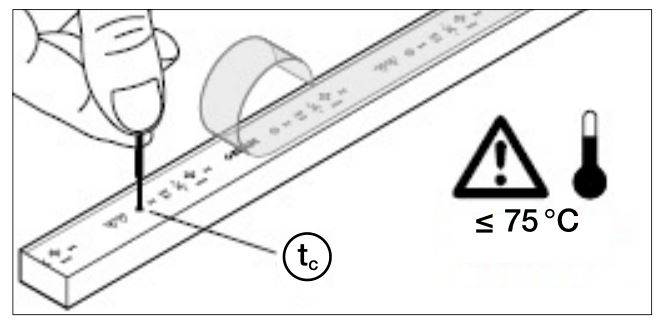
3.4 Temperature
For final application, it is important to check if the case temperature tc of the product is lower than the maximum declared value. An ambient temperature change during the day (due to, for example, a different sun exposure or the turning on of a heating system) can in fact influence the tc value when the LED module is on. For this reason, it is required to measure the case temperature at the tc point in the worst possible conditions of the installation. Where to measure the case temperature tc and the respective maximum temperature values are shown below:
Flexessories
To support the installation of Flex LED strips, a whole range of Flexessories – dedicated accessories for
Flex LED strips – is available. Our new extended range of Flexessories facilitates a quick and easy installation.
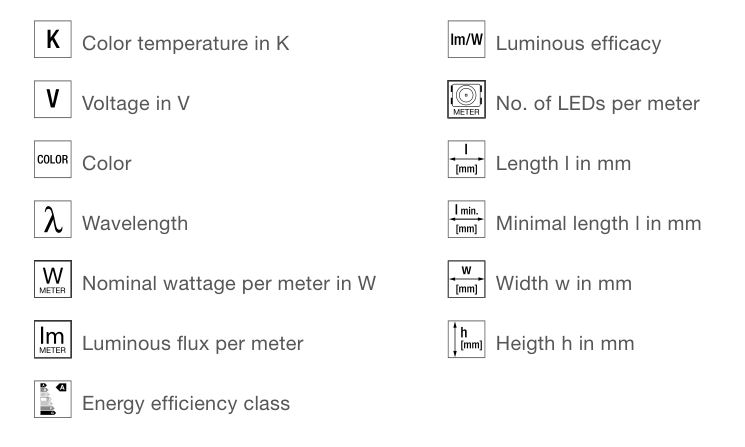
Symbols
Disclaimer
All information contained in this document has been collected, analyzed and verified with great care by OSRAM. However, OSRAM GmbH is not responsible for the correctness and completeness of the information contained in this document and OSRAM GmbH cannot be made liable for any damage that occurs in connection with the use of and/or reliance on the content of this document. The information contained in this document reflects the current state of knowledge on the date of issue.
OSRAM GmbH
Head office:
Marcel-Breuer-Strasse 6
80807 Munich, Germany
Phone +49 89 6213-0
Fax +49 89 6213-2020
www.osram.com
![]()