MOXA MDS-G4000-4XGS Layer 2 Managed Switches Installation

Package Checklist
Moxa’s MDS-G4000-4XGS/MDS-G4000-L3-4XGS Series industrial modular DIN-rail switch is shipped with the following items. If any of these items are missing or damaged, please contact your customer service representative for assistance.
- 1 MDS-G4000-4XGS or MDS-G4000-L3-4XGS switch
- Pre-installed DIN-rail kit
- 2 screws (M4 x 8 mm & M3 x 8 mm)
- Quick installation guide (printed)
- Substance Disclosure Table
- Product Certificate of Quality Inspection (Simplified Chinese)
- Product Notices (Simplified Chinese)
- Warranty card
NOTE You can find information and software downloads on the relevant product pages located on Moxa’s website: www.moxa.com
Default Settings
- IP address: 192.168.127.253
- Subnet mask: 255.255.255.0
- Username: admin
- Password: moxa
Panel Layouts
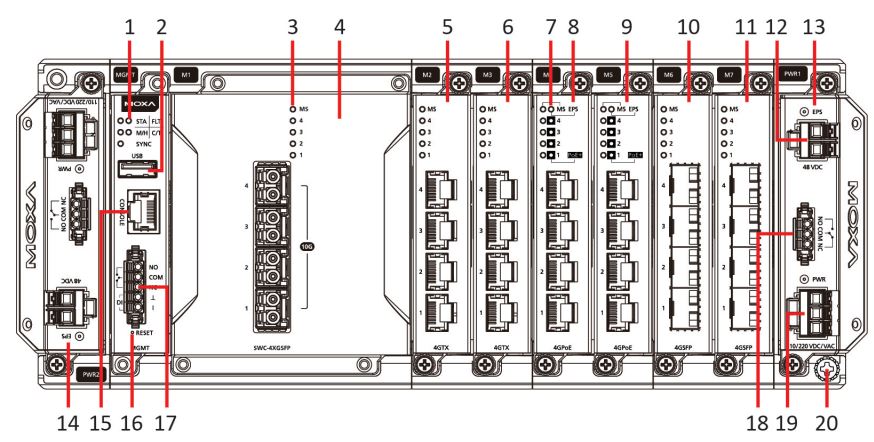
- System status LEDs (from left to right, top to bottom) STATE, FAULT, MASTER/HEAD, COUPLER/TAIL, and SYNC LED indicators
- USB storage port
- Module Status
- Switch and Control Module slot 1 (embedded)
- Ethernet module slot 2
- Ethernet module slot 3
- External power input status from EPS
- Ethernet module slot 4
- Ethernet module slot 5
- Ethernet module slot 6
- Ethernet module slot 7
- External Power Supply (EPS) input for PoE
- Redundant power module slot 1
- Redundant power module slot 2
- RS-232 console port with RJ45 interface
- Reset button (Pin hole 0.9 mm diameter)
- Relay output and Digital Input port
- Relay output
- Power input
- Grounding screw
Dimensions
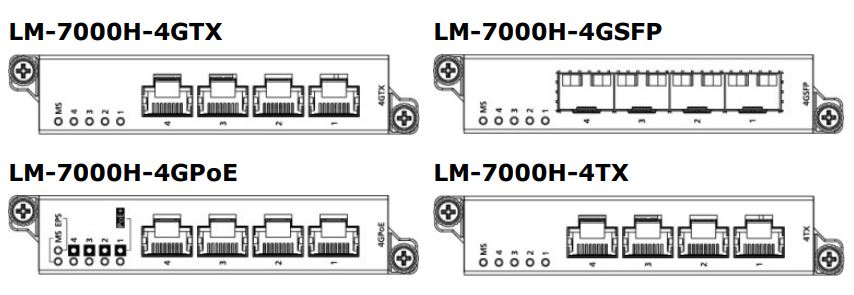
Ethernet Modules (Hardware Rev.2.0.0 and above)

Power Modules (Hardware Rev.2.1.0 and above)
DIN-rail Dimension and Instructions
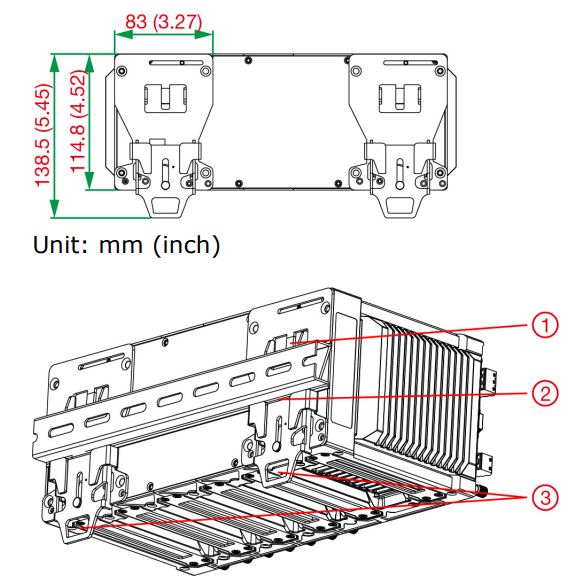
- Insert the upper lip of the DIN rail into the DIN-rail mounting kit.
- Press the device towards the DIN rail until it snaps into place.
- Pull down the two latches one by one to release the DIN-rail kit and lift up to remove the device from the DIN rail.
NOTE The DIN-rail must use TS35 (15 mm) specification for the MDSG4000-4XGS/MDS-G4000-L3-4XGS Series.
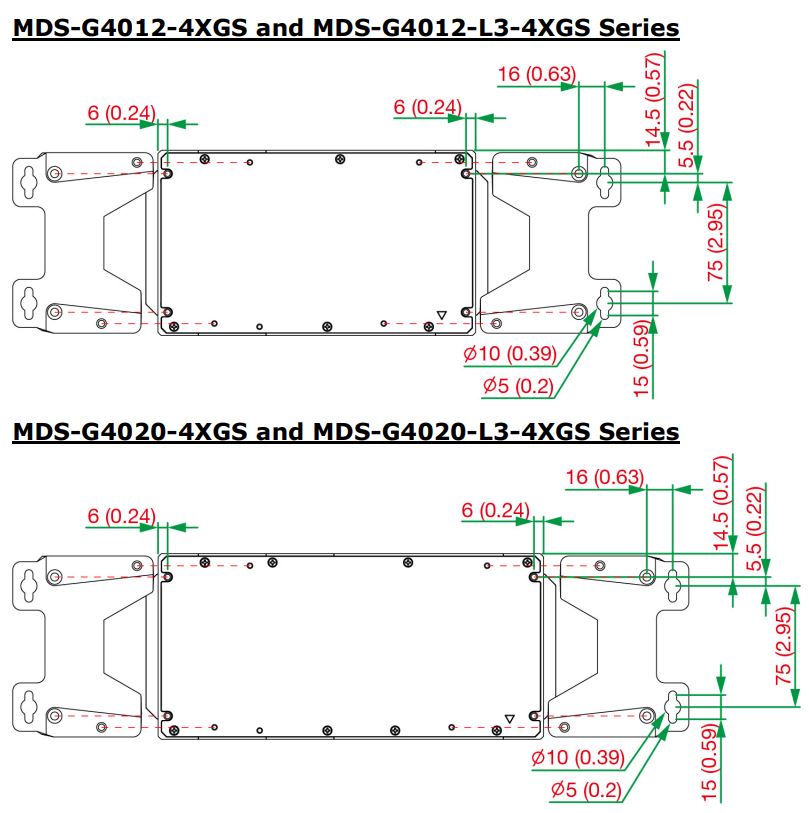
Wall Mount Dimension and Instructions (Optional: WK-112-01)
NOTE The wall-mount kit is certified for Hazardous Location usage.
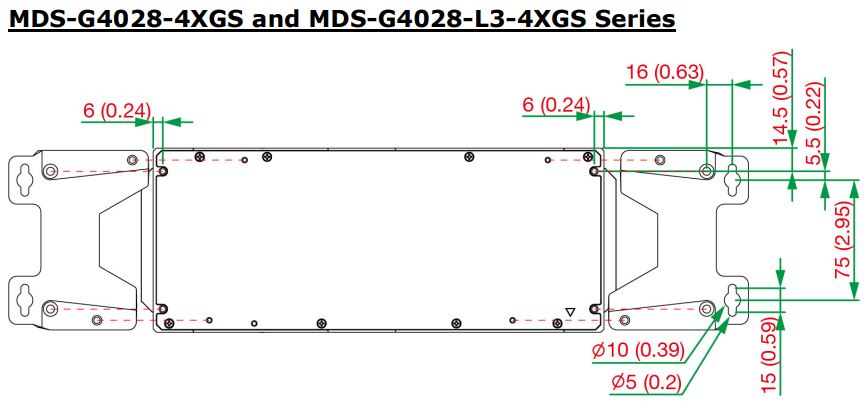
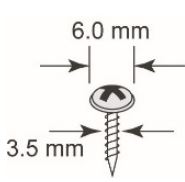 Mounting the switch to a wall requires four screws per kit (there are two kits). The heads of the screws should be between 6.0 to 9.0 mm in diameter, and the diameter of screw thread should be between 3.5 to 4 mm, as shown in the figure on the right. Use the switch with the wall-mounting kit attached as a guide to mark the correct locations of the eight screws.
Rack-mounting Kit Dimensions and Instructions
(Optional: RK-3U-02)
Please refer to the RK-3U-02 Series QIG.
Matters That Require Attention
- Elevated Operating Temperature: If installed in a closed or multi-unit rack assembly, the operating ambient temperature of the rack environment may be greater than room temperature. Therefore, consideration should be given to installing the equipment in an environment compatible with the maximum ambient temperature (Tma) specified by the manufacturer.
NOTE In order to ensure reliable operations, please make sure the operating temperature of the environment does not exceed the spec. When mounting a rack-mounted switch with other operating units in a cabinet without forced ventilation, it is recommended that 1U of space is reserved between each rack mounted switch and/or device. - Required Air Flow: Installation of the equipment in a rack should be such that the amount of air flow required for safe operation of the equipment is not compromised.
- Mechanical Loading: Mounting of the equipment in the rack should be such that a hazardous condition is not achieved due to uneven mechanical loading.
- Circuit Overloading: Consideration should be given to the connection of the equipment to the supply circuit and the effect that overloading of the circuits might have on overcurrent protection and supply wiring. Appropriate consideration of equipment nameplate ratings should be used when addressing this concern.
- Reliable Grounding: Reliable grounding of rack-mounted equipment should be maintained. Particular attention should be given to supply connections other than direct connections to the branch circuit (e.g. use of power strips).
⚠ ATTENTION
Safety First!
Be sure to disconnect the power cord before installing and/or wiring your Ethernet Switch. Calculate the maximum possible current in each power wire and common wire. Observe all electrical codes dictating the maximum current allowable for each wire size. If the current goes above the maximum ratings, the wiring could overheat, which can cause serious damage to your equipment.
⚠ WARNING
When end users are using Optical SFP Communications modules, these must be limited to Laser Class 1.
Connecting the Power Inputs
NOTE The required power module depends on the choice of LM-7000H module. Refer to the following power/module combination requirements.
- LM-7000H non-PoE modules: Any power module
- LM-7000H PoE modules: PWR-HV-P48-A, PWR-LV-P48-A only
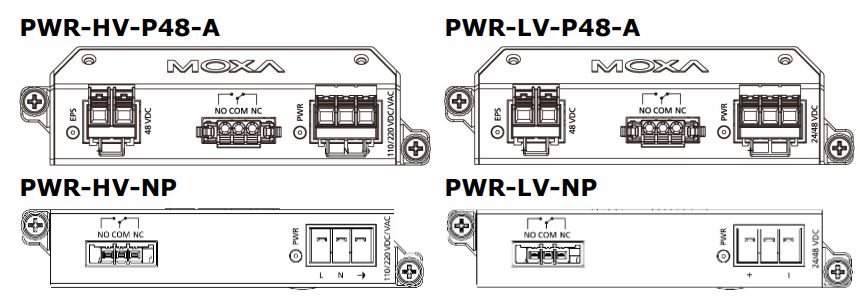
The MDS-G4000-4XGS/MDS-G4000-L3-4XGS Series supports 4 types of power supply:
- PWR-HV-P48-A: one 110/220 VAC/VDC (90 to 264 VAC, 88 to 300 VDC), one 48 VDC PoE power input for PoE+ ports.
- PWR-LV-P48-A: one 24/48 VDC (18 to 72 VDC), one 48 VDC PoE power input for PoE+ ports.
- PWR-HV-NP: one 110/220 VAC/VDC (90 to 264 VAC, 88 to 300 VDC) power input.
- PWR-LV-NP: one 24/48 VDC (18 to 72 VDC) power input.
For the PWR-HV-P48-A, the 110/220 VAC/VDC power supplies provide power to the switch. Separate 48 VDC power supplies are required to provide power to all PoE+ ports (50 to 57 VDC is recommended for IEEE 802.3at devices. The maximum PoE output from an external power supply is 720 W when the operating temperature is under 60°C; 360 W when the operating temperature is under 75°C.)
For the PWR-LV-P48-A models, the 24/48 VDC power supplies provide power to the switch. Separate 48 VDC power supplies are required to provide power to all PoE+ ports (50 to 57 VDC is recommended for IEEE 802.3at devices. The maximum PoE output from an external power supply is 720 W when the operating temperature is under 60°C; 360 W when the operating temperature is under 75°C.)
For the PWR-HV-NP, the 110/220 VAC/VDC power supplies provide power to the switch. For the PWR-LV-NP, the 24/48 VDC power supplies provide power to the switch.
Power Terminal Blocks
The connections for the power input are on the power modules.

PWR-HV-P48-A/PWR-HV-NP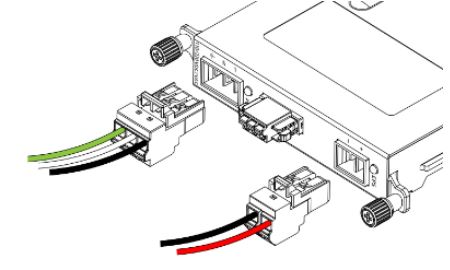
Step 1: Insert the neutral/line (L/N/Ground) AC wires into the terminals.
Step 2: Insert the terminal block connector into the terminal block receptor.
PWR-LV-P48-A/PWR-LV-NP
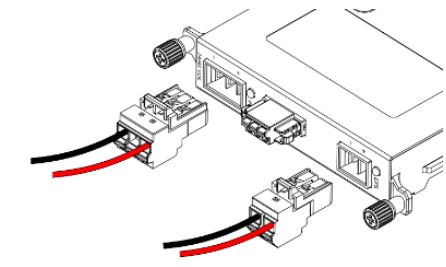 Step 1: Insert the negative/positive (-/+) DC wires into the terminals.
Step 2: Insert the terminal block connector prongs into the terminal block receptor.
PoE Power Terminal Blocks
Step 1: Insert the negative/positive DC wires into the -/+ terminals, respectively.
Step 2: Insert the terminal block connector prongs into the terminal block receptor.
NOTE In order to have higher levels of protection against surge, it is suggested to install a surge protector in front of the power input of the PoE powered device so that it is suitable for use in IEC 61850 conditions.
⚠ WARNING
When wiring the power input, we suggest using the cable type AWG (American Wire Gauge) 16 (1.31 mm2) and the corresponding pin type cable terminals. The rated temperature of the wiring should be at least 105°C and the wire type should be CU.
NOTE When two power units are installed on the MDS-G40004XGS/MDS-G4000-L3-4XGS Series switch, both power units will be activated simultaneously, which will enable power redundancy.
NOTE The reverse power input connection will not activate the device or PoE input. In addition, the PoE will only activate when the external power supply is installed on the same power unit.
Wiring the Relay Contact
Each power module has one relay output that can provide two types of relay output. Refer to the table below for detailed information.
The relay contact is used to detect user-configured events. Two wires are attached to the relay pins with normally close and normally open options.
FAULT: The relay contact of the 3-pin terminal block connector is used to detect user-configured events. The module provides normally open and normally closed circuits depending on what the user chooses. For pin definitions, refer to the table below.

⚠ WARNING
When wiring the relay contact, we suggest using the cable type
– AWG (American Wire Gauge) 16-21 (1.31-0.412 mm2) and the corresponding pin type cable terminals. The rated temperature of the wiring should be at least 105°C and the wire type should be CU.
Digital Input/Output
Digital Output 1 relay output with a current carrying capacity of 2 A @ 30 VDC.
Digital Input 1 digital output with the same ground, but electrically isolated from the electronics.
- +13 to +30 V for state 1
- -30 to +1 V for state 0
- Max. input current: 8 mA
⚠ WARNING
When wiring the Digital Input/Output contact, we suggest using the cable type – AWG (American Wire Gauge) 16-28 (1.310.081 mm2) and the corresponding pin type cable terminals. The rated temperature of the wiring should be at least 105°C and the wire type should be CU.
Installing and Removing the Ethernet Modules
The Ethernet modules are hot-swappable for the same module type. You can mount or remove the Ethernet module while the device is operating.
NOTE
- When performing a cold start, you cannot remove and insert a module before the device has fully booted up as this will cause the module to fail initialization.
- The default module is 4XGS. If this is the first time mounting a 4TX or SFP module, please reboot the switch after inserting it. The hot-swappable function, as defined above, will work after the device is rebooted for the first time.
- When swapping out a slotted module with a different type of module, it is recommended to reconfigure the settings or reset the device to factory default settings after rebooting the switch.
The installation procedure is as follows:
- Insert the Ethernet module straight into the slot
- Fasten the module to the device by tightening the 2 screws. The tightening torque is 3.5 kgf-cm (0.35 Nm)
The removal procedure is as follows:
- Loosen the 2 screws of the module
- Pull the module out of the slot
- Insert the dummy module into the slot in order to have better protection against dust and EMI
- Fasten the dummy module using the 2 screws. The tightening torque is 4 kgf-cm (0.4 Nm)
Installing and Removing the Power Modules
The power supply units are hot-swappable when both power modules are installed. You can mount or remove the power supply units while the device is operating.
The installation procedure is as follows:
- Insert the power unit straight into the slot
- Fasten the unit to the device by tightening the 2 screws. The tightening torque is 3.5 kgf-cm (0.35 Nm)
The removal procedure is as follows:
- Loosen the 2 screws of the module
- Pull the module out of the slot
- Insert the dummy module into the slot in order to have better protection against dust and EMI.
- Fasten the dummy module using the 2 screws. The tightening torque is 4 kgf-cm (0.4 Nm)
NOTE If one of the modules is removed from the device, it is recommended to insert a dummy module in order to provide better protection against dust and EMI.
Grounding the Moxa Industrial DIN-rail Switch
Grounding and wire routing help limit the effects of noise due to electromagnetic interference (EMI). Run the ground connection from the ground screw to the grounding surface prior to connecting devices.
⚠ ATTENTION
This product is intended to be mounted to a well-grounded mounting surface, such as a metal panel. We use the greenand-yellow cable type AWG (American Wire Gauge) min. 16 (1.31 mm2) for grounding.
NOTE The PoE power connection is for indoor and local area network usage only.
NOTE Using a shielded cable achieves better electromagnetic resistance.
RS-232 with RJ45 Interface Console Connection
The switch has an RS-232 serial console with an RJ45 interface. Please use a Moxa 9-pin female console cable to connect to your PC’s COM port (or via USB-to-Serial converters or hubs). You can then use a console terminal program, such as Moxa’s PComm Terminal Emulator, to access the console configuration utility of the switch. RS-232 Setup:
- Baud rate: 115,200
- Data Bits: 8
- Parity: None
- Stop Bits: 1
- Terminal Type: VT100
USB Storage Connection
Use Moxa’s ABC-02-USB automatic backup configurator to connect to the USB storage port (Type A connector; see the diagram below for pinout assignments) to perform configuration backup, firmware upgrade, or system log file backup.

The Reset Button (diameter 0.9 mm)
The reset button can perform two functions. One is to reset the switch to factory default settings and the other is to reboot the switch if the button has been depressed and release immediately.
Resetting to Factory Default Settings
Depress the Reset button for five seconds to load the factory default settings. Use a pointed object, such as a straightened paper clip or needle (the diameter must not exceed 0.9 mm), to depress the Reset button. When you do so, the STATE LED will start to blink about four times per second. Continue to depress the STATE LED until it begins blinking more rapidly; this indicates that the button has been depressed for five seconds and you can release the Reset button to load factory default settings.
NOTE Do NOT power off the switch when loading default settings.
LED Indicators
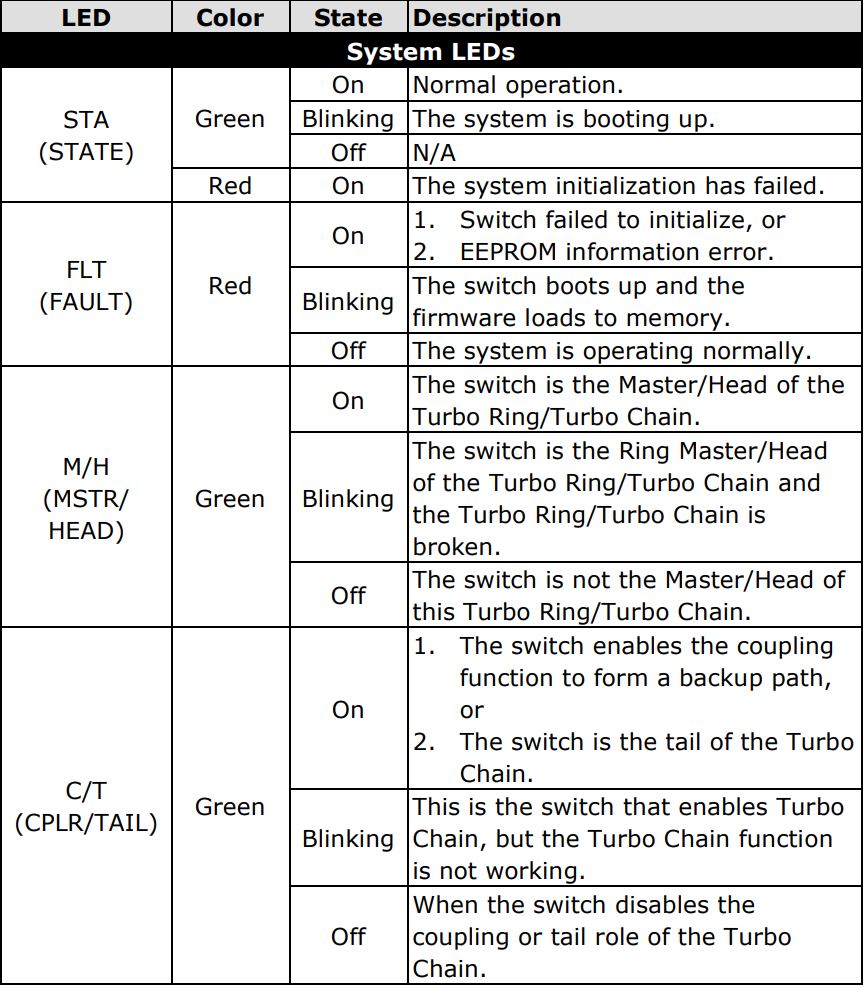
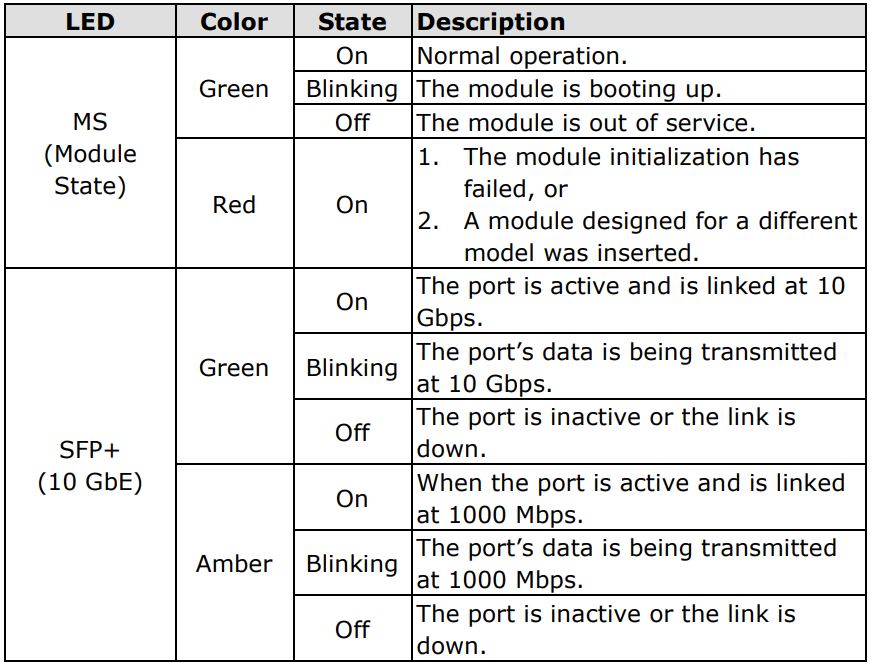
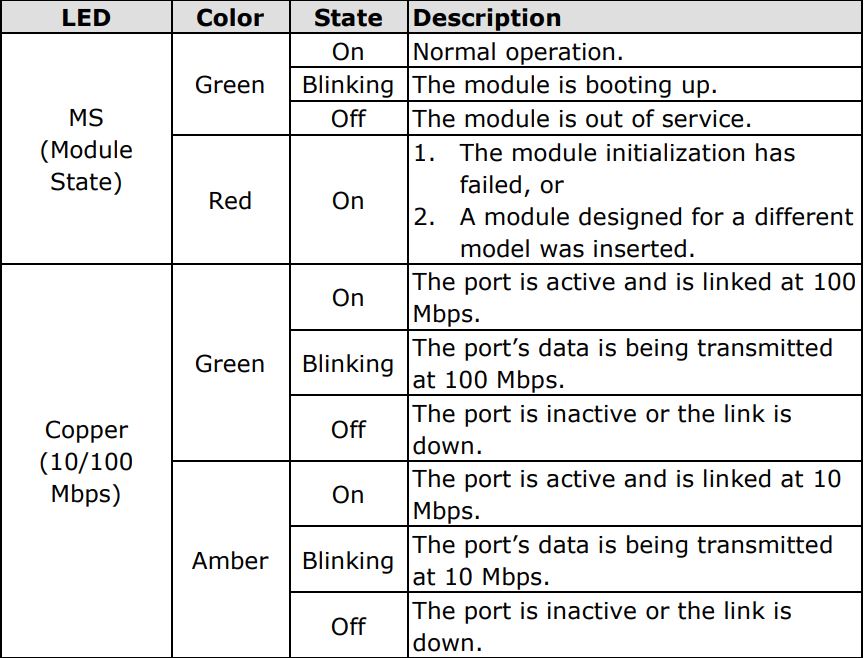
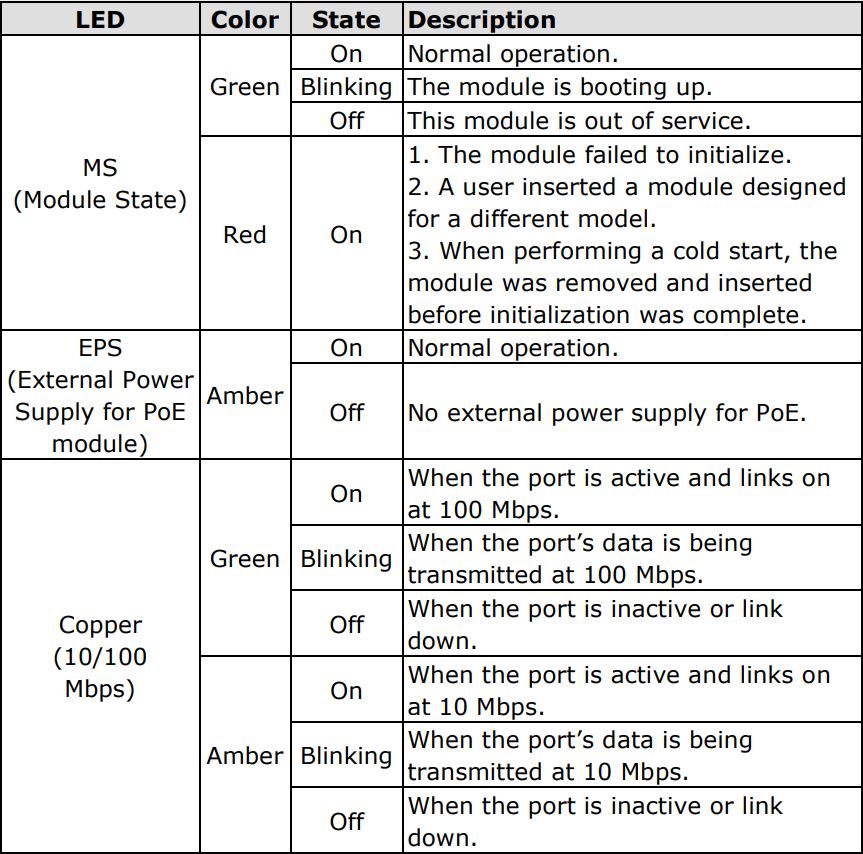
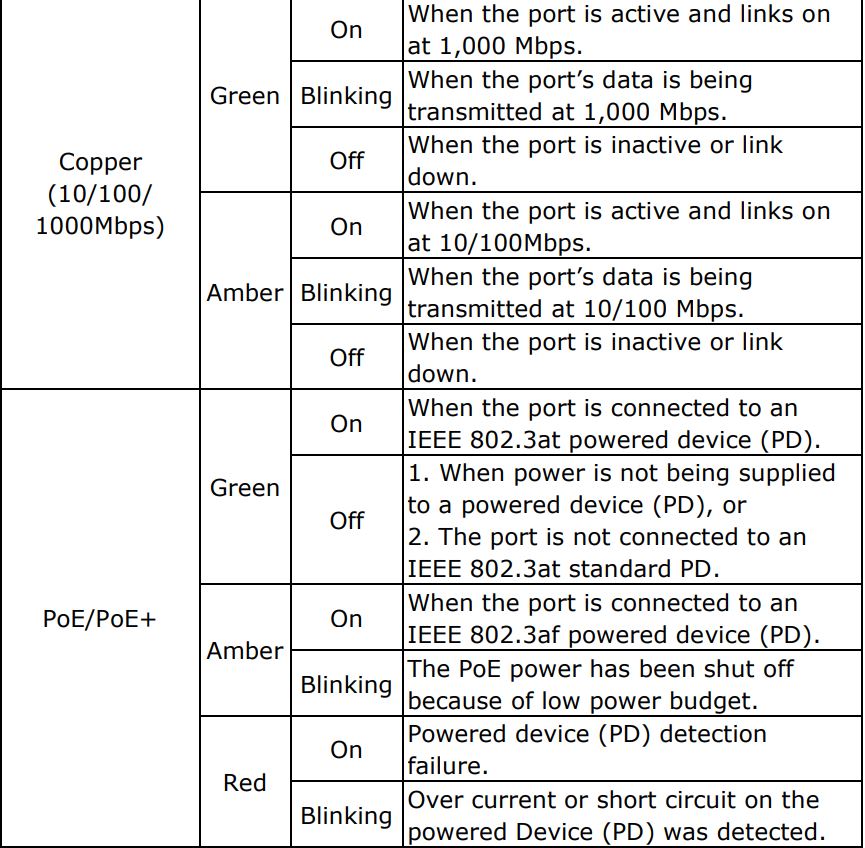
The function of each LED is described in the table below.
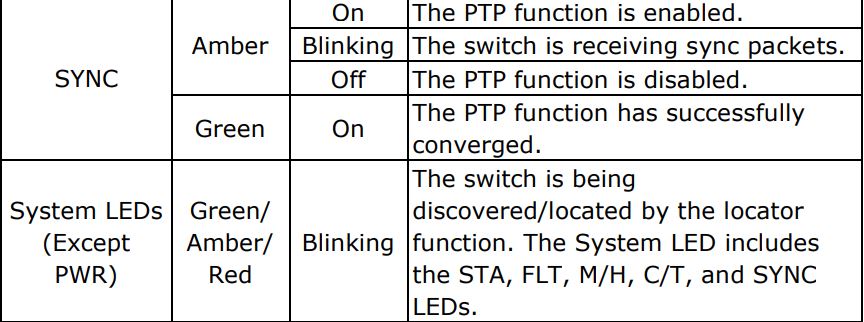
SWC-4XGSFP
LM-7000H-4GTX/LM-7000H-4GSFP/LM-7000H-4TX
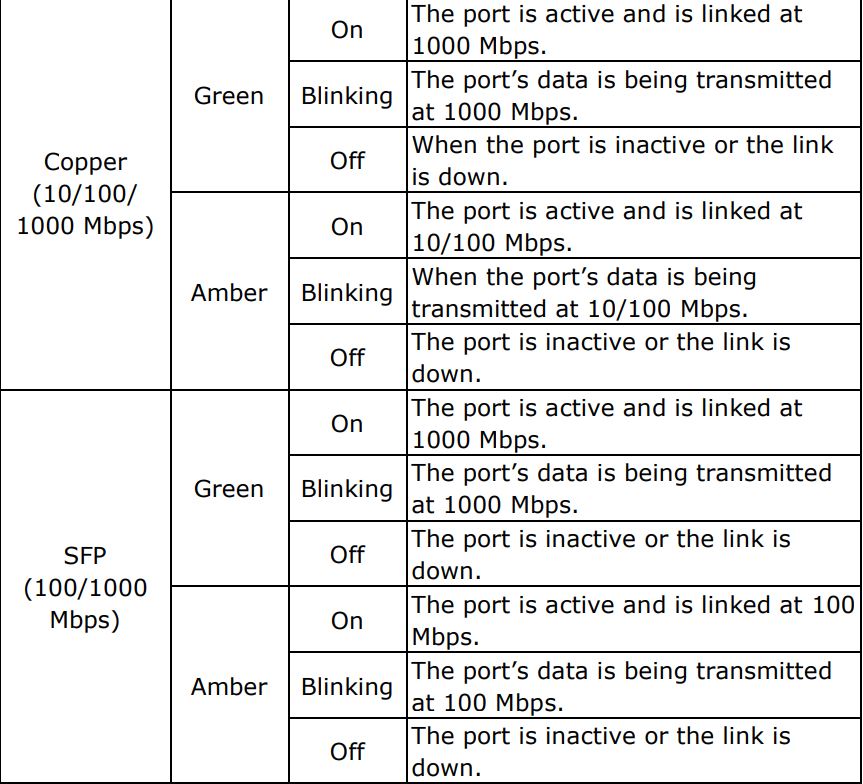
LM-7000H-4GPoE/LM-7000H-4PoE
PWR-HV-P48-A/PWR-LV-P48-A

PWR-HV-NP/PWR-LV-NP

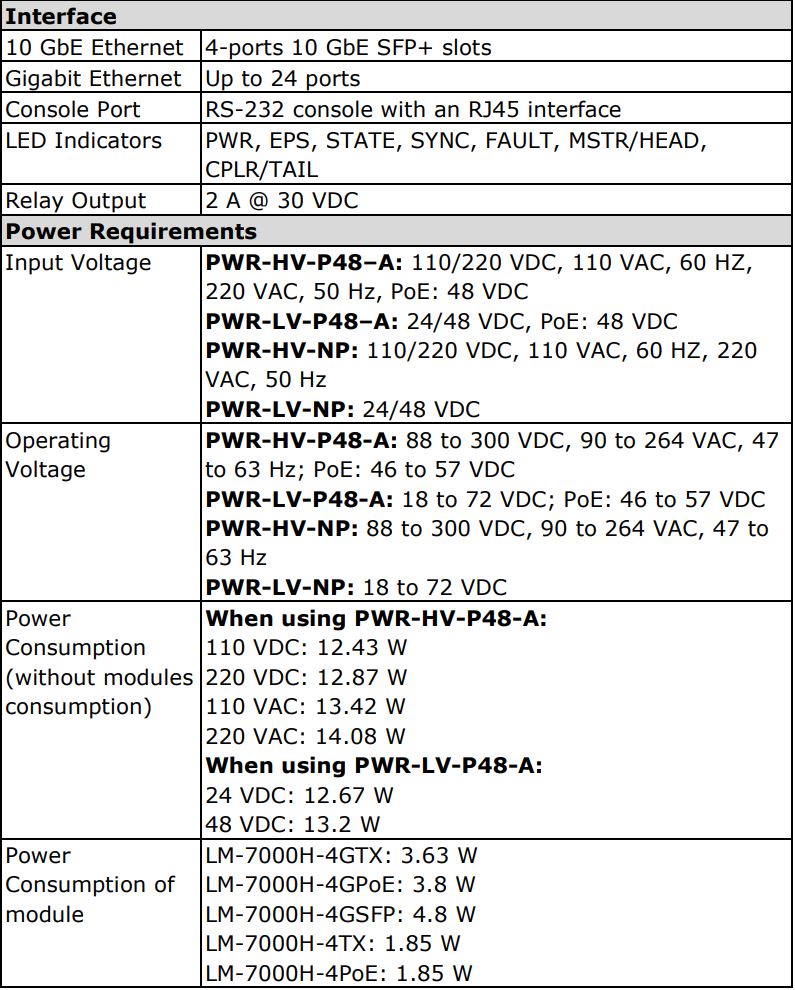
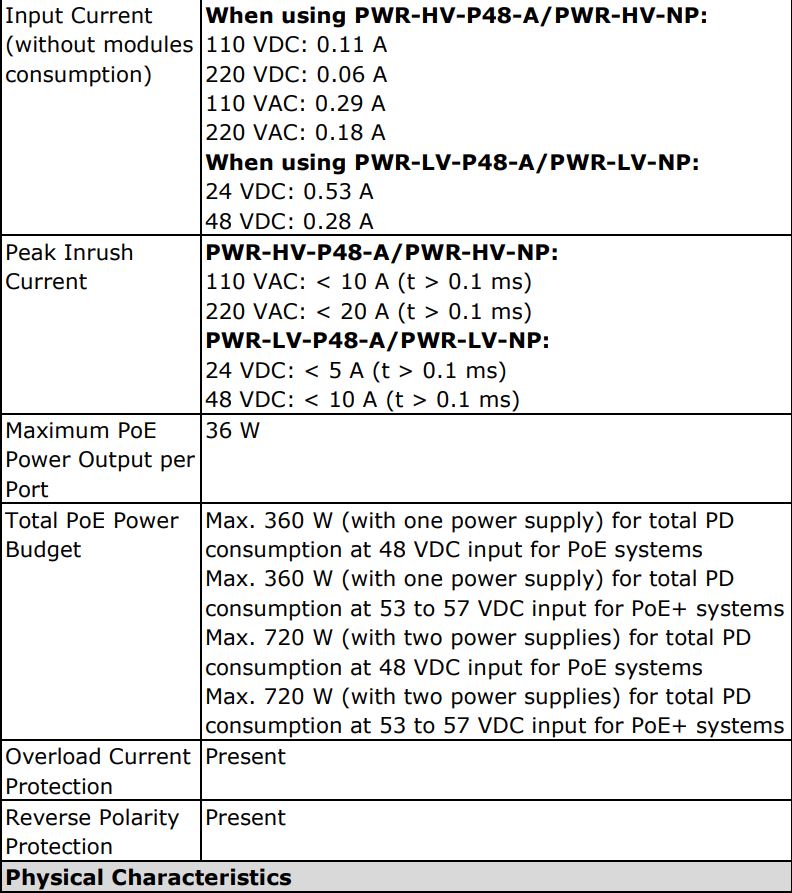
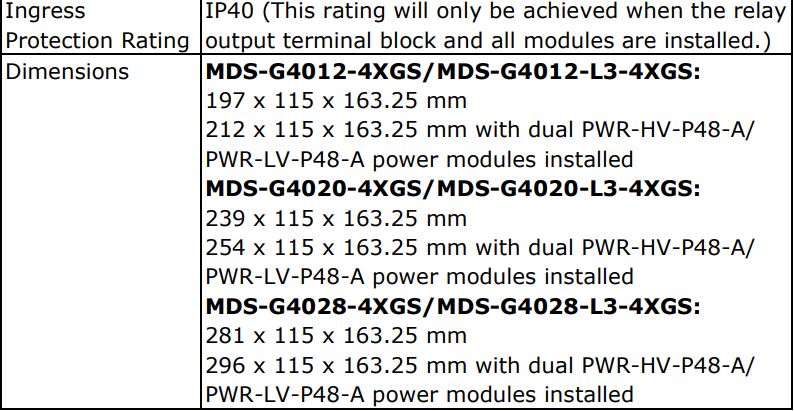
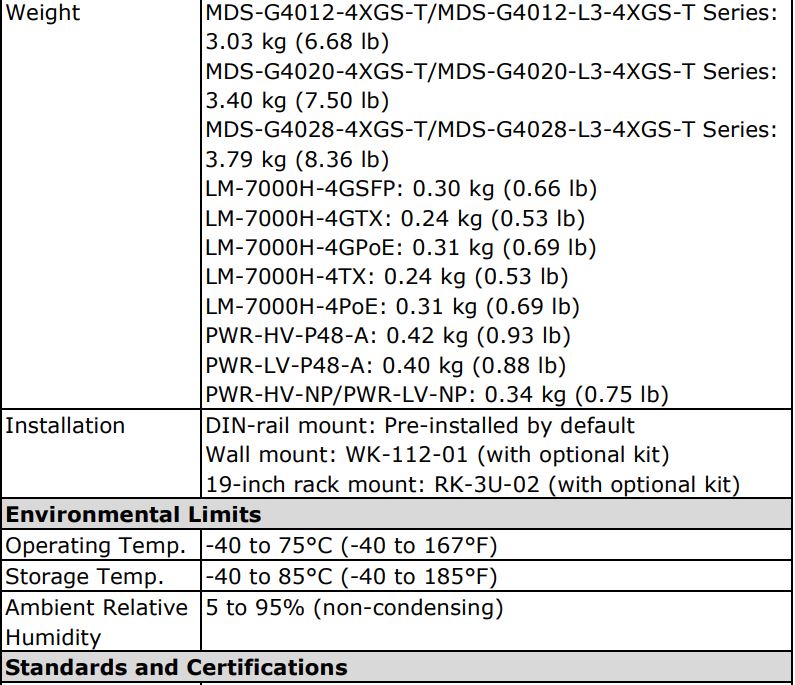
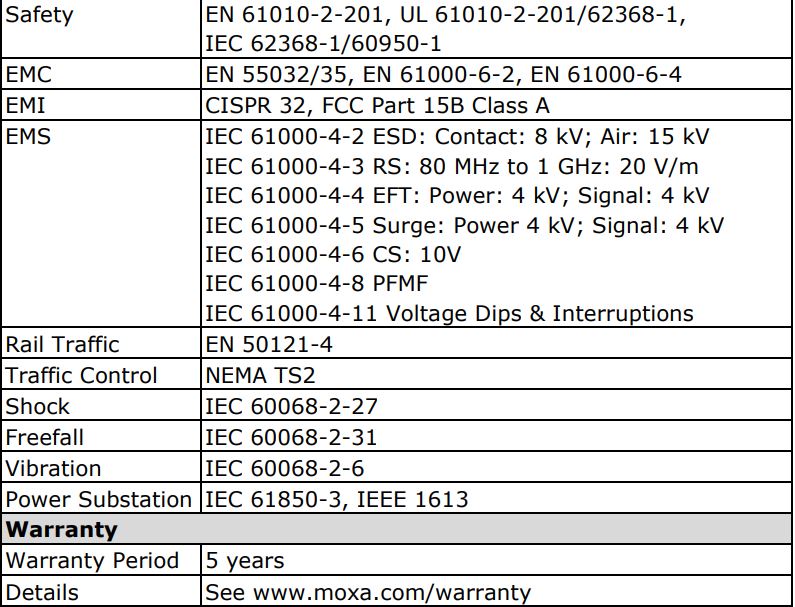
Specifications
Restricted Access Locations
 This equipment is intended to be used in Restricted Access Locations, such as a computer room, with access limited to service personnel or users who have been instructed on how to handle the metal chassis of equipment that is very hot. The location should only be accessible with a key or through a security system.
- External metal parts of this equipment are extremely hot. Before touching the equipment, you must take special precautions to protect your hands and body from serious injury.
ATTENTION
- This device is an open-type equipment and should be installed in a suitable enclosure.
- Please use an optical transceiver (SFP) that complies with IEC 60825-1, 21 CFR 1040 Section 1040.10 and 1040.11, classified as Class 1 laser product.
- If the equipment is used in a manner not specified by the manufacturer, the protection provided by the equipment may be impaired.
- The installation and the safety of any system incorporating the equipment is the responsibility of the assembler of the system.
- For any repair or maintenance needs, please contact us.
NOTE
- This device is intended for use indoor and at altitudes up to 2000 meters.
- Overvoltage category II.
- Pollution degree 2.
