LANCER 1100 Refrigerated Beverage Dispenser User Manual
For more Information visit lancerworldwide.com or call Tech Support/Warranty: 800-729-1550
6655 Lancer Boulevard · San Antonio, TX 78219 · custserv@lancerworldwide.com · ©2022 Lancer Corp.· Lancer PN: 28-3063 · Rev: 00-5, 6/7/22
ABOUT THIS MANUAL
This booklet is an integral and essential part of the product. Please carefully read the guidelines and warnings contained herein as they are intended to provide the user with essential information for the continued safe use and maintenance of the product. In addition, it provides GUIDANCE ONLY to the user on the correct services and site location of the unit.
BEFORE GETTING STARTED
Each unit is tested under operating conditions and is thoroughly inspected before shipment. At the time of shipment, the carrier accepts responsibility for the unit. Upon receiving the unit, carefully inspect the carton for visible damage. If damage exists, have the carrier note the damage on the freight bill and file a claim with carrier. Responsibility for damage to the dispenser lies with the carrier.
The installation or relocation, of this product must be carried out by qualified personnel with up-to-date safety and hygiene knowledge and practical experience, in accordance with current regulations.
READ ALL SAFETY INSTRUCTIONS BEFORE USING THIS UNIT.
This manual contains important safety information and all applicable safety precautions must be observed. To reduce the risk of fire, electric shock, damage to the equipment or personal injury when using this unit all instructions/warnings on the product being used must be followed:
![]() WARNING
WARNING
Text following the Warning signal indicates a hazardous situation, which if not avoided, will result in death or serious injury. Be sure to read all Warning statements before proceeding with the installation.
![]() ATTENTION
ATTENTION
Text following the Attention signal addresses a situation that if not followed could potentially damage the equipment. Be sure to read the Attention statements before proceeding.
![]() CAUTION
CAUTION
Text following the Caution signal indicates a hazardous situation, which if not avoided, could result in death or serious injury. Be sure to read the Caution statements before proceeding with the installation.
NOTE
Text following the Note signal provides you with information that may help you more effectively perform the installation procedures within this manual. Disregarding information will not cause damage or injury, however it may limit the performance of the dispenser.
IMPORTANT SAFETY INSTRUCTIONS
![]() Intended Use
Intended Use
- The dispenser is for indoor use only.
- This appliance is intended to be used in commercial applications such as restaurants or similar.
- This appliance should not be used by children or infirm persons without supervision.
- This appliance is not intended for use by persons (including children) with reduced physical, sensory or mental capabilities, or lack of experience and knowledge, unless they have been given supervision or instruction concerning use of the appliance by a person responsible for their safety.
- This appliance can be used by children aged from 8 years and above and persons with reduced physical, sensory or mental capabilities or lack of experience and knowledge if they have been given supervision or instruction concerning use of the appliance in a safe way and understand the hazards involved.
- Cleaning and user maintenance shall not be performed by children without supervision.
- This unit is not a toy and children should be advised not to play with the appliance.
- Do not operate unit below minimum or above maximum ambient operation conditions.
- Should freezing occur, cease operation of the unit and contact an authorized service technician.
- The maximum tilt for safe operation is 5°.
- This appliance must be installed and serviced by a professional.
![]() CAUTION
CAUTION
- Cleaning and user maintenance should not be performed by children without supervision.
- Do not allow the machine to be used by children or untrained persons.
- Do not leave the machine outside.
- Do not pull on the electrical cord when unplugging the machine.
![]() Power
Power
- Follow all local electrical codes when making connections.
- DO NOT plug into a wall electrical outlet unless the current shown on the serial number plate agrees with local current available.
- Each dispenser must have a separate electrical circuit.
- DO NOT use extension cords with this unit.
- DO NOT `gang’ together with other electrical devices on the same outlet.
- WARNING: Always disconnect electrical power to the unit to prevent personal injury before attempting any internal maintenance.
- The resettable breaker switch should not be used as a substitute for unplugging the dispenser from the power source to service the unit.
- Only qualified personnel should service internal components of electrical control housing.
- WARNING: Make sure that all water lines are tight and units are dry before making any electrical connections.
- If this dispenser is installed in an area that is susceptible to ±10% variation of the nominal line voltage, consider installing a surge protector or similar protection device.
![]() WARNING
WARNING
- Do not touch the machine when hands or feet are wet.
- Do not use the machine when barefooted.
- Children should not play with the appliance.
![]() ATTENTION
ATTENTION
- This instruction manual is an integral part of the machine and must be kept for any future use. · This machine is a cold drink dispenser.
- This machine should be used only for the purpose for which it was designed. Any other use is inappropriate and therefore dangerous.
- The manufacturer will not be held responsible for any damage caused by improper use.
- Before installing and operating the machine read carefully this instruction manual.
- The company reserves the right to modify the construction or appearance without notice.
INSTALLATION
Read This Manual
Please read this manual before installation and operation of this dispenser. Please see the Troubleshooting section for additional assistance if required. If the service cannot be corrected please call your service agent or Lancer customer service. Always have your model and serial number available when you call.
Unpacking the Dispenser
Useful instructions for transport
In order to prevent the oil contained in the air-tight compressor from flowing into the cooling circuit, it is necessary to always carry, store and handle the machine in a vertical position, following the instructions found on the packaging.
![]() ATTENTION
ATTENTION
DO NOT LAY UNIT ON ITS SIDE OR BACK. If the machine was accidentally or purposely placed in a non-vertical position during transport, before operating the machine, it should be kept in a straight position for approximately 30 minutes, to allow the oil to flow back into the compressor.
- Remove cardboard and plastic covering.
- Make sure that the machine has not been damaged.
- Remove the plastic film from all the stainless steel panels.
- Remove accessory kit and loose parts from dispenser.
- Before operating, remove the green plastic plug from the tap.
NOTE
Inspect unit for concealed damage. If evident, notify delivering carrier and file a claim against the same.
![]() CAUTION
CAUTION
The packaging material should not be left within reach of children since it is potentially dangerous.
NOTE
To assure that beverage service is accessible to all customers, Lancer recommends that counter height and equipment selection be planned carefully. The 2010 ADA Standards for Accessible Design states that the maximum reach height from the floor should be no more than 48″ if touch point is less than 10″ from the front of the counter, or a maximum of 46″ if the touch point is more than 10″ and less than 27″ from the front of the counter. For more information about the customer’s legal requirements for the accessibility of installed equipment, refer to 2010 ADA Standards for Accessible Design – http://www.ada.gov.
Positioning
NOTE
The dispenser should only be installed in a location where it can be overseen by trained personnel.
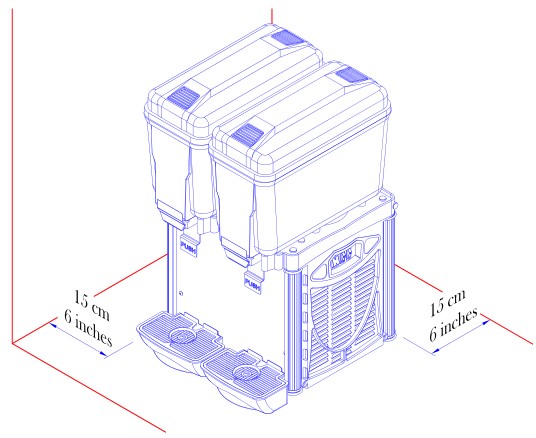
- Place machine on a horizontal and sturdy surface.
- For improved ventilation, a minimum of 6 inches (15 cm) of clearance must be maintained around the unit.
- Increase the distance if the obstacles are a heating source.
- When the dispenser is in place, adjust the legs in order to keep it level.
![]() ATTENTION
ATTENTION
Failure to maintain specified clearance will cause the compressor to overheat and will result in compressor failure.
Leveling the Dispenser:
In order to facilitate proper dispenser drainage, ensure that the dispenser is level, front to back and side to side. Place a level on the top of the rear edge of the dispenser. The bubble must settle between the level lines. Repeat this procedure for the remaining three sides. Level unit as necessary. For optimum performance place the unit at a 0° tilt. The maximum tilt is 5°.
Electrical Connection
NOTE
Before inserting the plug into the electrical socket, read the following precautions:
- Make sure that the machine is properly connected to an efficient grounding system, in compliance with current safety standards.
- Make sure that the voltage is in accordance with what is indicated on the “serial number” tag applied on the chassis.
- Make sure the current available is sufficient for the maximum required by the machine.
- If needed, use only approved multiple outlets, in compliance with current safety standards.
![]() WARNING
WARNING
The dispenser must be properly electrically grounded to avoid serious injury or fatal electrical shock. The power cord has a three-prong grounded plug. If a threehole grounded electrical outlet is not available, use an approved method to ground the unit. Follow all local electrical codes when making connections. Each dispenser must have a separate electrical circuit. Do not use extension cords. Do not connect multiple electrical devices on the same outlet.
USE
Dispenser Setup
NOTE
Before use, the dispenser should be cleaned carefully as it comes into contact with drinks:
NOTE
For a correct usage of the machine, ensure that the level of liquid in the bowl does not go below .75 – 1 gal.
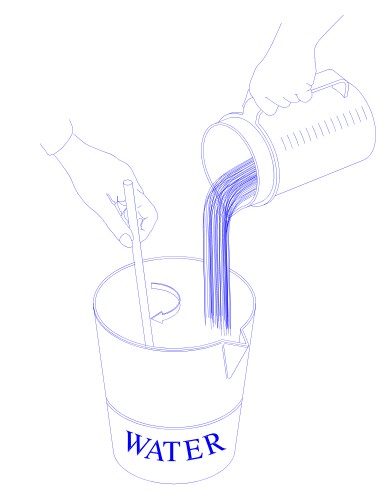
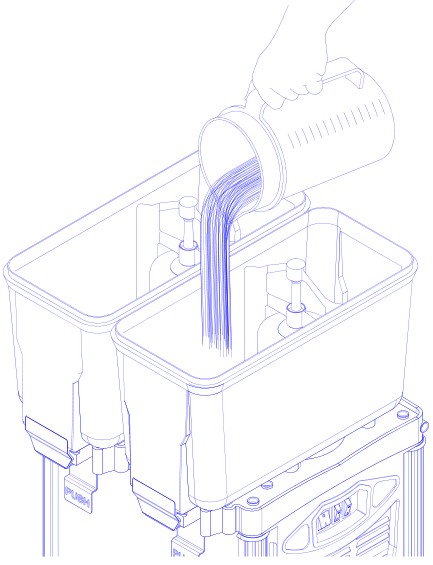
Refilling
1. Before filling up the container make sure to remove the power plug.
2. Mix product in a separate container.
3. Do not fill the container with hot product.
4. Do not fill past the MAX level line.
Dispenser Function
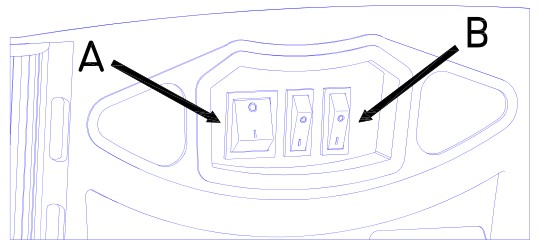
- Make sure that the main switch (A) is in the OFF position, then plug in the machine.
- Before starting the machine, ensure that the bowls are properly closed with their covers.
- Turn the main switch (A) to the ON position, the refrigerant group unit will automatically start.
- To start the mixing action, turn the mixing system switch (B) to the ON position. There is a switch for each container.
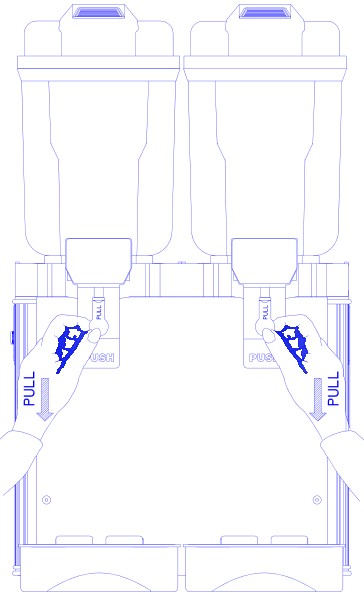
- To pour drink out, lightly press the drinking glass against the lever.
![]() ATTENTION
ATTENTION
DO NOT RUN THE PUMP WITHOUT LIQUID.
Beverage Temperature Regulator
NOTE
Every dispenser has been tested with the thermostat set at c.a. +41 °F (5 °C).
- To adjust this temperature, turn the thermostat knob clockwise to set a lower temperature.
- If unit has an internal thermostat, remove left or rear side panel (machine with 2 compressors).
- To disassemble the side panels, loosen the screws on the panels pushing up then unlatching.
- To adjust temperature, turn thermostat handle clockwise to set a lower temperature.
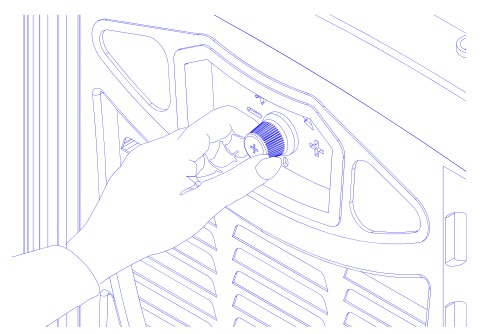
![]() ATTENTION
ATTENTION
Before adjusting temperature, always remove the power plug.
CLEANING AND SANITIZING
General Information
- For health standards and quality beverages, clean as often as possible.
- Cleaning should be accomplished only by trained personnel. Sanitary gloves are to be used during cleaning operations.
- Applicable safety precautions must be observed. Instruction warnings on the product being used must be followed.
![]() ATTENTION
ATTENTION
Before carrying out cleanings and refills, remove the power plug.
NOTE
The cleaning procedures provided herein pertain to the Lancer equipment identified by this manual. If other equipment is being cleaned, follow the guidelines established by the manufacturer for that equipment.
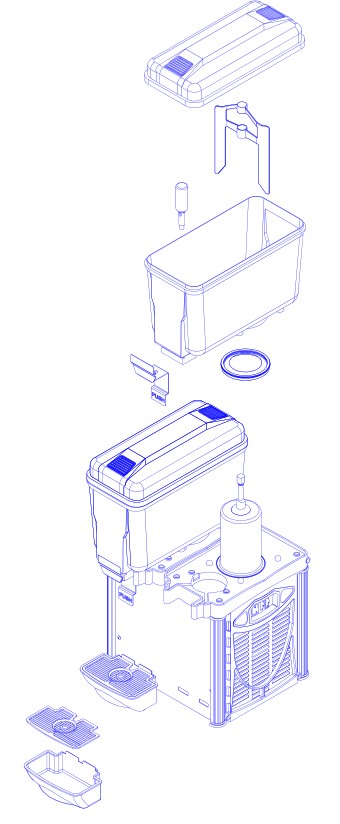
Disassembling and Assembling
- Disconnect the unit by removing the plug.
- Remove lid.
- Remove mixer.
- Lift container with both hands using a light, swinging motion. If there is difficulty in lifting container, dampen the steel refrigerator and gasket, then repeat the operation.
- To remove container’s gasket, lift it from its setting.
- To disassemble panels, unscrew the nuts on the panels pushing up and then unlatching.
- To reassemble the unit, repeat the above operations in reverse.
Cleaning
![]() ATTENTION
ATTENTION
Do not use abrasive powders which might damage container and lid’s shine.
- Use neutral soap and lukewarm water to wash container, lid, mixer, refrigerator and tap.
- Rinse carefully with water in order to remove any residual of soap.
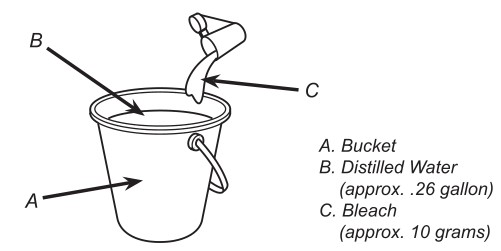
- For sanitation purposes, wash the parts with a solution of cold water and sodium hypochlorite (bleach) with a 10 gram per .26 gallon of water ratio.
- Rinse with lukewarm water.
NOTE
For better cleaning and sanitation use a soft brush. - If the dispenser is out of use for a long period, remove the power plug and carefully clean all parts. Keep the dispenser away from dust and cover it with a plastic sheet.
Servicing
- After disconnecting the dispenser, remove panels and clean inside parts (especially condenser fins) with a brush.
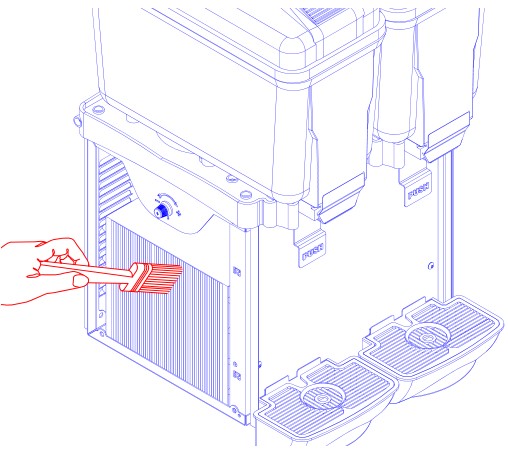
![]() ATTENTION
ATTENTION
Since dust reduces the performance of the machine, it should be cleaned at least once a month.
NOTE
The dispenser does not require oiling.
NOTE
Any necessary repairs on the machine should be performed exclusively by an authorized repair center, using original replacement parts. The electrical cord should not be replaced by the user.
Dispenser Disposal
To prevent possible harm to the environment from improper disposal, recycle the unit by locating an authorized recycler or contact the retailer where the product was purchased. Comply with local regulations regarding disposal of the refrigerant and insulation.
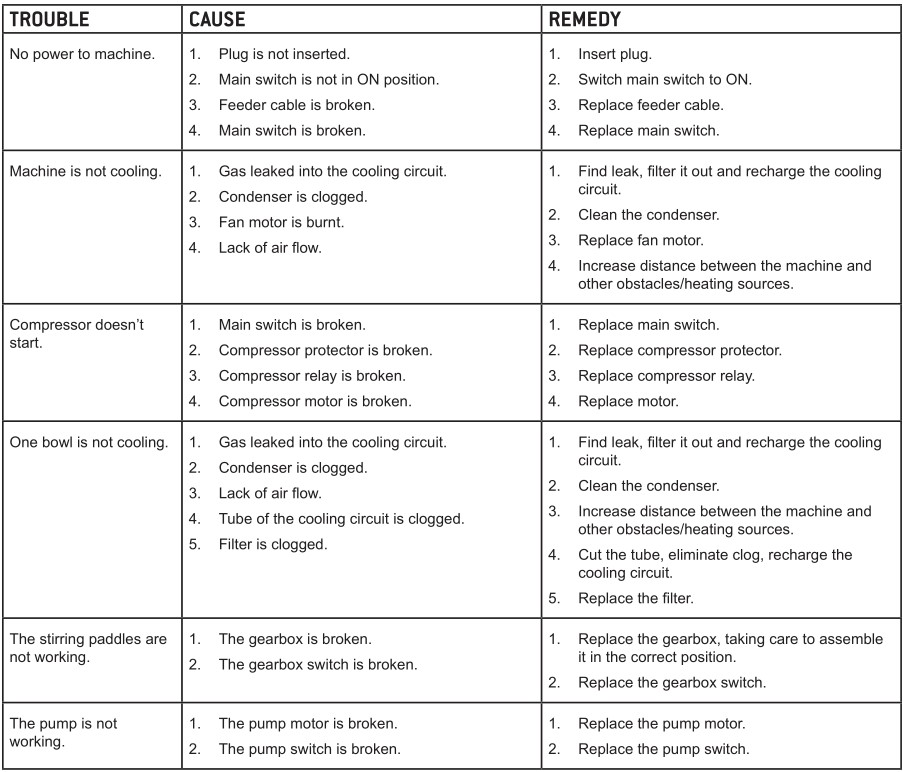
TROUBLESHOOTING
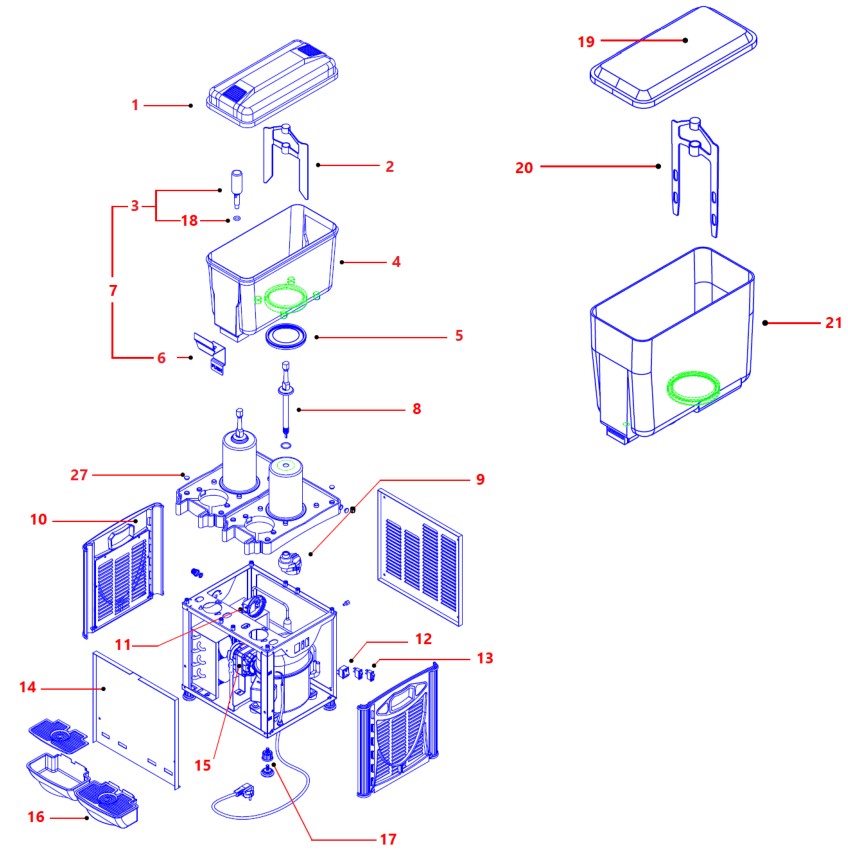
ILLUSTRATIONS AND PART LISTINGS
Main Unit Assembly
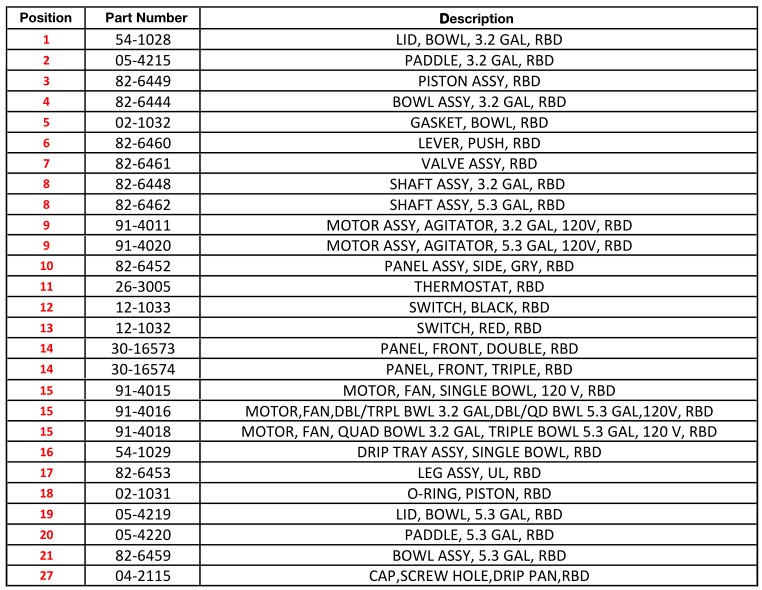
Spare Parts
Unit Specifications

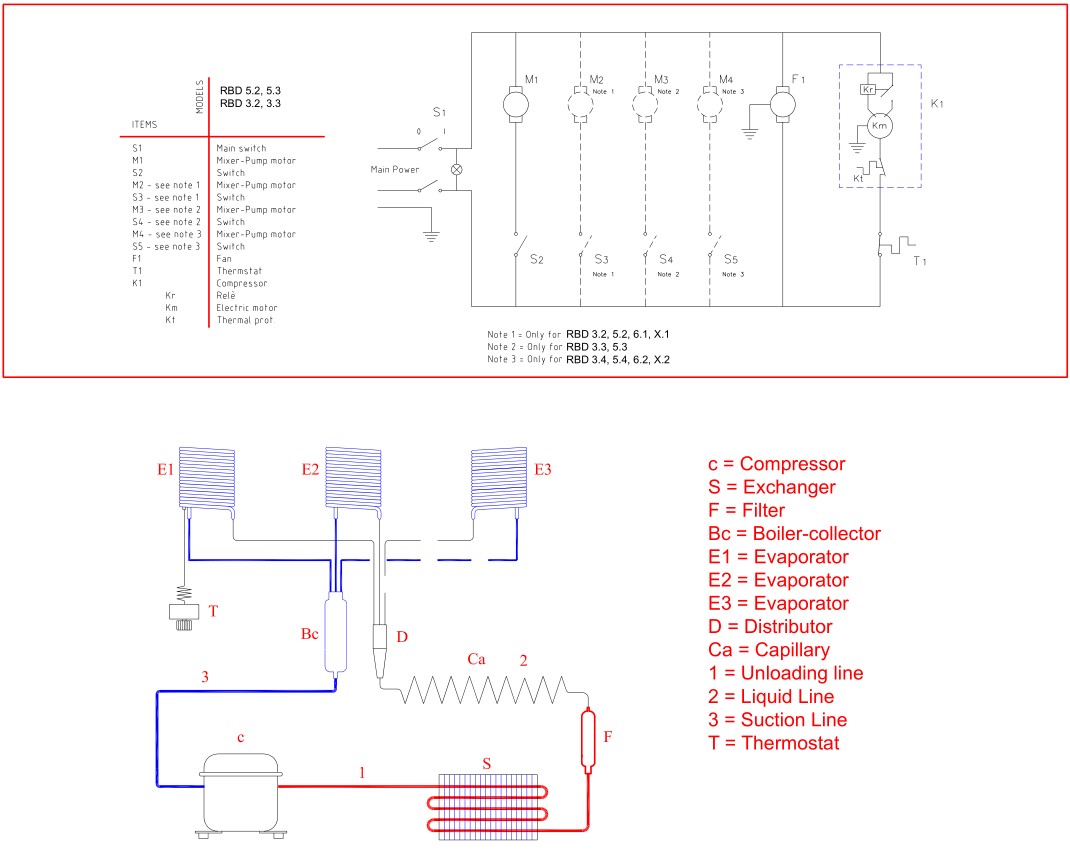
Wiring Diagram