Safety & Warnings
- Read all safety notes and instructions before first use even if you are familiar with this product. Retain this user guide for future reference.
- Use the product only as described in this user guide.
- Do not operate the microwave with the door open, as this can result in harmful exposure to microwave energy. Do not tamper with or disable the safety interlocks.
- Do not place any object between the front of the microwave and the door, and do not allow dirt or cleaning residue to build up on the sealing surfaces.
- If the door or door seals are damaged, do not operate the product. Contact help.Kogan.com for support.
- If the product is not kept in a clean condition, its surfaces may degrade, which can reduce the lifespan of the appliance and create a hazardous situation.
Important Safety Instructions
- Follow all instructions to reduce the risk of fire, electric shock, injury or exposure to excessive microwave energy.
- This appliance may be used by persons aged 8 years and over, and by persons with reduced physical, sensory or mental capabilities, only if they are supervised or instructed on the safe use of the appliance and understand the hazards involved.
- Children must not play with the appliance.
- Children must not perform cleaning or maintenance without supervision.
- Keep the appliance and its cord out of reach of children under 8 years of age.
- If the power cord is damaged, it must be replaced by Kogan.com, its service agent or a qualified technician to avoid hazards. Contact help.Kogan.com for support.
- Ensure the appliance is switched off before replacing the internal lamp to avoid electric shock.
- Only a competent technician may perform servicing or repairs involving removal of any cover that protects against microwave energy.
- Do not heat liquids or foods in sealed containers, as they may explode.
- Monitor the appliance when heating food in plastic or paper containers due to possible ignition.
- Use only microwave-safe utensils.
- If smoke is observed, switch off or unplug the appliance and keep the door closed to smother any flames.
- Microwave heating of beverages can cause delayed eruptive boiling. Handle containers with care.
- Always stir or shake the contents of baby food jars and feeding bottles and check the temperature before consumption.
- Do not heat eggs in the shell or hard-boiled eggs, as they may explode even after heating has finished.
- Clean the microwave regularly and remove any food deposits.
- Do not install the appliance behind a decorative door unless the product is specifically designed for it.
- Use only the temperature probe recommended for this model if one is supplied.
- Do not place the microwave inside a cabinet unless the product has been tested and approved for such installation.
- For models with a decorative door, the microwave must be operated with the decorative door open.
- This appliance is intended for household and similar use, including;
- staff kitchen areas
- hotel and motel rooms
- farmhouses
- bed-and-breakfast accommodation.
- This microwave is designed for heating food and beverages. Do not use it for drying food or clothing, or for heating warming pads, slippers, sponges, or damp cloths, as this can cause injury, ignition or fire.
- Do not use metallic containers for food or beverages during microwave cooking.
- Do not clean the appliance with a steam cleaner.
- This product is intended for freestanding installation only.
- Position the rear panel of the appliance directly against a wall.
Electrical Safety
- Do not disassemble the appliance. Internal components can cause severe electric shock.
- Improper grounding can result in electric shock. Do not plug the appliance into an outlet until it is properly installed and grounded.
- This appliance is equipped with a grounding wire and plug. Ensure the outlet is correctly installed and grounded.
- If you are unsure about grounding, consult a qualified electrician.
- If using an extension cord, it must be a 3-wire grounding type.
- A short power cord is provided to reduce the risk of tripping. If using a longer cord or extension cord, ensure the electrical rating meets or exceeds the appliance rating, the cord is a 3-wire grounded type, and the cord is positioned where it cannot be pulled by children or create a trip hazard.
Cleaning
- Unplug the appliance before cleaning.
- Clean the cavity with a slightly damp cloth after each use.
- Wash accessories in warm soapy water.
- Clean the door frame, seals and surrounding areas carefully with a damp cloth.
- Do not use harsh, abrasive cleaners or metal scrapers on the door glass, as this may scratch or weaken it.
- For easier cleaning, place half a lemon in 300ml of water and heat on full power for 10M minutes. Wipe dry with a soft cloth.
Utensils
- Refer to the ‘Operation’ section for utensils you can use in microwave ovens or avoid using in microwave. Some non-metallic utensils may still be unsafe.
- To test a utensil, place it empty in the microwave with 250ml of cold water in a separate microwave-safe container. Heat on maximum power for 1 minute. If the utensil becomes warm, it is not microwave-safe.
- Do not exceed 1 minute when performing this test.
Disposal
![]() This marking indicates that this appliance should not be disposed with other household wastes. To prevent possible harm to the environment or human health from uncontrolled waste disposal, recycle it responsibly to promote the sustainable reuse of material resources.
This marking indicates that this appliance should not be disposed with other household wastes. To prevent possible harm to the environment or human health from uncontrolled waste disposal, recycle it responsibly to promote the sustainable reuse of material resources.
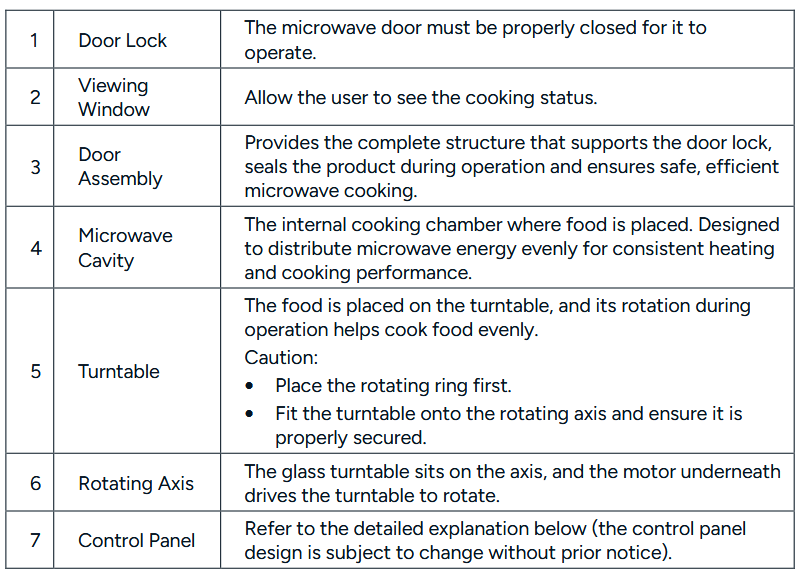
Components
Overview

Control Panel
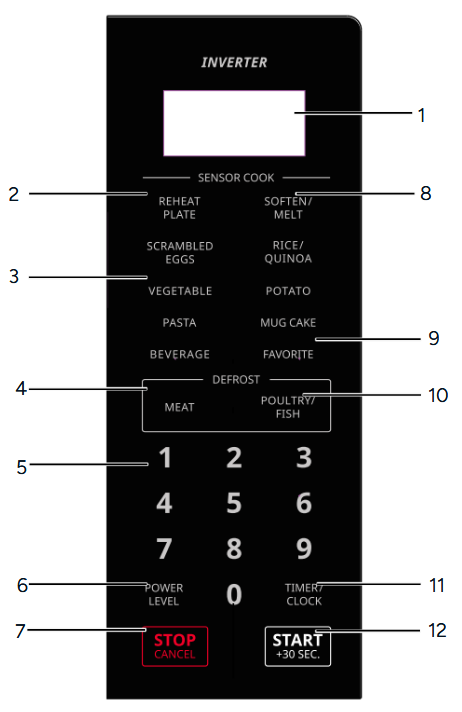
- Display Screen
- Reheat Plate Button
- Pre-set Menu Buttons
- Defrost Meat Button
- Number Buttons
- Power Level Button
- Stop/Cancel Button
- Soften/Melt Button
- Favorite Button
- Defrost Poultry/Fish Button
- Timer/Clock Button
- Start/+30Sec Button
Installation
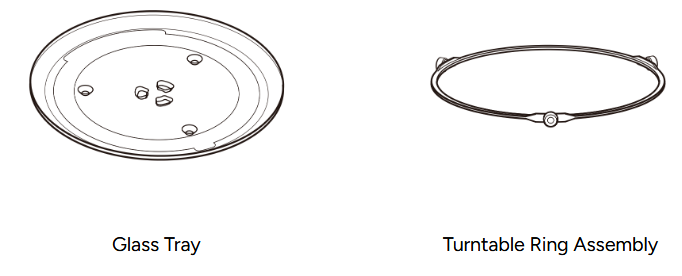
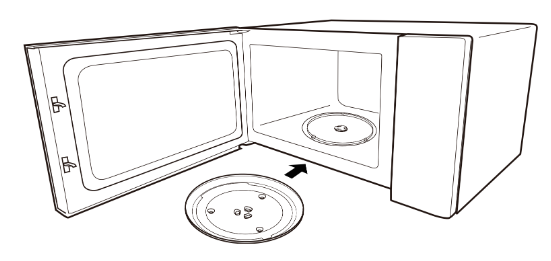
- Never place the glass tray upside down. The glass tray should never be restricted.
- Both glass tray and turntable ring assembly must always be used during cooking.
- All food and containers of food are always placed on the glass tray for cooking.
- If glass tray or turntable ring assembly cracks or breaks, contact your nearest authorised service centre.
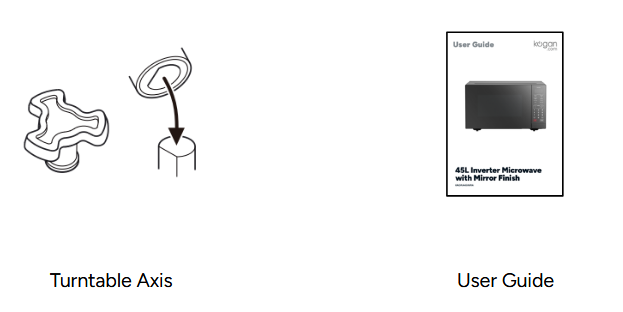
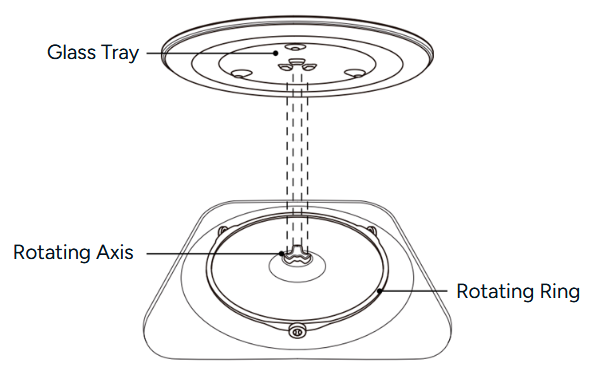
- Place the rotating ring over the rotating axis
- Place the glass tray on top of the rotating ring ensuring it aligns with the rotating axis.
Countertop Installation
- Do not remove the legs from the bottom of the appliance.
- Do not block the air intake or outlet vents, as restricted airflow can cause damage.
- Position the microwave as far away from radios and televisions as possible. Microwave operation may interfere with radio or TV reception.
- Do not install the microwave above a range cooktop or any other heat-producing appliance.
- The accessible surfaces of the appliance may become hot during operation.
- Remove all packaging material and accessories. Check the microwave for any visible damage such as dents or a damaged door. Do not install or use the product if any damage is found.
- Remove any protective film from the exterior surfaces of the microwave.
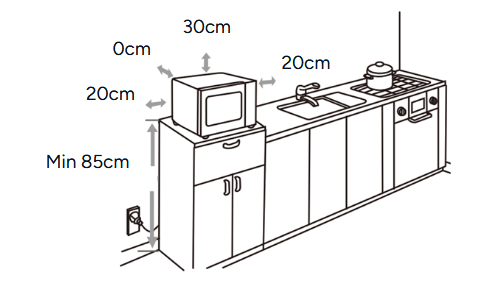
- Select a stable, level surface that provides sufficient space around the product for ventilation.
• The minimum installation height is 85cm.
• The rear panel of the appliance must be positioned directly against a wall.
• A minimum clearance of 30cm is required above the microwave, and at least 20cm must be left between the microwave and any adjacent walls. - Plug the microwave into a standard electrical outlet. Ensure the voltage and frequency match those stated on the rating label.
Operation
Setting the Clock
- The clock uses a 12-hour display. Press the ‘Timer/Clock’ button twice and then ‘00:00’ will display.
- Enter the time using the ‘Number’ buttons. For example, to set 12:10, press ‘1, 2, 1, 0’.
- Press the ‘START/+30s’ button again to confirm. The clock is set.
- To reset the clock, repeat steps 1 to 3.
Notes:
- If the clock is not set, it will not function during operation.
- During the process of clock setting, pressing the ‘STOP/Clear’ button will go back to the previous state.
Setting the Kitchen Timer
- Press the ‘Timer/Clock’ button once and ‘00:00’ will display.
- Use the ‘Number’ buttons to set the required time, up to the maximum value of ‘99:99’.
- Press the ‘START/+30s’ button to confirm. The timer will begin counting down.
- To reset the clock, please repeat step 1 to step 3.
- Press the ‘STOP/Clear’ button to cancel the kitchen timer.
- Clear if you make a mistake during programming.
Microwave Cooking
- This microwave provides 11 power levels from 100% to 0%, displayed as ‘1200’ to ‘P10’.
- You can program up to 99 minutes, 99 seconds.
- After cooking, the fan will continue to operate. Press the ‘STOP/ CLEAR’ button to stop the fan. If a power level is not selected, then 1200W is automatically used.
1. Use the ‘Number’ buttons to enter the cooking time, up to a maximum of ‘99:99’.
2. Press the ‘START/+30s’ button to begin cooking.

Example: Suppose you want to cook Fish Fillets for 10 minutes on 700W power.
- Press the ‘Power Level’ button 6 times (display will show ‘700’).
- Press the ‘START/+30s’ button.
- Use the ‘Number’ buttons to enter the cooking time, up to a maximum of ‘99:99’.
- Press the ‘START/+30s’ button to begin cooking.
- If the door is opened during cooking, the cooking time on the display automatically stops.
- To continue cooking, close the door and press the ‘START/+30s’ button.
Sequence Cooking
Your microwave can be programmed with up to 4 manual cooking sequences. Each stage will run automatically in the order programmed. This allows you to switch from one power level to another during a single cooking cycle.
Example: Cook for 10 minutes at 70% power, followed by 3 minutes at 100% power.
- Press the ‘Microwave’ button repeatedly to select ‘P70’.
- Press the ‘Start/+30Sec’ button to confirm the power level.
- Enter ‘1-0-0-0’ using the ‘Number’ buttons to set 10 minutes of cooking time.
- Press the ‘Microwave’ button repeatedly to select ‘P100’.
- Press the ‘Start/+30Sec’ button to confirm the power level.
- Enter ‘0-3-0-0’ using the ‘Number’ buttons to set 3 minutes of cooking time.
- Press the ‘Start/+30Sec’ button to begin the full sequence.
- The timer will count down the first programmed stage. When it reaches 0, the second stage will begin automatically and the timer will count down again until the full sequence is complete.
Quick Heat Function
- With the microwave in Standby mode and the door closed, press the ‘Start/+30Sec’ button once to begin cooking at full power for 30 seconds. Each additional press adds 30 seconds, up to a maximum time of ‘99:99’.
- Alternatively, enter a cooking time using the ‘Number’ buttons and then press the ‘Start/+30Sec’ button to cook at full power.
- During microwave cooking or time-based defrosting, pressing the ‘Start/+30Sec’ button will add an extra 30 seconds. This does not apply to Defrost by Weight programs or Auto Menu functions.
Increasing Time During a Cooking Programme
Additional cooking time can be added during a manual cooking program by using the ‘Start/+30Sec’ button.
Example: You want to increase the cooking time by 2 minutes while cooking at 70% power for 5 minutes, and the remaining time is currently 1 minute 30 seconds.
- Select the required power level by pressing the ‘Microwave’ button repeatedly until ‘P70’ appears.
- Press the ‘Start/+30Sec’ button to confirm the power level.
- Enter the desired cooking time using the ‘Number’ button.
- Press the ‘Start/+30Sec’ button to begin cooking.
- Press the ‘Start/+30Sec’ button 4 times to add 2 minutes of additional cooking time.
Notes for Automatic Operations
- Wipe any moisture from the outside of cooking containers and from the interior of the microwave with a dry cloth or paper towel before using any automatic cooking menu.
- After the microwave is plugged in, wait 2 minutes before using any automatic cooking menu.
- When cooking small quantities of food using an automatic program, the food may cook without the Display Screen showing the remaining time or requiring any further user operation.
- Always follow the instructions provided for each automatic menu to achieve the best cooking results.
- If the instructions are not followed, food may be overcooked or undercooked. Ensure all steps are followed carefully.
- Food weighing more or less than the recommended weight for a specific automatic menu should be cooked manually using manual cooking settings.
- Final cooking results may vary depending on the condition of the food (such as initial temperature, shape or quality). Check the food after cooking and continue cooking manually if required.
- After cooking has finished, the cooling fan may continue to operate. Press the ‘STOP/ECO’ button if you wish to stop the fan while it is operating.
Automatic Sensor Cooking
- The microwave will automatically calculate the required power level and cooking time when using sensor-based automatic menus. These menus are divided into four categories.
- To select an automatic sensor menu, press the desired sensor menu button repeatedly until the menu you want appears on the Display Screen. Follow the instructions provided for each sensor menu to ensure the best cooking
results.
Example: Cooking 2 Jacket Potatoes Using an Automatic Sensor Menu
- Press the ‘Potato’ button once to select the correct menu.
- Press the ‘Start/+30Sec’ button to begin cooking.
- When the sensor detects steam from the food, the remaining cooking time will appear on the Display Screen (for example, approximately 4 minutes 36 seconds).
- When it is time to turn the food, the microwave will beep four times and the remaining time will begin blinking.
- Open the door and turn the potatoes over.
Opening the door will pause cooking and stop the blinking display.
Close the door once the food has been turned. - Press the ‘Start/+30Sec’ button to resume cooking.
The timer will continue counting down.
When the cooking time reaches zero, the microwave will beep five times and stop.
Note:The “beep” will repeat every 30 seconds up to 2 minutes or the door is opened. The cooking will not stop until the door is opened. If the door is not opened within 2 minutes, the oven will continue to cook and the display will stop blinking.
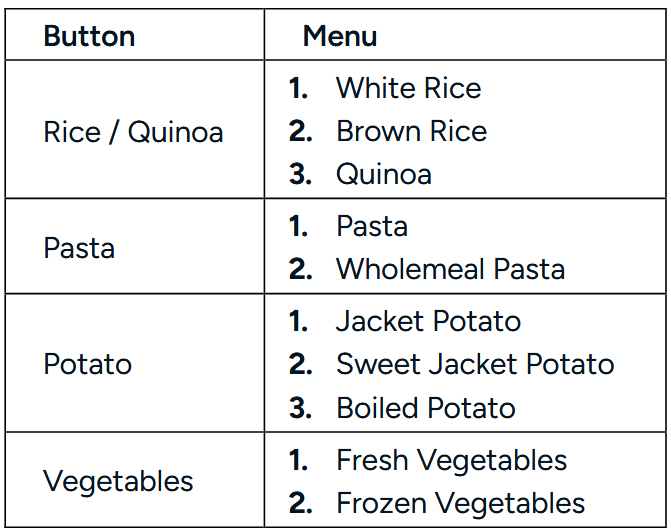
Pre-Set Menu
The microwave provides several Pre-set Menu programs that automatically adjust cooking time based on food type and weight.

Example: Melting 250g of chocolate
- Press the ‘Melt/Soften’ button repeatedly until the chocolate menu appears on the Display Screen.
- Press the ‘Start/+30Sec’ button to confirm the menu.
- Use the ‘Number’ buttons to enter the weight.
- Press the ‘Start/+30Sec’ button to begin cooking. The timer will begin counting down.
- When it is time to stir the food, the microwave will beep 4 times and the remaining time will begin blinking on the Display Screen.
- Open the door and stir the chocolate. Close the door once stirring is complete.
- Press the ‘Start/+30Sec’ button to resume cooking. When the cooking time reaches ‘0’, the microwave will beep five times and stop.
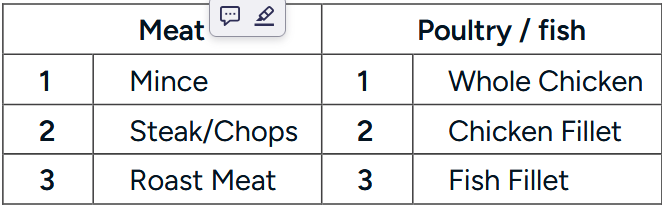
Defrost Menu
The Defrost Menu provides automatic programs for different types of meat and poultry. The microwave will calculate the required power level and defrosting time based on the food type and weight.
Example: Defrosting a 1.5 kg whole chicken
- Press the ‘Poultry/Fish’ button repeatedly until the ‘Whole Chicken’ menu appears on the Display Screen.
- Press the ‘Start/+30Sec’ button to confirm the menu.
- Use the ‘Number’ buttons to enter the weight.
- Press the ‘Start/+30Sec’ button to begin defrosting. The timer will begin counting down.
- When it is time to turn the food, the microwave will beep 4 times and the remaining time on the Display Screen will begin blinking.
- Open the door and turn the chicken over. Opening the door pauses defrosting and stops the blinking display. Close the door once the food has been turned.
- Press the ‘Start/+30Sec’ button to resume defrosting.
Favourite
The Favourite function allows you to store 3 frequently used microwave power levels and cooking times to make every day heating and cooking more convenient.
Example: Save a Favourite 2 program to cook food for 3 minutes and 20 seconds at 800W.
- Press the ‘Favourite’ button twice to select Favourite 2.
- Select the desired power level by pressing the ‘Power Level’ button repeatedly until ‘P80’ appears
- Press the ‘Start/+30Sec’ button to confirm the power level.
- Enter ‘3 2 0’ using the ‘Number’ buttons to set 3 minutes and 20 seconds.
- Press the ‘Start/+30Sec’ button to save the setting as Favourite 2.
- Press the ‘Start/+30Sec’ button again to operate the saved Favourite 2 program.
- If a Favourite program has already been saved, pressing the ‘Start/+30Sec’ button after selecting it will immediately start the stored sequence.
- Each Favourite can store 1 or 2 manual cooking stages.
Child Lock
Child Lock prevents accidental operation of the microwave by disabling all buttons.
To activate Child Lock:
- Ensure the microwave is in Standy Mode.
- Press and hold the ‘0’ button for 3 seconds. A beep will sound and the lock icon will appear on the Display Screen.
To deactivate Child Lock: Press and hold the ‘STOP/Clear’ button for 3 seconds. A beep will sound and the lock icon will disappear, restoring normal operation.
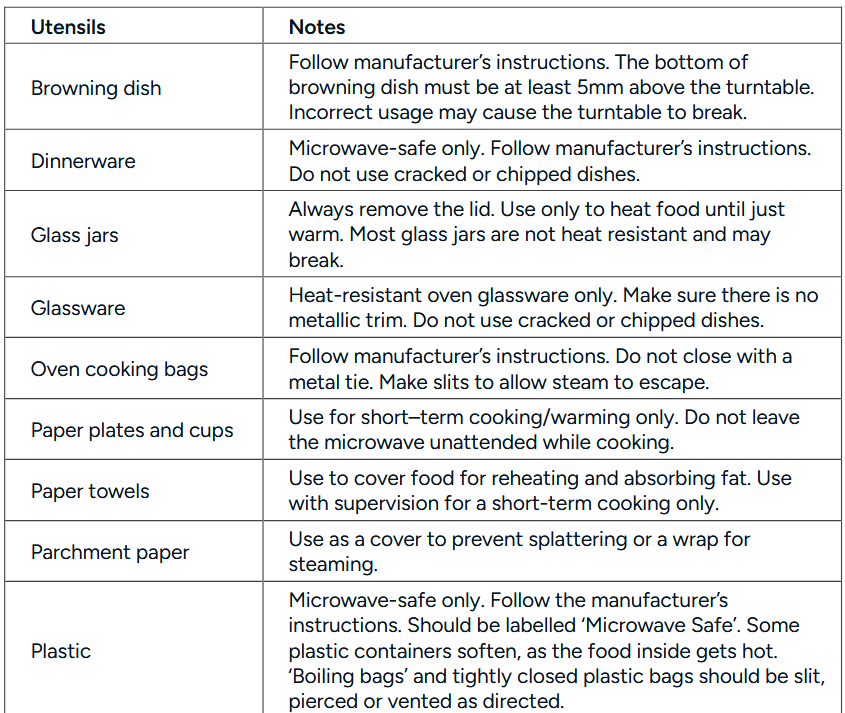
Utensils Guideline
Use only containers that are suitable and safe for microwave cooking. Heat-resistant ceramic, glass, and plastic containers are recommended. Never use metal containers, as sparks may occur.

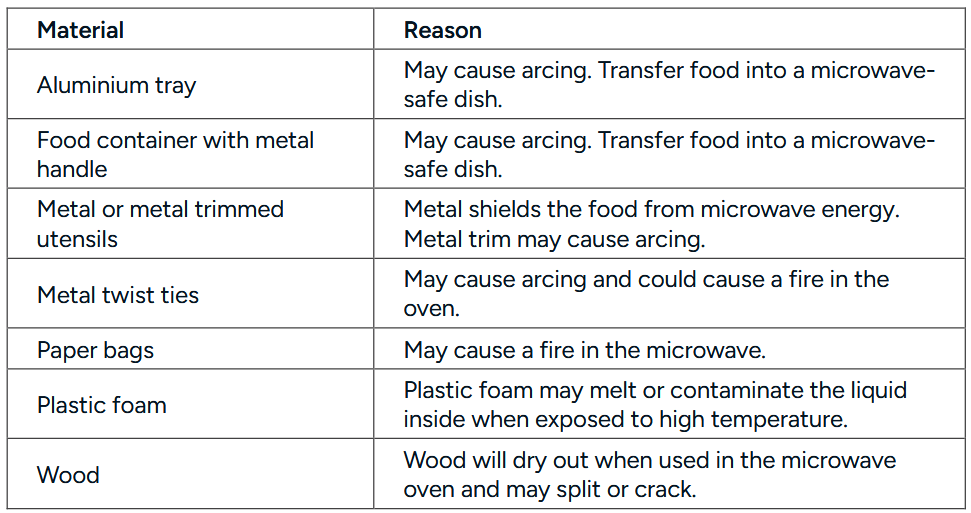
Materials to Avoid
Cooking Tips
The following factors may affect the cooking result:
- Food arrangement: Place thicker areas toward the outside of the dish and thinner parts toward the centre. Spread food evenly and avoid overlapping if possible.
- Cooking time length: Start with a short cooking time, evaluate the food after it times out, and extend the cooking time as needed. Overcooking may cause smoke or burns.
- Cooking food evenly: Foods like chicken, hamburgers, or steak should be turned once during cooking. For other foods, stir from the outside toward the centre of the dish once or twice, if applicable.
- Allow standing time: After the cooking time ends, leave the food in the microwave for an adequate period. This allows the cooking cycle to complete and the food to cool gradually.
Determining if the Food is Done
Use the colour and texture of food to assess doneness:
- Steam is released evenly from all parts of the food, not just the edges
- Poultry joints move easily.
- Pork or poultry shows no signs of blood.Microwave-Safe Plastic Wrap
- Fish is opaque and flakes easily with a fork.
Browning Dish
When using a browning dish or self-heating container, always place a heat-resistant insulator, such as a porcelain plate, underneath to prevent damage to the turntable and rotating ring.
Microwave-Safe Plastic Wrap
When cooking food with high-fat content, ensure the plastic wrap does not come into contact with the food to avoid melting.
Microwave-Safe Plastic Cookware
Some microwave-safe plastic cookware may not be suitable for cooking foods with high fat or sugar content. Additionally, do not exceed the preheating time specified in the dish’s instruction manual.
Cleaning & Care
WARNING: After use, clean the waveguide cover by wiping it with a damp cloth, then dry it thoroughly with a dry cloth to remove any food splashes or grease. Accumulated grease can overheat, potentially causing smoke or fire.
Microwave Care
- The microwave should be cleaned regularly, and food deposits should be removed.
- Disconnect the power cord from the electrical outlet before cleaning. Allow the microwave to cool completely. Do not immerse the appliance in water or other fluids.
- Failure to maintain cleanliness may deteriorate the oven’s surface, reducing its lifespan and potentially creating a hazardous situation.
- Avoid using harsh detergents, gasoline, abrasive powders, or metal brushes on any part of the appliance.
- Do not remove the waveguide cover,
- To remove odours from extended use, try the following methods:
- Place several lemon slices in a cup and heat on high power for 2–3 minutes.
- Place a cup of red tea in the microwave and heat on high power.
- Put some orange peel in the microwave and heat on high power for 1 minute.
- When not in use, store the microwave in a dry, ventilated area.
Cleaning
- Exterior: Wipe the enclosure with a damp, soft cloth.
- Door
- Wipe the door and window with a damp, soft cloth.
- Clean the door seals and adjacent parts to remove spills or splatters.
- Wipe the control panel with a slightly dampened soft cloth.
- Interior Walls
- Wipe the interior surfaces with a damp, soft cloth.
Specifications
Rated Voltage/Frequency : 230-240 V~ 50Hz
Microwave Input : 1800W
Microwave Output :1200W
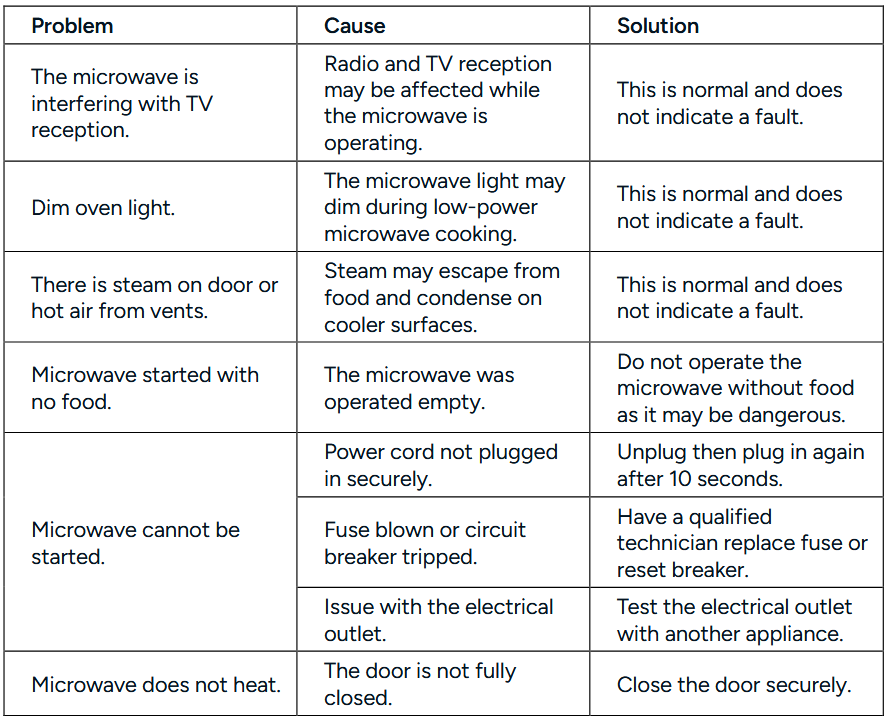
Troubleshooting
Need more information?
We hope that this user guide has given you the assistance needed for a simple set-up.
For the most up-to-date guide for your product, as well as any additional assistance you may require, head online to help.Kogan.com.