Instruction Manual of PeakTech
5310 PH Meter
Safety Precautions
This product complies with the requirements of the following directives of the European Union for CE conformity: 2014/30/EU (electromagnetic compatibility), 2011/65/EU (RoHS). Pollution degree 2.
To ensure safe operation of the equipment, the following safety precautions must be observed.
Damages resulting from failure to observe these safety precautions are exempt from any legal claims whatever.
- Do not place water filled containers on the equipment (danger of shortcircuit in case of knock over of the container).
- Do not operate the equipment near strong magnetic fields (motors, transformers etc.).
- Do not operate the meter before the cabinet has been closed.
- Check instrument and accessories for any damages.
- Comply with the warning labels and other info on the equipment.
- Do not subject the equipment to direct sunlight or extreme temperatures, humidity or dampness.
- Do not subject the equipment to shocks or strong vibrations.
- Keep hot soldering irons or guns away from the equipment.
- Allow the equipment to stabilize at room temperature before taking up measurement (important for exact measurements).
- Replace the battery as soon as the battery indicator “BAT” appears. With a low battery, the meter might produce false readings.
- Fetch out the battery when the meter will not be used for long period.
- Periodically wipe the cabinet with a damp cloth and mid detergent. Do not use abrasives or solvents.
- The meter is suitable for indoor use only
- Do not store the meter in a place of explosive, inflammable substances.
- Do not modify the equipment in any way.
- Opening the equipment and service – and repair work must only be performed by qualified service personnel
- Measuring instruments don’t belong to children hands.
Cleaning the cabinet
Clean only with a damp, soft cloth and a commercially available mild household cleanser. Ensure that no water gets inside the equipment to prevent possible shorts and damage to the equipment.
1.1. Features
- Digital bench PH meter, general purpose applications,
- easy operation and compact size
- Large 3 ½ – digit LCD display
- Calibration and adjustments at ph7 with build in potentiometer.
- Application: Education, School, Colleges, Laboratory, Industrial and Quality control
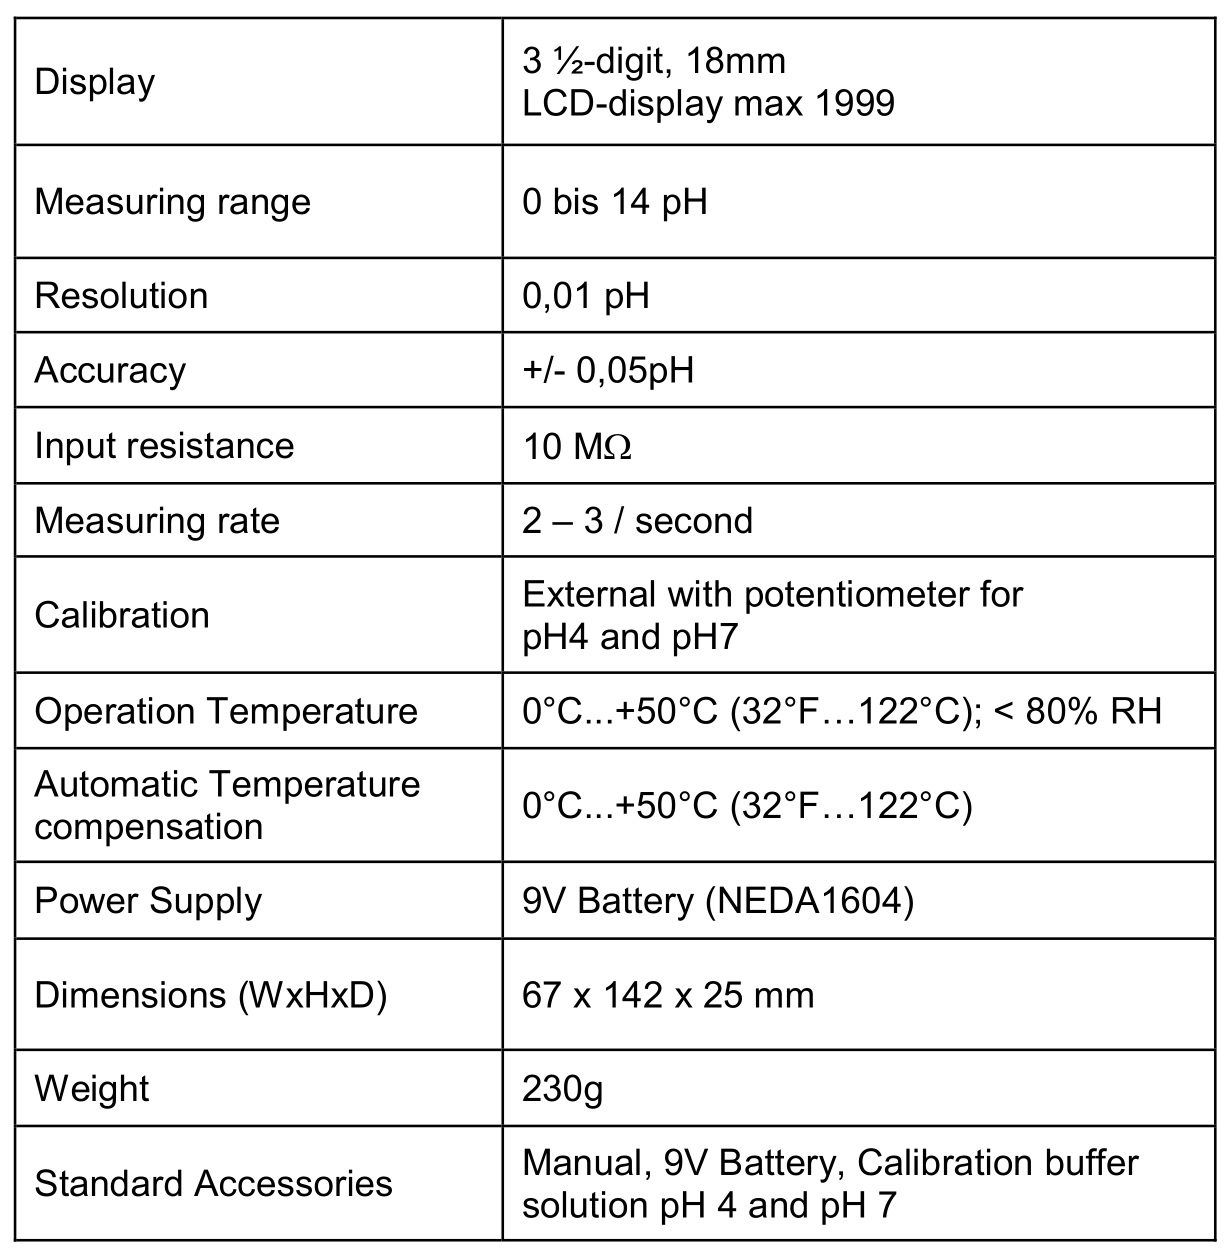
Specifications
Front Panel Description
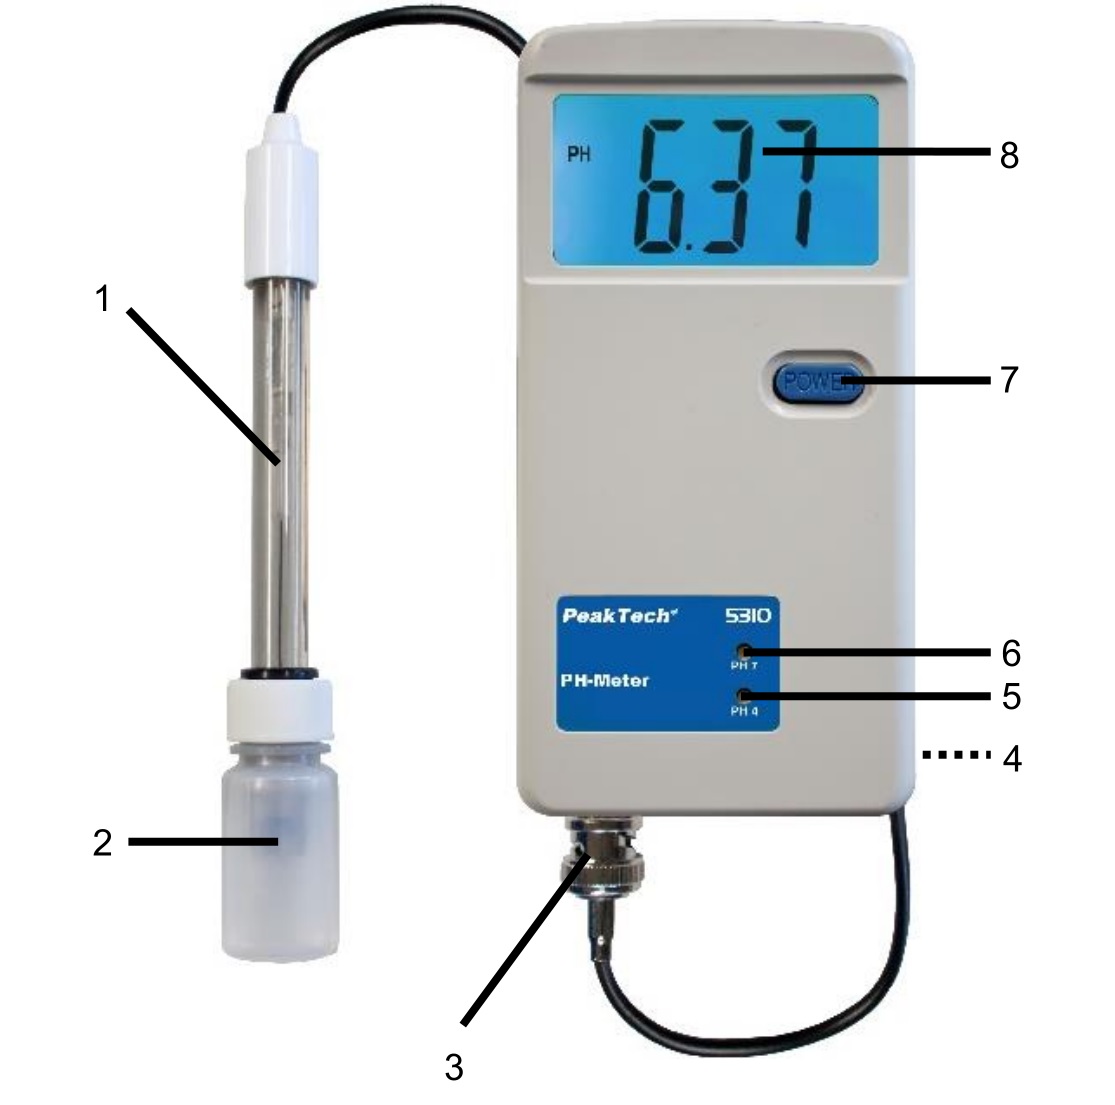
- PH-Electrode
- containers designed for cleaning – or calibration buffer solution
- BNC-socket for PH-Electrode
- Battery compartment
- Potentiometer for adjustment of PH-4
- Potentiometer for adjustment of PH-7
- Power switch
- Display
PH Calibrating Procedure
4.1. Calibrating Consideration
This pH meter was calibrated by a mV signal, which was simulated from the ideal mV query of the pH electrode (on the basis of an environment of 25°C).
Has to be considered:
a) An ideal electrode produces 0 mV at a value of pH = 7.0, however, most electrodes differ slightly.
b) The temperature of the measurement environment is not always about 25°C, but mostly between 15°C and 35°C.
Under certain circumstances it is necessary to carry out the following calibration procedure to adjust the electrode of the instrument to the maximum accuracy.
Important:
The instrument’s pH range must be re-calibrated whenever:
- The electrode has been used (laid) for long time from the last calibration
- The electrode has been used in particularly taxing conditions.
- The utmost accuracy is required.
- After replacing the new electrode
4.2. Calibration
- Pour a small quantity of ph 6.86, ph 4.01 and ph 9.18 solution into clean beakers.
- For a particularly accurate calibration, it is advised to use two beakers for each buffer solution; the first is to be used for rinsing the electrode, the second is to be used for the calibration. In this way, the risks of contaminating the buffer solution are reduced to a minimum.
PH7
3.) Switch on the instrument.
4.) Immerse the pH electrode into a standard buffer solution with pH = 6.86.
5.) Stir slowly the electrode in the solution until you get a stable reading.
6.) Use a small screwdriver (supplied) to adjust the calibration trimmer (PH7) at the front of the instrument until the display shows “6.86”.
7.) Rinse the electrode with distilled water.
PH4
8.) Immerse the pH electrode into a standard buffer solution with pH = 4.01.
9.) Stir slowly the electrode in the solution until you get a stable reading.
10.) Use a small screwdriver (supplied) to adjust the calibration trimmer (PH4) at the front of the instrument until the display shows “4.01”.
11.) Rinse the electrode with distilled water.
PH9
12.) Immerse the pH electrode into a standard buffer solution with pH = 9.18.
13.) Stir slowly the electrode in the solution and wait for the reading stabilized until it displays 9.18.
14.) Rinse the electrode with distilled water.
15.) The calibration for the instrument is now complete.
4.3. Measuring Procedure
After the calibration of the measuring device and the pH electrode, the device is ready for measuring.
- Connect the combined-type electrode.
- Remove the protective cap.
- Turn on the meter by pressing the ON / OFF button.
- Immerse the electrode in the solution to be measured.
- Stir gently the electrode in the solution until you get a stable reading.
- After you make a measurement, rinse the electrode with distilled water to minimize contamination! Then dry them with filter paper.
- Replace the protective cap and turn off the meter.
Replacement of Battery
- When the LCD shows “BAT”-symbol in the left corner, the battery must be replaced. However, measurements of the spectrum can also be made a few hours after the appearance of the low battery indication before the instrument become inaccurate.
- Remove the battery cover on the rear side of the device.
- Take out the old battery and insert new 9V-battery (9V NEDA 1604 or equivalent) according to the polarity.
- Replace the battery compartment cover back on.
Statutory Notification about the Battery Regulations
The delivery of many devices includes batteries, which for example serve to operate the remote control. There also could be batteries or accumulators built into the device itself. In connection with the sale of these batteries or accumulators, we are obliged under the Battery Regulations to notify our customers of the following:
Please dispose of old batteries at a council collection point or return them to a local shop at no cost. The disposal in domestic refuse is strictly forbidden according to the Battery Regulations. You can return used batteries obtained from us at no charge at the address on the last side in this manual or by posting with sufficient stamps.
![]() Batteries, which contain harmful substances, are marked with the symbol of a crossed-out waste bin, similar to the illustration shown left. Under the waste bin symbol is the chemical symbol for the harmful substance, e.g. „Cd“ for cadmium, „Pb“ stands for lead and „Hg“ for mercury.
Batteries, which contain harmful substances, are marked with the symbol of a crossed-out waste bin, similar to the illustration shown left. Under the waste bin symbol is the chemical symbol for the harmful substance, e.g. „Cd“ for cadmium, „Pb“ stands for lead and „Hg“ for mercury.
You can obtain further information about the Battery Regulations from the (Federal Ministry of Environment, Nature Conservation and Reactor Safety).
All rights, also for translation, reprinting and copy of this manual or parts are reserved. Reproductions of all kinds (photocopy, microfilm or other) only by written permission of the publisher.
This manual is according the latest technical knowing. Technical alterations reserved.
We herewith confirm that the units are calibrated by the factory according to the specifications as per the technical specifications.
We recommend to calibrate the unit again, after 1 year.
© PeakTech® 08/2021 Po./Ehr.
PeakTech Prüf- und Messtechnik GmbH
– Gerstenstieg 4 – DE-22926 Ahrensburg / Germany
![]() +49-(0) 4102-97398 80
+49-(0) 4102-97398 80 ![]() +49-(0) 4102-97398 99
+49-(0) 4102-97398 99