
Instruction Manual of MEEC TOOLS 019803 12V
Compact Circular Saw

OPERATING INSTRUCTIONS
![]() Important! Read the user instructions carefully before use. Save them for future reference. (Translation of the original instructions)
Important! Read the user instructions carefully before use. Save them for future reference. (Translation of the original instructions)
Jula reserves the right to make changes.
For latest version of operating instructions, see www.jula.com
JULA AB, BOX 363, SE-532 24 SKARA
2022-11-21
© Jula AB
![]()
DECLARATION OF CONFORMITY
Item number
019803
![]()
Jula AB, Box 363, SE-532 24 SKARA, SWEDEN
This declaration of conformity is issued under the sole responsibility of the manufacturer.
CIRCULAR SAW
Conforms to the following directives, regulations and standards:

This product was CE marked in year
Skara 2021-11-04 ![]()
Mattias Lif
BUSINESS AREA MANAGER
(Signatory for Jula and authorised to compile the technical documentation.
SAFETY INSTRUCTIONS
WARNING!
Read all warnings, safety instructions and other instructions carefully before use. Failure to follow all the instructions and safety instructions can result in the risk of electric shock, fire and/or serious personal injury.
WORK AREA
- Keep the work area clean and well lit. Dark and cluttered work areas increase the risk of accidents and injuries.
- Do not use power tools in explosive environments, such as in the vicinity of flammable liquids, gas or dust. Power tools produce sparks that can ignite dust and fumes.
- Keep children and onlookers at a safe distance when using power tools. You can easily lose control of the tool if you are distracted.
ELECTRICAL SAFETY
- The plug on the power tool must match the power point. Never modify the plug in any way. Never use an adapter with earthed power tools. Unmodified plugs and matching power points reduce the risk of electric shock.
- Avoid body contact with earthed surfaces such as pipes, radiators, cookers and refrigerators. There is an increased risk of electric shock if your body is earthed.
- Do not expose power tools to rain or moisture. There is a greater risk of electric shock if water gets into a power tool.
- Be careful with the power cord. Never use the power cord to carry or pull the tool, or to pull out the plug from the power point. Keep the power cord away from heat, oil, sharp edges and moving parts. Damaged or tangled power cords increase the risk of electric shock.
- If the tool is used outdoors, only use an extension cord approved for outdoor use. Cords intended for outdoor use reduce the risk of electric shock.
- If it is absolutely necessary to use power tools in damp conditions, use a power point protected by a residual current device. Using an RCD reduces the risk of electric shock.
PERSONAL SAFETY
- Stay alert. Pay attention to what you are doing, and use your common sense when working with power tools. Never use power tools if you are tired or under the influence of drugs, alcohol or medication.
A moment of inattention when using a power tool can result in serious personal injury. - Use personal safety equipment. Wear safety glasses.
- Depending on the type of tool and how it is used, safety equipment such as dust masks, non-slip safety shoes, safety helmets and ear protection reduce the risk of personal injury.
- Never saw in asbestos.
- Dust from oak, ash and other types of wood can be carcinogenic. Use a dust mask and ensure there is adequate ventilation.
- Avoid accidental starting. Check that the power switch is in the OFF position before plugging in the power cord and/or the battery, or lifting/carrying the tool. Carrying a power tool with your finger on the switch, or connecting a tool to the mains supply when the switch is in the ON position, increases the risk of accidents and injuries.
- Remove adjuster keys/spanners etc. before starting the tool.
- Spanners or the like that are left in a rotating part of the tool can cause personal injury.
- Do not overreach. Always maintain a firm footing and good balance. This will ensure you have better control over the tool in unexpected situations.
- Wear suitable clothing. Do not wear loose-fitting clothing or jewellery. Keep your hair, clothing and gloves away from moving parts. Loose-fitting clothing, jewellery and long hair can get caught in moving parts.
- If dust extraction and dust collection equipment is available, this should be connected and used correctly. The use of such devices can reduce the risk of dust-related problems.
USING AND LOOKING AFTER POWER TOOLS
- Do not force the power tool. Use the correct power tool for the planned work. The tool does the job better and safer when used at the rate for which it was designed.
- Do not use the tool if it cannot be switched on and off with the power switch. Power tools that cannot be controlled with the power switch are dangerous and must be repaired.
- Unplug the power cord before making any adjustments, changing accessories or putting the power tool away. These safety precautions reduce the risk of accidently starting the power tool.
- Store power tools out of the reach of children when not in use. Never allow children, or anyone who is unfamiliar with the power tool and these instructions, to use the tool. Power tools are dangerous if used by inexperienced persons.
- Keep power tools properly maintained. Check that moving parts are properly adjusted and do not jam, and that no
parts are incorrectly fitted or damaged. Check for other factors that could affect functionality. If the power tool is damaged, it must be repaired before being used again. Many accidents are caused by poorly maintained power tools. - Keep cutting tools sharp and clean. Properly maintained cutting tools with sharp cutting edges are less likely to jam and are easier to control.
- Use the power tool, accessories and bits etc., in accordance with these instructions, taking into account the actual working conditions and the work that is to be done. It can be dangerous to use power tools for purposes other than those they are intended to be used for.
USING AND MAINTAINING BATTERY-POWERED TOOLS
- Charge the batteries only with the charger recommended by the manufacturer. The use of another charger can result in the risk of personal injury and fire.
- Only use batteries intended for the power tool. The use of other batteries can result in the risk of personal injury and fire.
- Do not allow batteries to come into contact with paper clips, coins, keys, nails, screws and other small metal objects that can result in short circuiting.
- Short circuiting the battery terminals can result in the risk of burn injuries or fire.
- Incorrect use can cause liquid to leak from the battery. Avoid touching this. Rinse with water after unintentional contact.
Seek medical attention if you get battery fluid in your eyes. Leaking battery fluid can cause skin irritation or burn injuries.
SERVICE
- The power tool must only be serviced by qualified personnel using identical spare parts. This will ensure that the power tool remains safe to use.
- Never attempt to repair damaged batteries. The battery must only be serviced by the manufacturer or at an authorised service centre.
SAFETY INSTRUCTIONS FOR CIRCULAR SAW
- Never use grinding discs.
- Keep your hands away from the cutting area and blade. If you hold the tool with both hands, they cannot come into contact with blade.
- Do not put your hand under the workpiece. The guard does not protect you from the blade under the workpiece.
- Adjust the cutting depth to the thickness of the workpiece. Slightly less than one full tooth on the blade should be visible below the workpiece.
- Never hold the workpiece in your hands or across your legs. Secure the workpiece on a stable surface. It is important to support the workpiece properly so that body contact is minimised, the blade does not jam, and you do not lose control.
- Hold the power tool by the insulated grips when working in areas where it may come into contact with concealed electrical cables or its own power cord. Contact with a live cable will cause the metal parts on the tool to also become live – risk of electric shock.
- Always use a fence or guide rail to obtain a straight cut when sawing. This makes the cut more precise and reduces the risk of the blade jamming.
- Always use blades with the correct size and shape of centre hole (rhomboidal or round). Blades that do not fit properly on the tool will run eccentrically, which makes them more difficult to control.
- Never use damaged or defective washers or screws for the blade. Blade washers and screws are specially designed for the
tool to ensure optimum functionality and maximum safety. - Never lock, or block the blade guard. If the blade guard is not working properly it must be repaired before using the tool.
- If the spring for the blade guard is damaged it must be replaced before using the tool.
- Never remove the riving knife The gap between the sole plate and the riving knife should not be more than 5 mm. The difference in height between the sole plate and the riving knife should not be more than 5 mm.
- Do not use high-speed steel blades.
- Do not use blades that are warped or damaged.
- Only use saw blades that comply with the specifications in these instructions.
- Remove any nails, screws and other metal objects from the workpiece before sawing.
- Allow the blade to reach maximum speed before applying it to the workpiece.
- Brace the workpiece firmly. Do not work on workpieces that are too small to be firmly secured.
- Switch off the tool and wait until all moving parts have completely stopped before putting down the tool.
- Never attempt to brake the saw blade by pressing it to the side.
- Pull out the plug when the tool is not in use.
- Do not use blades that are thicker than the riving knife.
- Do not use blades with a tooth width less than the width of the riving knife.
- Only use blades with the correct size and shape of centre hole to fit the tool axle.
Risk of kickback
– Sudden kickback can occur when the saw blade gets stuck, jams or is incorrectly adjusted, whereby the
saw kicks back up from the workpiece towards the user.
– If the blade jams, or gets caught in a cut that is squeezed together, it will lock and the power of the motor can cause the saw to kick back towards the user.
– If the blade is twisted, or comes out of alignment in the cut, the teeth on the back edge of the blade can cut into the surface of the workpiece, so that the blade jerks out of the cut and kicks back towards the user.
– Kickback occurs during incorrect use of the tool and/or incorrect working methods or conditions, but can be prevented by taking the following measures.
- Hold the tool firmly with both hands and hold your arms in a position that prevents kickback. Stand to the side of the blade, not in line with it. Kickback can cause the tool to jerk backwards, but the user can control this by taking the appropriate measures.
- If the blade jams, or the sawing action is interrupted for any reason, release the power switch and hold the saw still in the material until the blade has completely stopped. Never attempt to remove the saw from the workpiece, or pull the saw back, while the blade is still moving – otherwise kickback can occur. Check and rectify the reason why the blade has jammed.
- When restarting the tool in the workpiece, centre the blade in the kerf and check that the teeth are not gripping the material. If the blade jams it can slip or kick back from the workpiece when the saw is started again.
- Support large boards to minimise the risk of kickback or the blade jamming. Large boards often sag under their own weight. Supports must be placed under the board on both sides, close to the cutting line and close to the edge of the board.
- Do not use blunt or damaged blades. Poorly sharpened or incorrectly adjusted blades produce narrow saw cuts, which generate excessive friction and cause the blade to jam or kick back.
- The locking devices for the depth and angle of the blade must be tightened and secured before you start sawing. If the adjustment of the blade changes during the sawing there is a risk of the blade jamming or kicking back.
- Take extra care when plunge cutting in walls or other similar areas where you cannot see what lies behind. The protruding blade may strike objects that can cause kickback.
BOTTOM HINGED GUARD
- Check that the bottom guard is closed before use. Do not use the saw if the guard does not move freely and immediately closes around the blade. Never lock or block the guard in the open position. If you accidently drop the saw this could bend the guard. Lift up the bottom guard with the handle and check that it moves freely in all sawing depths and angles, and does not touch the blade or any other part.
- Check that the spring on the bottom guard works. If the guard and the spring do not function correctly they must be repaired before use. The bottom guard can get stiff as a result of damaged parts, tacky deposits or the accumulation of debris.
- The bottom guard must only be moved back manually for special applications, e.g. plunge sawing and combination sawing. Lift up the bottom guard by moving back the handle. The bottom guard must be released as soon as the blade comes into contact with the workpiece. The bottom guard will function automatically for all other types of sawing.
- Always check that the bottom guard covers the blade before placing the saw on the bench or floor. An unprotected and freely rotating blade can cause the saw to move backwards, and cut everything in its path. Remember that the blade continues to rotate for a few seconds after releasing the power switch.
GUARD
- Always check that the guard is closed before using the tool. Do not use the saw if the guard does not move freely and immediately closes around the blade.
Never fasten or lock the guard in the open position. If you accidently drop the saw this could bend the guard. Check in all cutting depths and angles that the guard moves freely and does not touch the blade or any other part. - Check that the guard’s return spring works and is in good condition. If the guard and the spring do not function correctly they must be repaired before use. The bottom guard can get stiff as a result of damaged parts, tacky deposits or the accumulation of debris.
- Check that the base plate cannot move during plunge sawing when blade is at an angle of less than 90°. If the blade moves sideways it can get stuck and cause kickback.
- Always check that the guard covers the blade before placing the saw on the bench or floor. An unprotected and freely
rotating blade can cause the saw to move backwards, and cut everything in its path. Bear in mind that it takes a while for the blade to stop after you have released the power switch.
SPECIAL SAFETY INSTRUCTIONS
- Keep your hands away from the chip ejector – risk of personal injury from moving parts.
- Never work above head height, this will not give you full control of the tool.
- Use a suitable detector to determine if there are any pipes or cables concealed in the work area, or contact the local power company. Contact with a live wire can result in a risk of fire and/or electric shock.
Damage to gas conduits can cause an explosion. A hole in a water conduit can result in electric shock and/or material damage. - The product is not intended to be mounted on a saw bench or the equivalent.
- Do not use high-speed steel blades. Such blades can easily shatter.
- Do not saw in ferrous metal. Hot fragments can ignite dust extraction equipment..
- If the battery is damaged or used incorrectly it can emit gas. This gas can irritate the respiratory system. Make sure the work area is well ventilated and seek medical attention if you feel discomfort.
- Do not open the battery – risk of short circuiting.
- Keep the battery away from sharp objects and metal objects, and do not subject it to knocks or blows – risk of short-circuiting, fire, explosion and/or personal injury.
- Only charge the battery with products recommended by the manufacturer. If the battery is used with other products there is a risk of overloading, which can result in fire, electric shock and/or personal injury.
- Protect the battery from heat, direct sunlight, fire and moisture – risk of explosion.
- Switch off the tool and wait until all moving parts have completely stopped before putting it down. Otherwise the accessory can catch on the surface and cause the tool to move out of control.
MINIMISATION OF NOISE AND VIBRATION
- Plan the work so that exposure to heavy vibrations is spread over a longer period.
- To reduce noise and vibrations when in use, limit the time the tool is in use, and use low-power/vibration mode and suitable safety equipment.
- Take the following precautions to minimise the risks of exposure to vibrations and/or noise:
– Only use the tool in accordance with these instructions.
– Check that the tool is in good condition.
– Use accessories in good condition, and which are suitable for the purpose.
– Keep a firm grip on the handles/ grips.
– Maintain and lubricate the tool in accordance with these instructions.
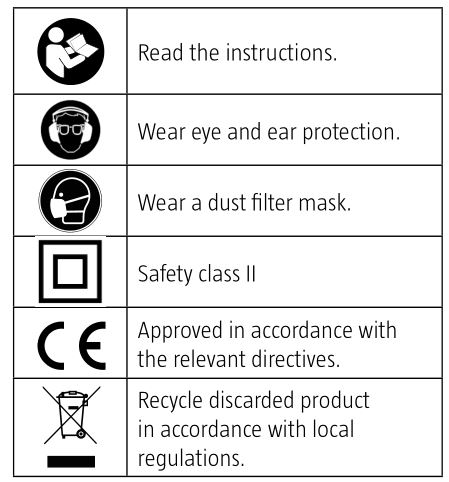
Symbols
The following symbols can be of importance for how you should use your power tool. Make sure you understand the symbols and their significance.
TECHNICAL DATA
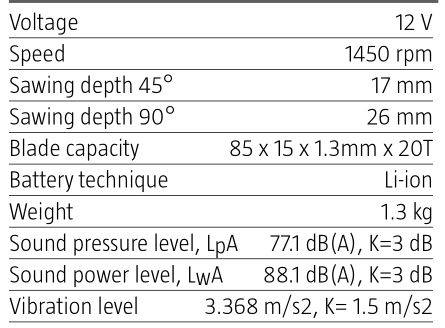
Always wear ear protection!
The declared values for vibration and noise, which have been measured according to a standardised test method, can be used to compare different tools with each other and for a preliminary assessment of exposure. The measurement values have been determined in accordance with EN 62841-2-5:2014.
WARNING!
The actual vibration and noise level when using tools may differ from the specified maximum value, depending on how the tool is used and the material. It is therefore necessary to determine which safety precautions are required to protect the user, based on an estimate of exposure in actual operating conditions (taking into account all stages of the work cycle, e.g. the time when the tool is switched off and when it is idling, in addition to the start-up time).
DESCRIPTION
Circular saw included in the Meec Tools Multiseries 12 V, with integrated LED, function for angle adjustment, and rubber coated grips.
It also has adjustable speed control. Battery and battery charger sold separately. Saw blade and key for changing the blade included.
The product is intended for straight cuts in wood, with or across the grain, and for mitre sawing in wood with the base plate resting firmly against the workpiece.
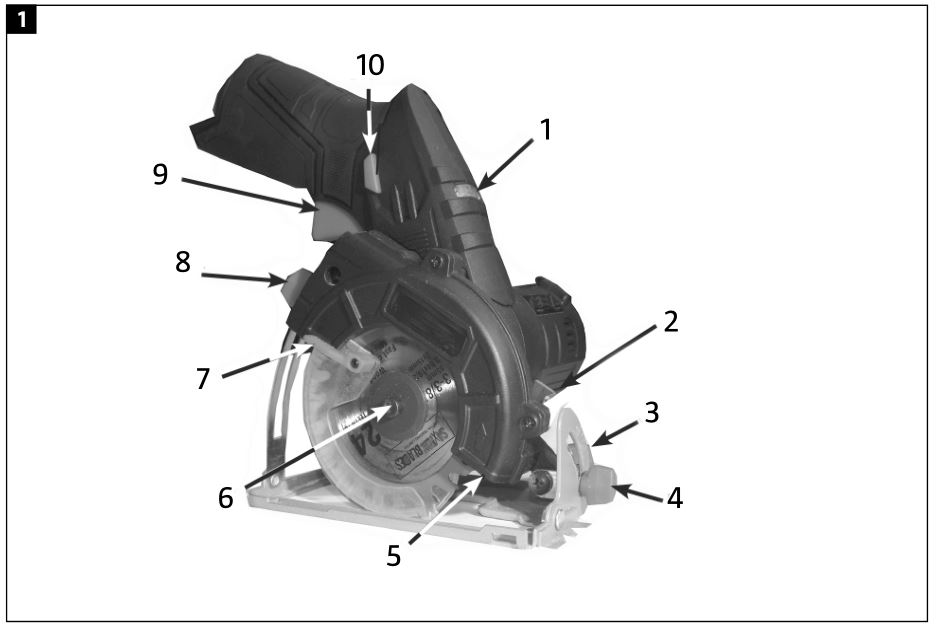
Parts
- Battery state LEDs
- Spindle lock
- Guide bar lock (far side)
- Bevel lock
- Work illumination LED (on underside)
- Spindle clamp screw
- Guard release Lever
- Cut depth lock
- Trigger
- Trigger lock
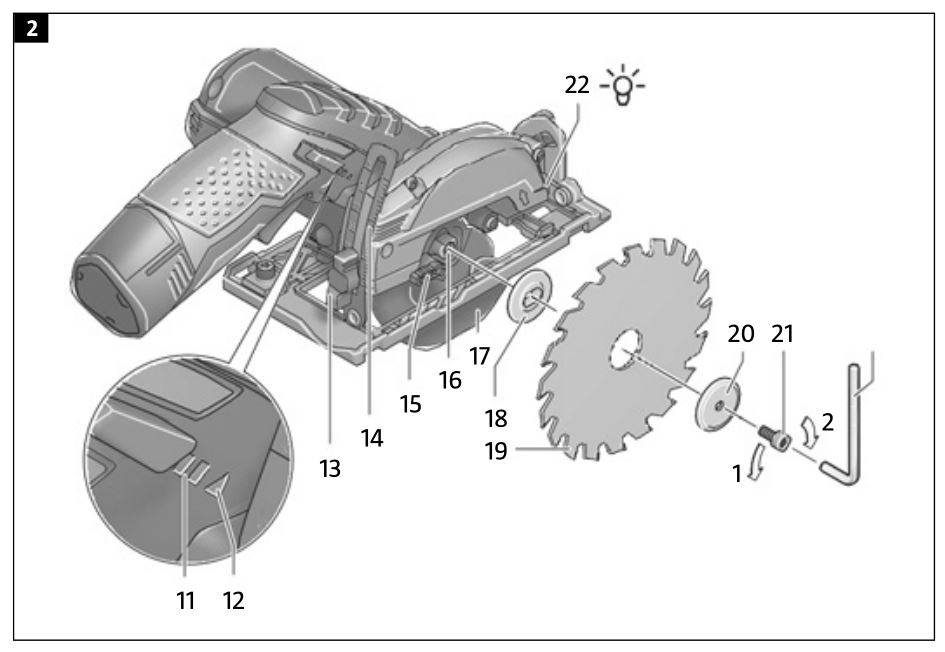
- Battery charging indicator
- Temperature indicator/overload protection
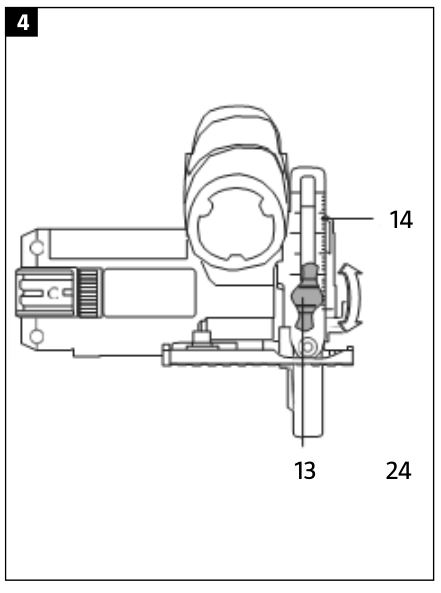
- Wing screw to set sawing depth
- Scale for sawing depth
- Lock lever for movable blade guard
- Saw spindle
- Movable blade guard
- Retaining flange
- Blade
- Flange clamp
- Clamping screw
- Saw line laser
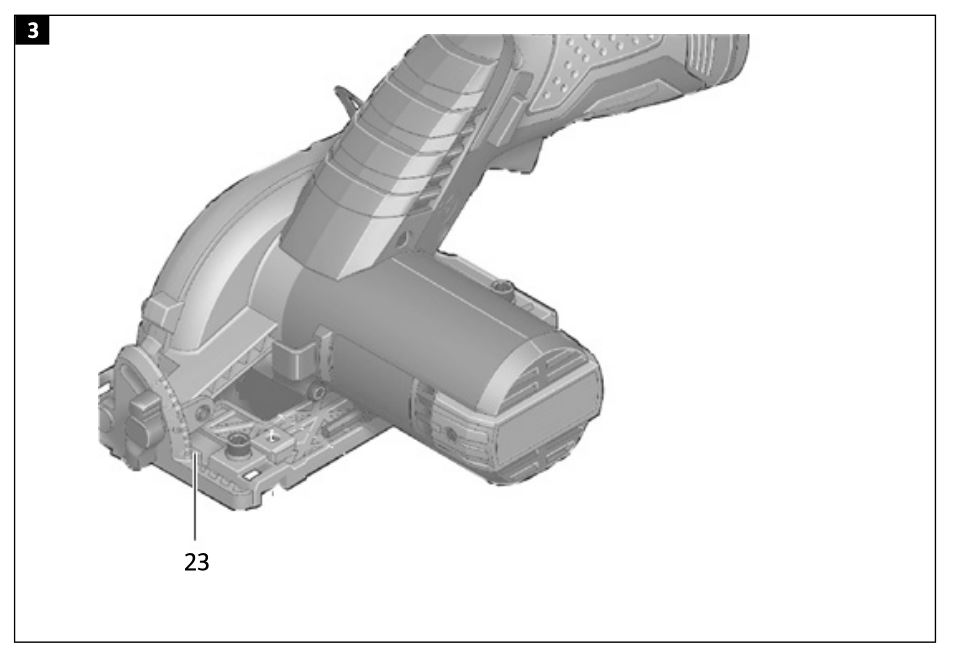
- Reference marking for mitre angle adjustment
- Reference marking for sawing depth edjustment
FIG. 1-4
USE
PREPARATIONS
Only use blades with at least the same high speed as specified on the power tool.
Battery charging indicator
The three green LEDs in the battery charge indicator (15) show the battery (1) charge status. For safe use the charge status can only be checked when all moving parts have stopped.
Press the power switch (4) to show the battery status.


If no status lights go on when the power switch (4) is pressed the battery is defective and must be replaced.
Fitting/replacing blade
- Remove the battery before working on the product.
- Wear safety gloves when handling the blade. Risk of personal injury when replacing the blade.
- Only use blades approved and marked in accordance with EN 847-1 and which comply with the specifications in these instructions.
- Only use accessories with at least the same rated speed as the product. Accessories that rotate faster than their rated speed can shatter and cause personal injury.
- Never use grinding or cutting discs together with the product.
Choice of blade
Only use blades that comply with the technical data in these instructions.
Removing the blade
Place the product with the front of the motor casing on the surface.
- Press in the spindle lock button (6).
- Do not press the spindle lock button (6) when the spindle is rotating, this can damage the product.
- Undo the clamping screw (25) in the direction of rotation (1) with the hex key (5).
- Move back the movable blade guard (21) and hold.
- Remove the flange clamp (24) and blade (23) from the saw spindle (20).
Fitting the blade
Place the product with the front of the motor casing on the surface.
- Clean the blade (23) and all assembly parts.
- Move back the movable blade guard (21) and hold.
- Place the blade (23) on the support flange (22). Check that the arrow for the direction of rotation on the blade points in the same direction as the arrow on the blade guard (21).
- Fit the flange clamp (24) and tighten the clamping screw (25) in the direction of rotation (2). Make sure to fit the support flange (22) and clamping screw (24) correctly.
- Press in the spindle lock button (6).
- Tighten the clamping screw (25) in the direction of rotation (2) with the hex key (5). Tighten to a torque of 6–9 Nm, which corresponds to tightening by hand plus 1/4 turn.
Dust and chip extraction
Dust from materials such as lead paint and some types of wood, minerals and metals, can be a health hazard and cause allergic reactions or damage to the respiratory organs of users and/or onlookers.
Dust from oak and birch, for example, is considered to be carcinogenic, especially in combination with some wood treatment agents. Materials that contain asbestos should only be handled by qualified personnel.
- Use suitable dust extraction equipment.
- Ensure good ventilation.
- Use a breathing mask with a P2 filter.
Follow the applicable regulations for the material being worked. - Make sure that dust does not accumulate at the workplace. Dust can easily ignite and constitute a fire risk.External dust extraction
External dust extraction
Connect the dust extraction hose (30) to a dust extraction device (sold separately). Instructions for connection of different dust extraction devices are to be found at the end of the instructions.
Only use dust extraction devices that are suitable for the actual material.
A special dust extractor must be used if the dust is dry and especially hazardous to health, or carcinogenic.
HOW TO USE
Remove the battery before working on the product.
Adjusting the sawing depth
Adjust the sawing depth to the thickness of the workpiece. Slightly less than one full tooth on the blade should be visible below the workpiece.
Undo the wing screw (17). Reduce the sawing depth by pulling the product away from the base plate (7), and increase the depth by pressing the product against the base plate (7). Set the required sawing depth according to the scale (18) and tighten the wing screw (17).
Use thee reference marking (31) beside the sawing depth scale (18) to adjust the sawing depth.
Adjusting the mitre/bevel angle
Place the product with the front of the blade guard (13) on the surface.
Undo the wing screw (10). Swing the saw to the side. Adjust to the required mitre angle with the scale (9). Tighten the wing screw (10).
Use the reference marking (27) on the top edge of the holder to adjust the mitre/bevel angle.
NOTE:
During mitre sawing the sawing depth will be less than the setting on the sawing depth scale (18).
Mitre angle marking
The mitre angle marking 0° (12) shows the position of the blade when sawing at right angles. The mitre angle marking 45° (11) shows the position of the blade when sawing at an angle of 45°.
Starting
Inserting the battery
Only use lithium-ion batteries recommended by the manufacturer, with the voltage specified on the type plate on the product. Use of other batteries can result in fire and/or personal injury.
Insert the charged battery (1) from in front view in the base of the product. Press in the battery as far as it goes, until the red line cannot be seen and the battery is firmly locked in place.
Switching on/off
Start the product by pressing the power switch
button (3) and then pressing the power switch (4).
Switch off the product by releasing the power switch (4). NOTE: To ensure safe use the power switch (4) cannot be locked in the on position, and must be held pressed in while working.
Blade brake
The product has a built-in brake function, which makes the blade stop more quickly after the product is switched off.
Temperature indicator/overload protection
The red status light (16) makes it easier to avoid overheating the battery or overloading the motor.
If the status light (16) goes red the battery temperature is too high and the product switches off automatically.
- Switch off the product.
- Allow the battery to cool before using the product again.
If the status light (16) flashes red the product is blocked and switches off automatically.
Pull the product out of the workpiece.
The product starts again as soon as the blockage is cleared.
Over-discharge protection
The lithium-ion battery is protected from overdischarging by an ECP function. The product is switched off by a protective circuit when the battery is discharged.
Work light
The work light (26) goes on when the power switch (4) is pressed or partly pressed. The work light simplifies working in dark areas.
Tips
Protect the blade from knocks and blows.
Move the product gently and smoothly in the direction of sawing. Do not press too hard on the product, this will wear the blade more quickly and can damage the product.
The sawing and fineness of the cut depends on the condition and toothing of the blade.
Only use sharp blades that are suitable for the actual material.
Sawing in wood
Which blade is suitable depends on the type of wood and the quality, and if the wood is sawn lengthwise or across the grain.
Sawing spruce along the grain produces long, spiral shaped shavings.
Dust from beech and oak is harmful to health.
Always use dust extraction when sawing.
MAINTENANCE
- Remove the battery before working on the product (for example maintenance or changing accessories) and before transport and storage. This reduces the risk of accidental starting.
- Keep the product and its ventilation opening clean for best functionality and life span.
The movable blade guard must be able to move freely and should close automatically.
Keep the area round the movable blade guard clean. Remove dust and shavings with a brush or the equivalent.
Bare blades can be protected from corrosion with a thin layer of acid free oil. Remove this oil before using the blade, otherwise the workpiece can become discoloured.
Residue of glue, resin etc, reduce the fineness of the cut. Clean the blade immediately after use.