Instruction Manual of ERNESTO IAN
385839_2107 Pasta Machine

![]()


Pasta machine
Introduction
We congratulate you on the purchase of your new product. You have chosen a high quality product. Familiarise yourself with the product before using it for the first time. In addition, please carefully refer to the operating instructions and the safety advice
below. Only use the product as instructed and only for the indicated field of application. Keep these instructions in a safe place. If you pass the product on to anyone else, please ensure that you also pass on all the documentation with it.
♦ Proper use
The instrument is not intended for commercial use.
♦ Description of parts and features
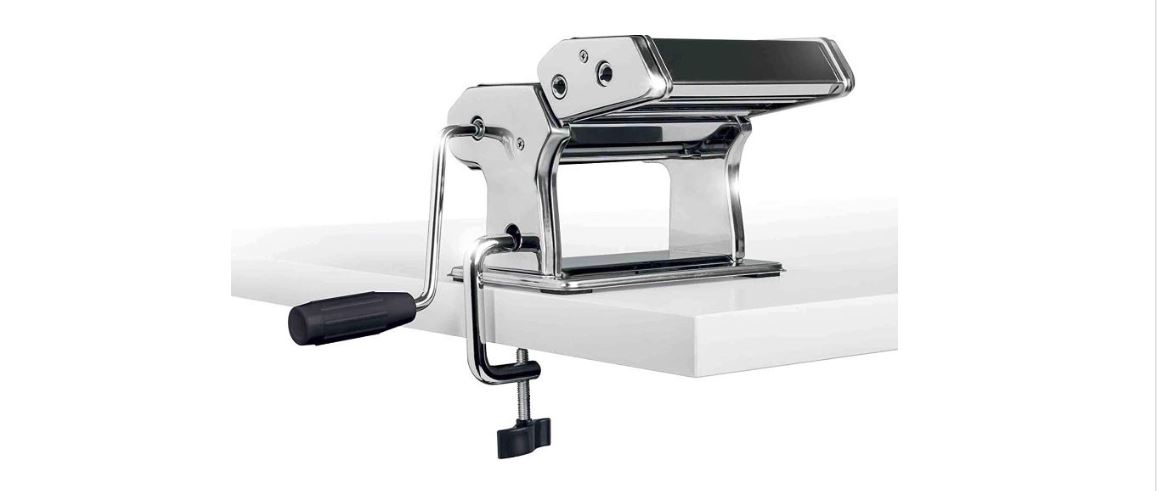
- Pasta maker
- Crank
- Clamp
- Roller setting wheel
- Roller attachment
♦ Technical data
Materials: Housing: Stainless steel Noodle roller: Stainless steel, Aluminium
![]() Safety instructions
Safety instructions
KEEP ALL THE SAFETY ADVICE AND INSTRUCTIONS IN A SAFE PLACE FOR FUTURE REFERENCE!
![]() DANGER OF INJURY!
DANGER OF INJURY!

 DANGER OF DEATH AND ACCIDENTS FOR TODDLERS AND CHILDREN!
Never leave children unsupervised with the packaging material or the product. The packaging material presents a suffocation hazard and there is a risk of loss of life from cut injury. Children often underestimate danger. Always keep the product out of reach of children.- After use, store this device in a safe place, out of reach of children.
- This device is not intended to be used by persons (including children) with restricted physical, sensory or mental abilities or with insufficient experience and/or knowledge, unless they are supervised by a person who is responsible for safety or they have received instruction on how to use the device from such a responsible person.
- Check that all parts have been assembled and fitted properly. Incorrect assembly or fitting may lead to injury.
- Remain alert at all times and always watch what you are doing. Proceed with caution. Just one moment of inattention during assembly may lead to injury.
- All moving parts of the machine present a shearing, cutting and trapping hazard.
 FOOD-SAFE! This product has no adverse effect on taste or smell.
- Product not unbreakable.
- Function may be imparied if the product has been dropped.
♦ Preparing for first use
♦ Basic recipe for an Italian noodle dough
Ingredients
300g flour (preferably a hard grain wheat flour)
130ml natural mineral water
½ teaspoon salt
- Create a mound with the flour and the salt on
your working surface then stir well. Press out a
hollow in the middle. - Place the water into the hollow and mix together with a fork. Mix the water with the flour from the centre outwards until it reaches a uniform consistency.
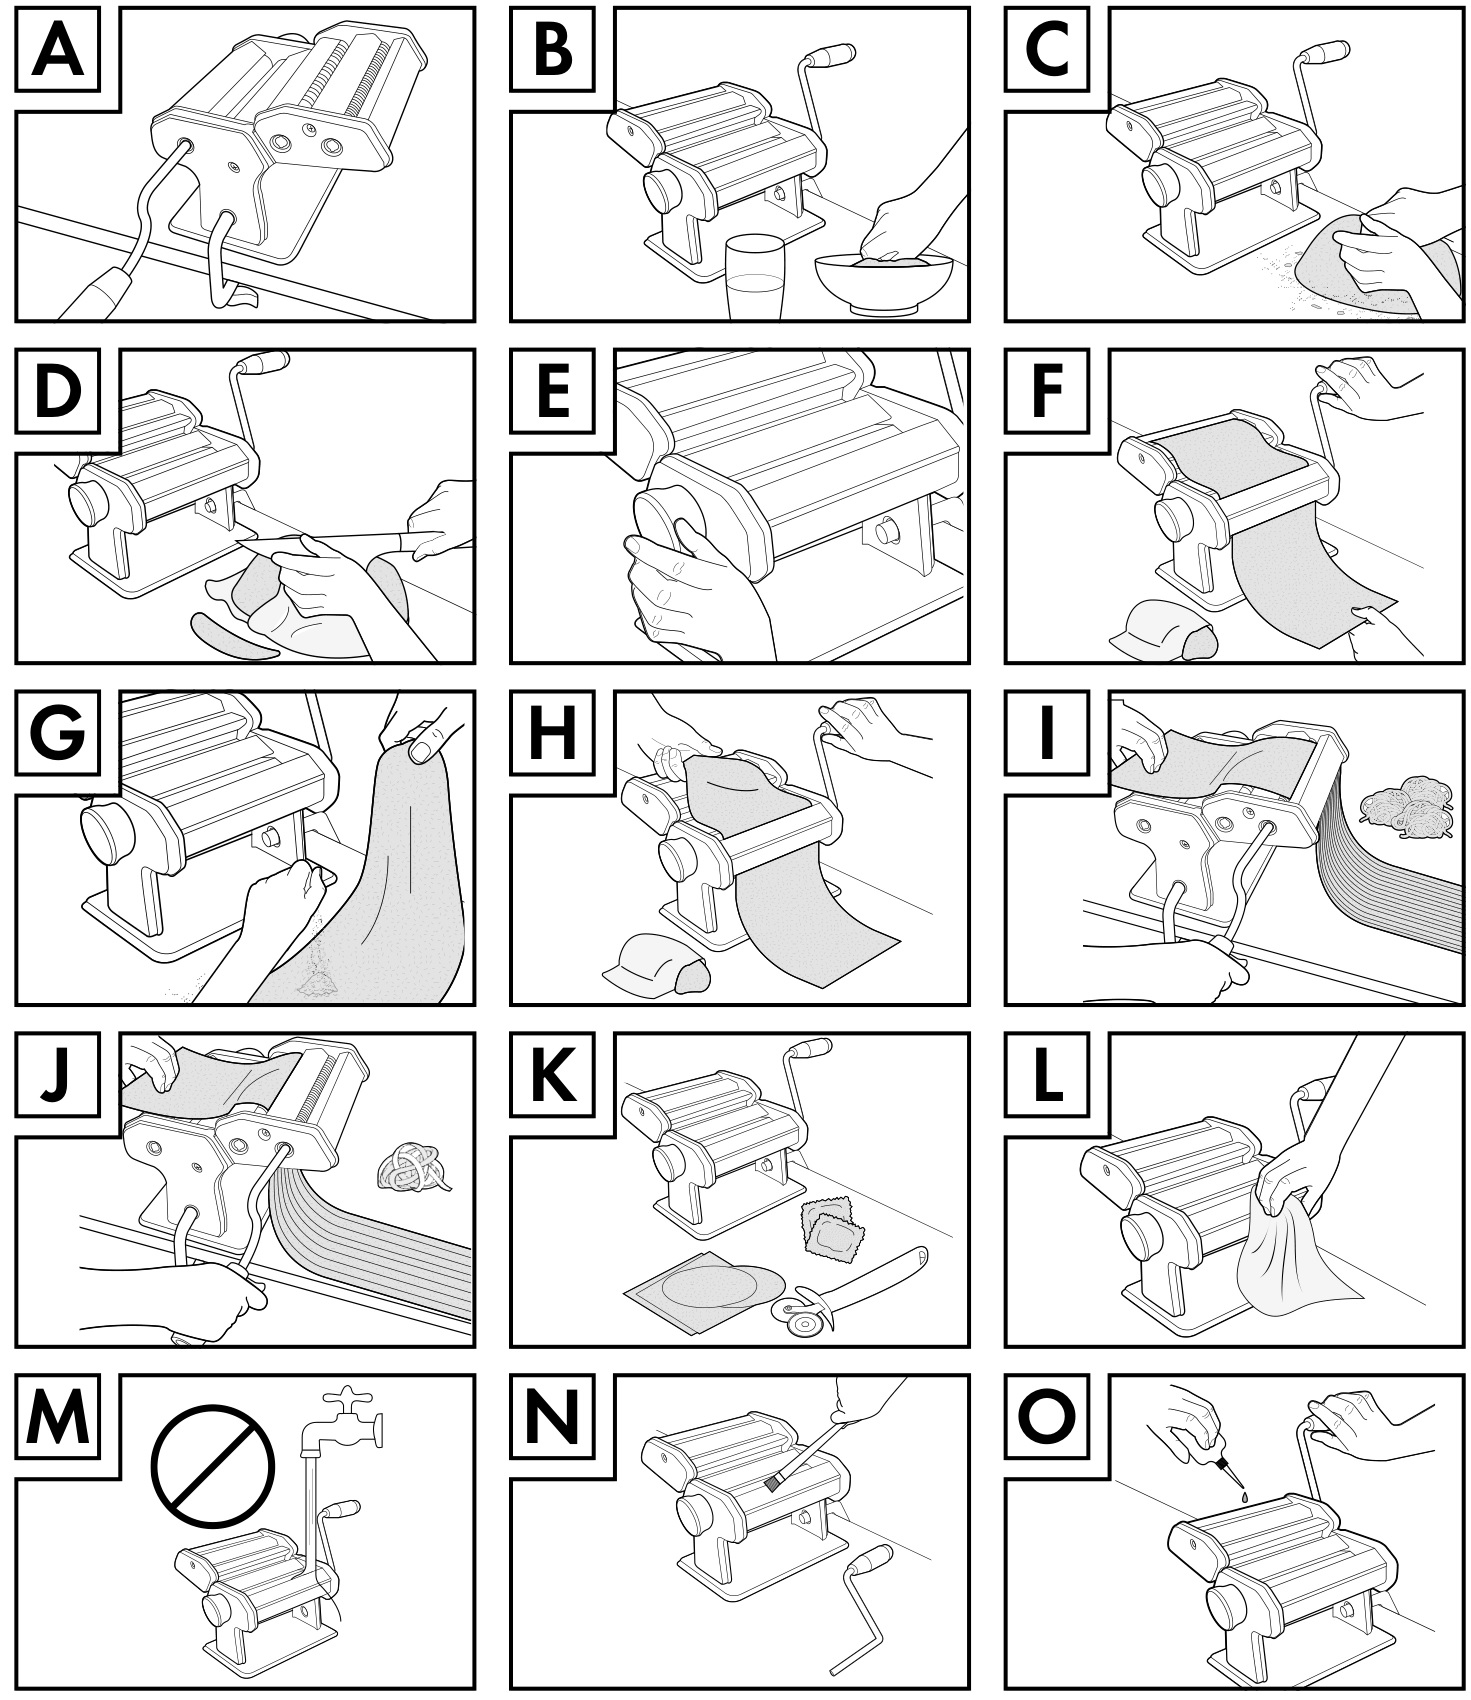
- Knead the dough with your hands for about 10–15 minutes until it is smooth and shiny (see Fig. B). Carefully add some water if the dough becomes too hard. Knead the dough some more if it is too soft. The dough should not stick to your hands.
- Form the dough into a ball (see Fig. C), cover it with a clean, damp cloth and let it rest for 30 minutes.
♦ First use
- Stand the noodle machine 1 on a table.
- Insert the clamp 3 into the hole and fasten the noodle machine 1 down on to the table (see Fig. A).
- Place the roller attachment 5 along the guide rails on the noodle machine 1 .
- Insert the crank 2 into the hole on the noodle machine 1 (see Fig. A).
- Before you use the noodle machine 1 for the first time clean it as described in the section on “Cleaning and maintenance”. Clean all the parts that come into contact with foodstuff with a moist cloth to remove any dirt. Then fully dry the parts.
- Turn a small amount of the dough through the rollers to clean them. This first dough must not be eaten.
- Divide the previously prepared dough into smaller portions. Work on one portion at a time. Cover the rest so that it does not dry out (see Fig. D).
- Pull out the roller setting wheel 4 slightly and turn it to position 7, so that the smooth rollers have the biggest distance to each other (see Fig. E).
- Turn the crank 2 clockwise and run the dough through the rollers. Fold the dough together again and if necessary sprinkle some more flour on the dough. Repeat this process about 5–6 times (see Fig. F). The dough should have a uniform shape.
- Adjust the roller setting wheel 4 to a more narrow position and insert the dough sheet again until you have the required thickness.
- Cut the sheet of dough to the desired length using a knife.
- Insert the crank 2 into one of the holes on the roller attachment 5 and run the dough through it slowly (see Fig. I, J).
- Then place the noodles on to a tablecloth or over a noodle stand and leave them to dry for at least 1 hour.
Tip: If the rollers do not cut the dough then the dough is too soft. In this case the dough should be mixed with some flour and run through the smooth rollers again (see Fig. G, H).
For better performance, fold the dough and add some flour on the dough. Repeat this process about 5–6 times each position (see Fig. G, H).
If the dough is too dry it will not be gripped by the rollers. In this case some water should be added to the dough and the dough run through the smooth rollers again.
- Add the noodles to an adequate volume of boiling salted water (approx. 4 litres per ½kg noodles). Fresh noodles are ready within 2–5 minutes depending on their thickness.
- Stir the noodles carefully while cooking then pour out the noodles into a sieve.
♦ Cleaning and maintenance (see Fig. L–O)
- Never use petrol, solvents or chemical cleaners.
- While using the device clean the scraper under the rollers from time to time with a dry cloth.
- Use a soft, clean cloth to clean the noodle machine.
- Use a brush or a wooden stick to clean the noodle machine after use.
- Clean off any substantial adhering particles with a moist cloth and then dry the parts fully.
- Never wash the noodle machine in water or clean it in the dishwasher.
- Never immerse the product in water or other liquids. This can damage the product.
♦ Disposal
The packaging is made entirely of recyclable materials, which you may dispose of at local recycling facilities.
Contact your local refuse disposal authority for more details of how to dispose of your worn-out product.
♦ Warranty
The product has been manufactured to strict quality guidelines and meticulously examined before delivery. In the event of product defects you have legal rights against the retailer of this product. Your legal rights are not limited in any way by our warranty detailed below.
The warranty for this product is 3 years from the date of purchase. The warranty period begins on the date of purchase. Please keep the original sales receipt in a safe location. This document is required as your proof of purchase.
Should this product show any fault in materials or manufacture within 3 years from the date of purchase, we will repair or replace it – at our choice – free of charge to you. This warranty becomes void if the product has been damaged, or used or maintained improperly.
The warranty applies to defects in material or manufacture. This warranty does not cover product parts subject to normal wear, thus possibly considered consumables (e.g. batteries) or for damage to fragile parts, e.g. switches, rechargeable batteries or glass parts.
♦ Warranty claim procedure
To ensure quick processing of your case, please observe the following instructions:
Please have the till receipt and the item number (IAN 385839_2107) available as proof of purchase. You will find the item number on the rating plate, an engraving on the front page of the instructions for use (bottom left), or as a sticker on the rear or bottom of the product.
If functional or other defects occur, please contact the service department listed either by telephone or by e-mail.
You can return a defective product to us free of charge to the service address that will be provided to you. Ensure that you enclose the proof of purchase (till receipt) and information about what the defect is and when it occurred.
♦ Service
Service Great Britain
Tel.: 08000569216
E-Mail: owim@lidl.co.uk
Service Cyprus
Tel.: 8009 4211
E-Mail: owim@lidl.com.cy
![]()
OWIM GmbH & Co. KG
Stiftsbergstraße 1
74167 Neckarsulm
GERMANY
Model-No.: HG08850
Version: 01/2022
Last Information Update
09/2021 · Ident.-No.: HG08850092021-7
IAN 385839_2107
