hygger HG183 Single Tube Fish Waste Collector User Manual
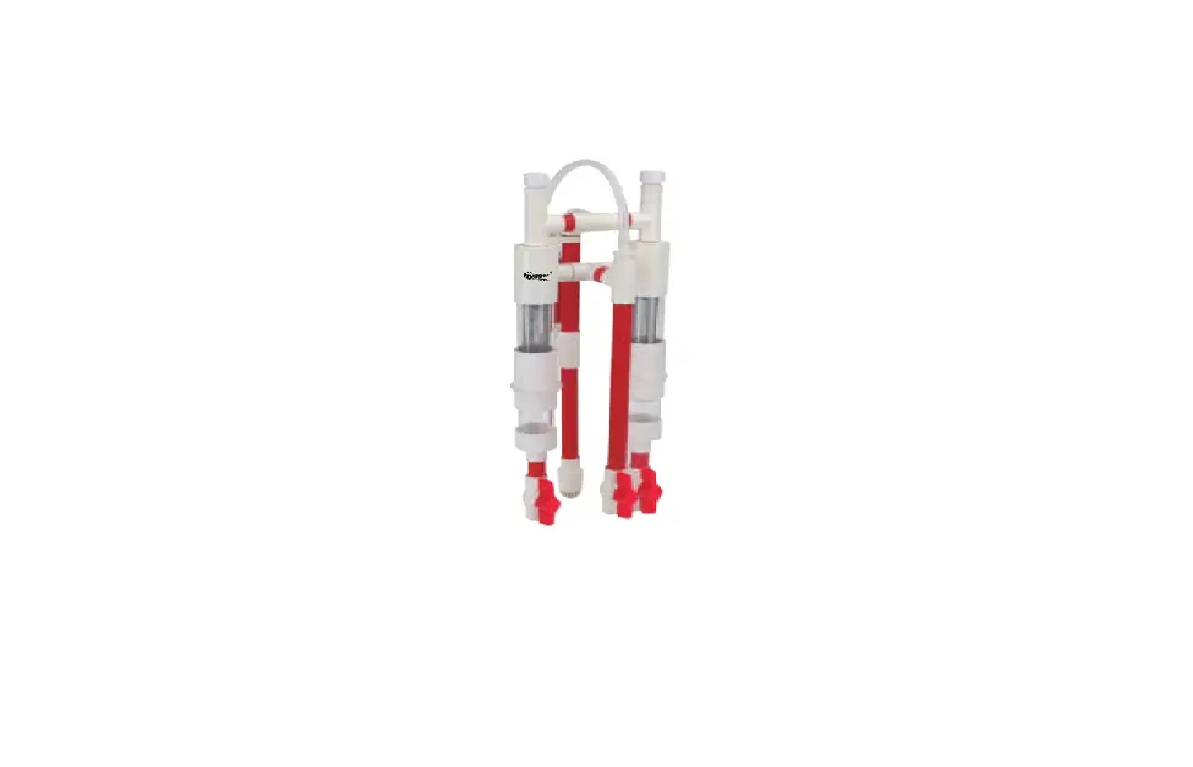
PRODUCT DIAGRAM
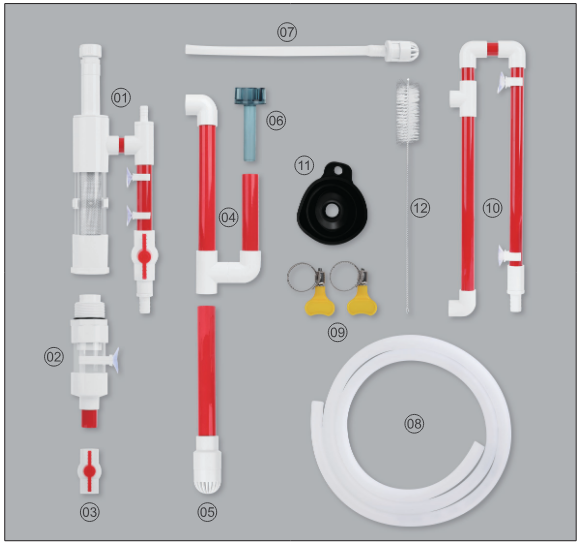
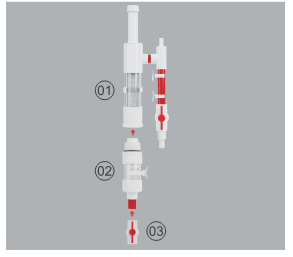
- Filter body and connection pipe with valve
- Waste sedimentation chamber pipe
- Discharge valve
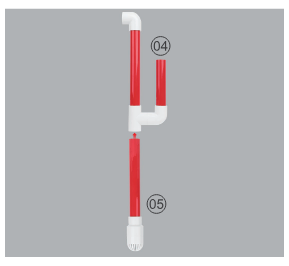
- Upper outlet pipe with oil film tube
- Lower outlet pipe with dirt suction
- Surface oil film remover
- Siphon hose
- Bottom hose
- Adjustable hose clamps
- Water inlet pipe
- Hopper
- Cleaning brush
PRODUCT FEATURES
- No drilling is required and the sump tank is for ease of use. The fish waste collector must be equipped with a sump tank during operation.
- The fish waste collector is equipped with an oil film remover- removal of water surface oil film. Separation of fish waste for efficient disposal and discharge, reducing filter sponge cleaning time.
- A 304 stainless steel filter screen provides highly efficient filtration; most waste will remain on the screen. Additionally, the filter has an isolation layer that prevents the waste from migrating upwards. A loose pipe joint allows easy disassembly for cleaning the internal filter screen.
- Power outage, then water outage, automatic operation when restored.
- Separation of fish waste for efficient disposal and discharge, reducing filter sponge cleaning time.
- When the power is turned off, the water level in the tank drops. The siphon leaves the water surface, the air enters the siphon, and the water flow decreases. When the water level of the tank drops to parallel with the lowest edge of the T-pipe, the water flow stops.
- After switching on, the pump pumps water from the sump tank into the tank. The water level in the tank rises, and the siphon tube delivers the water downward. The water flow is initially low and gradually increases when the siphon is fully submerged.
ASSEMBLY INSTRUCTIONS
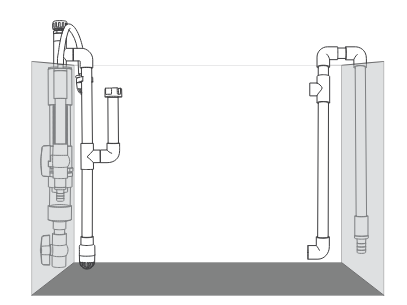
- Before attaching the fish waste collector to the aquarium glass, ensure that the glass is aligned with the table’s edge.
- Each tank is different in size and use and requires different lengths of pipes, such as upper and lower outlet pipe in the tank, hose to the sump tank, and the water pump connection. Therefore, the user must manually measure and cut these hoses and pipe sections
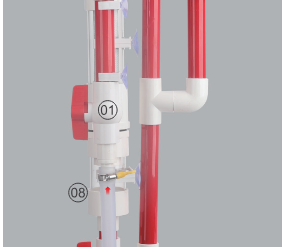
Step 1: Install the waste sedimentation chamber 2 on the filter body and connection pipe with valve 1. Install the valve 2 onto the chamber pipe 2.
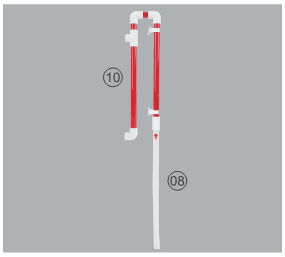
Step 2: Measure and cut the Upper outlet pipe with oil film tube 4 and the Lower outlet pipe with dirt suction 5 to fit the aquarium’s height sing your tools, and then connect pipes 4 and 5.

Step 3: Connect the Outlet pipe 4 and the Filter body and connection pipe with valve 1
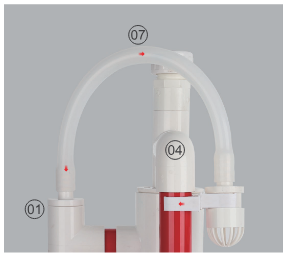
Step 4: Attach the siphon hose 7 to the Outlet pipe 4 and Connecting pipe top with valve 1 (note: the siphon clip is installed on the top of the pipe).
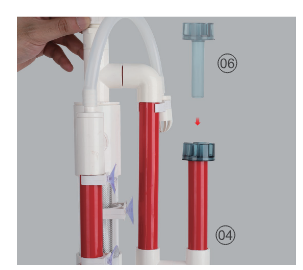
Step 5: Install the Surface oil film remover 6 on the outlet pipe 4.
Step 6: Measure and cut the hose 8 , then connect the hose sections to the Connecting pipe top with valve 1.
Step 7: Connect the water pump (not included) and the Water inlet pipe 10 using the remaining section of the hose 8. If your pump comes with hose, the included hose may not require cutting.
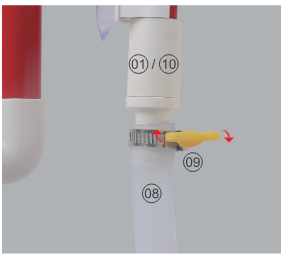
Step 8: Secure the connection between hose 8 and the hard pipe with Adjustable Hose lamps (Thumb Screw Clamp) 9.
INSTRUCTIONS
- Hang the installed fish waste collector and the intake hose connected to the water pump on the aquarium wall, adjust the position, and secure it with a suction cup.
- Close the valve on the outlet hose.
- Open the cover for the water-filling nozzle and manually pour water into the nozzle (for the first use, manual filling is required; ensure the valve is closed while filling).
- Close the cover for the water-filling nozzle once water is visible in the siphon hose.
- Fill the aquarium and sump tank with water until the pump is fully submerged, then turn on the pump. After a few seconds, the water level in the aquarium increases. Open the outlet hose valve once the water has fully covered the siphon head.
- The outlet hose will automatically flow water, with the flow rate increasing from a trickle to normal. Note: Operate for 1 to 2 minutes to expel as much air as possible from the pipe.
- Ensure that the water level in the aquarium never drops below the lowest edge of the siphon head, and that the siphon does not leave the water while expelling air from the pipe.
- When the pump pumps water from the sump tank into the tank, the water level rises, the siphon tube delivers the water downward, and the water level in the tank begins to drop. As air enters the siphon, the water flow decreases, and the water level rises until the siphon contacts the water surface. The siphon tube delivers the water downward, and that cycle repeats.(Note: Slight fluctuations in water level are normal.)
- If the water output is too high and the siphon is in constant contact with air, use valves to reduce the flow rate and noise during operation. (To ensure proper operation of the appliance, pay more attention when the appliance is operating).
ATTENTIONS
- If the water level in the tank is too high, use the valve on the outlet pipe to increase the amount of water output or reduce the pump’s flow rate.
- If the water level in the tank is too low, increase the pump’s flow rate.
- The above procedure can be adjusted as the water level in the tank changes.
- There are two methods of preventing air from entering the siphon when the waste collector discharges the waste. Method 1: Submerge the siphon head 1-2 inches below the surface of the water while the waste collector is discharging the waste. Method 2: Close the valve on the outlet pipe before discharging the waste. Wait 10 seconds after discharging until the water surface touches the siphon, then open the valve.
- If air enters the siphon and the filter is not properly functioning, switch the power off immediately, close the valve on the outlet pipe and restart the unit.
- Fill water into the water-filling nozzle, and cover the water-filling nozzle after the water fills the siphon hose.
- After energizing the pump, wait for the water level to submerge the siphon head and open the valve on the outlet pipe to activate the siphon action.
- The filter screen must be cleaned regularly to maintain its efficiency. (Note: Before cleaning
the filter screen, drain all water from the pipe where the filter screen is located , and then unscrew the loose joint to remove the filter screen). - Critical areas of the pipes are reinforced with glue, and other connections must also be sealed with tape provided if they leak. Pipes usually have scratches or glue marks. Please feel relieved about the use!
PACKING LIST
- 1 x Filter body and connection pipe with valve
- 1 x Waste sedimentation chamber pipe
- 1 x Upper outlet pipe with oil film tube
- 1 x Lower outlet pipe with dirt suction
- 1 x Surface oil film remover
- 2 x Adjustable hose clamps
- 1 x Water inlet pipe
- 1 x Discharge valve
- 1 x Siphon hose
- 1 x Bottom hose
- 1 x Hopper
- 1 x Cleaning brush
- 6 x Suction cup
- 1 x User manual
CONTACT INFORMATION
Email: service@hygger-online.com
Website: www.hygger-online.com
![]() Company Name:E-CrossStu GmbH
Company Name:E-CrossStu GmbH
Address:Mainzer Landstr.69,60329
Frankfurt am Main
E-mail:E-CrossStu@web.de
Tel:+49 69332967674
![]() CET Product Service Ltd.
CET Product Service Ltd.
Beacon House Stokenchurch
Business Park,Ibstone Rd,
Stokenchurch High
Wycombe HP14 3FE UK
info.cetservice@gmail.com
+447419325266
![]()