BORMANN PRO BBP5100 20V Pro Cordless Brushless Rotary
Hammer Instruction Manual


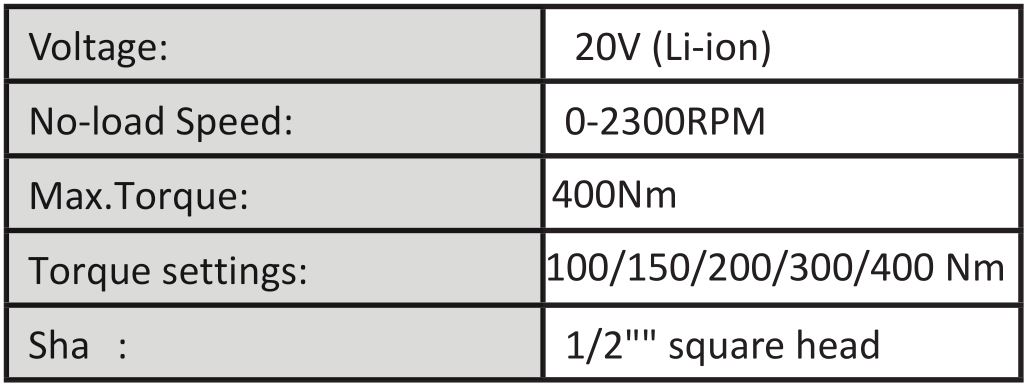
Technical Data

* The manufacturer reserves the right to make minor changes to product design and technical specifications without prior notice unless these changes significantly affect the performance and safety of the products. The parts described / illustrated in the pages of the manual that you hold in your hands may also concern other models of the manufacturer’s product line with similar features and may not be included in the product you just acquired.
Please note that our equipment has not been designed for use in commercial, trade or industrial applications. Our warranty will be voided if the machine is used in commercial, trade or industrial businesses or for equivalent purposes.
To ensure the safety and reliability of the product and the warranty validity, all repair, inspection, repair or replacement work, including maintenance and special adjustments, must only be carried out by technicians of the authorized service department of the manufacturer.
General Safety Rules
![]() WARNING ! READ AND UNDERSTAND ALL INSTRUCTIONS.
WARNING ! READ AND UNDERSTAND ALL INSTRUCTIONS.
Failure to follow all instructions listed below, may result in electric shock, fire and /or serious personal injury.
Work area
- Keep work area clean and well lit. Cluttered and dark areas invite accidents.
- Do not operate power tools in explosive atmospheres, such as in the presence of flammable liquids, gases or dust. Power tools create sparks which may ignite the dust or fumes.
- Keep children and bystanders away while operating a power tool. Distractions can cause you to lose control.
Electrical Safety
- Do not abuse the cord. Never use the cord to carry the tool. Keep cord away from heat, oil, sharp edges, or moving parts.
Replace damaged cords immediately. Damaged cords may create a fire.
(The following applies only to tools with a separate battery pack) - A battery operated tool with integral batteries or a separate battery pack must be recharged only with the specified charger for the battery. A charger that may be suitable for one type of battery may create a risk of fire when used with another battery.
Personal Safety
- Stay alert, watch what you are doing and use common sense when operating a power tool. Do not use a power tool while you are tired or under the influence of drugs, alcohol or medication. A moment of inattention while operating power tools may result in serious personal injury.
- Dress properly. Do not wear loose clothing or jewellery. Contain long hair. Keep your hair, clothing, and gloves away from moving parts. Loose clothes, jewellery, or long hair can be caught in moving parts.
- Avoid accidental starting. Be sure switch is in the locked or off position before inserting batter pack. Carrying tools with your finger on the switch invites accidents.
- Do not overreach. Keep proper footing and balance at all times. Proper footing and balance enable better control of the tool in unexpected situations
- Use safety equipment. Always wear eye protection, Dust mask, non-skid safety shoes, hard hat, or hearing protection must be used for appropriate conditions.
Power tool use and care
- Use clamps or other practical ways to secure and support the work piece to a stable platform. Holding the work piece by hand or against your body is unstable and may lead to loss of control.
- Do not force tool. Use the correct tool for your application. The correct tool will do the job better and safer at the rate for which it is designed.
- Do not use tool if switch does not turn it on of off. A tool that cannot be controlled with the switch is dangerous and must be repaired.
- Store idle tools out of reach of children and other untrained persons. Tools are dangerous in the hands of untrained users
- Maintain tools with care. Keep cutting tools sharp and clean. Properly maintained tools with sharp cutting edge are less likely to bind and are easier to control.
- Check for misalignment or binding of moving parts, breakage of parts, and any other condition that may affect the tool’s operation. If damaged, have the tool serviced before using .Many accidents are caused by poorly maintained tools.
- Use only accessories that are supplied with your model. Other accessories that may not be suitable for this tool and may create a risk of injury when used.
Specific safety rules
- Hold tool by insulated gripping surfaces when performing an operation where the cutting tool may contact hidden wiring. Contact with a “live” wire will also make exposed metal parts of the tool “live” and shock the operator.
- keep hands clear of moving parts .
- Do not touch moving parts, Allow the power tool accessories (bit and blades etc)to cool before touching them .They can become extremely hot during use and can burn your skin.
- Always wear protective safety glasses when operating power tools. Wear a face mask when environment is dusty.
Main Description
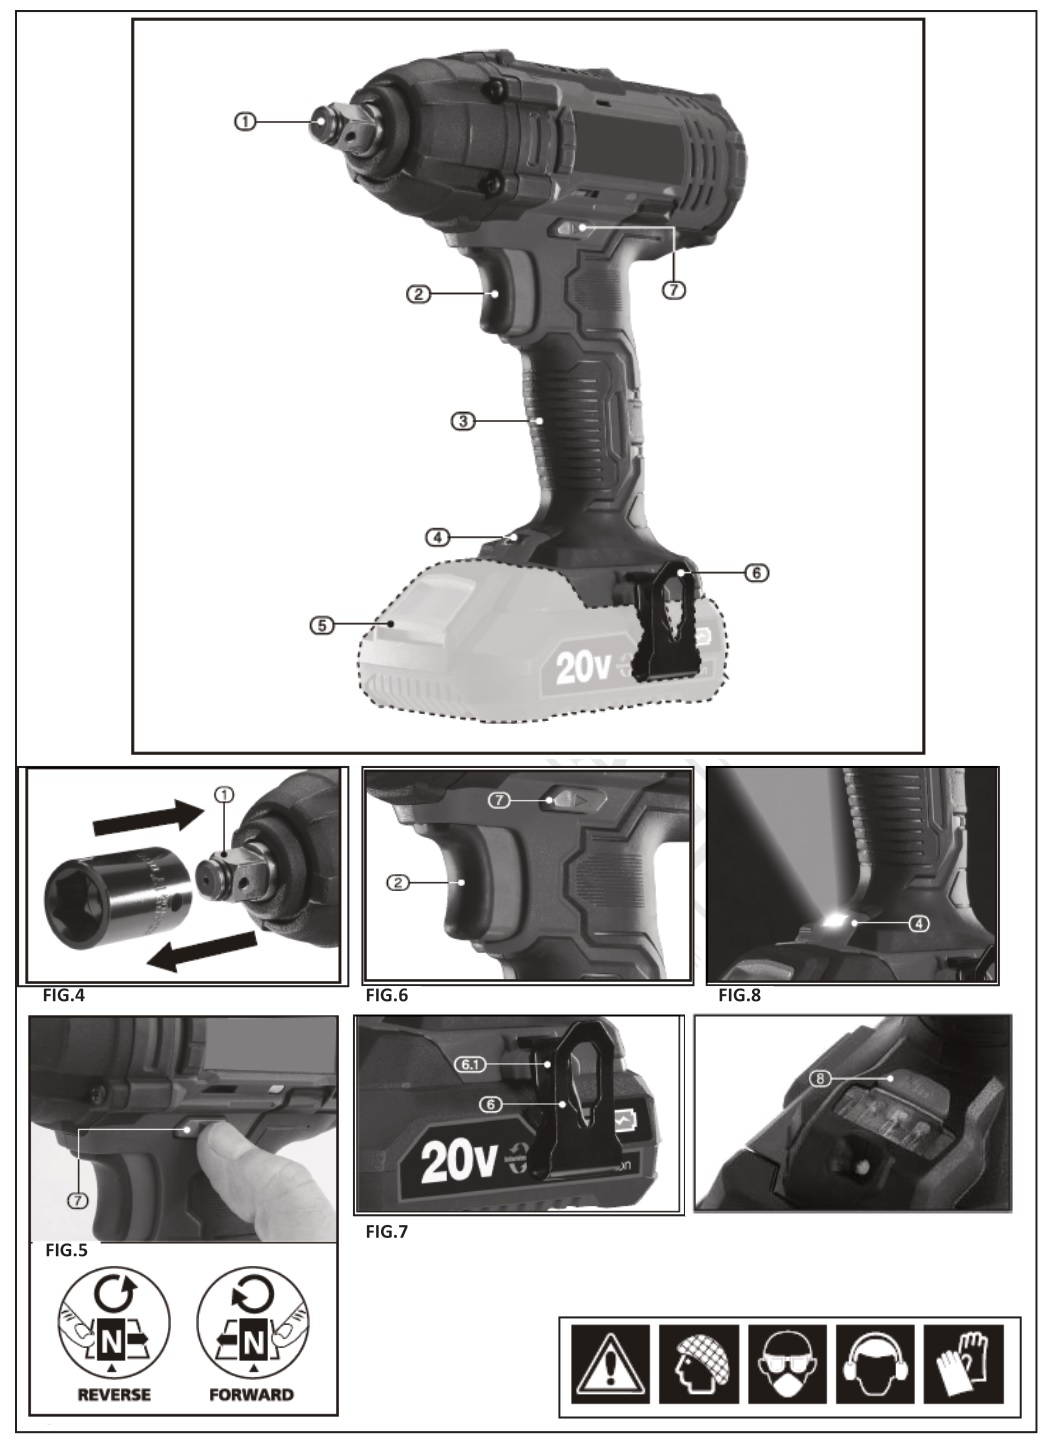
- 1/2” Square drive anvil
- Variable speed trigger switch
- Hand Grip
- Led Worklight
- 20V Li-ion Battery Pack (sold separately)
- Variable torque selector (Select the optimum output torque)
- Belt Clip
- Forward / Reverse selector
Basic Operation
Rotational Drive Selection (Fig.5)
The forward/reverse drive selector switch 7 determines the direction of rotation of drive (clockwise or anticlockwise).
To select the direction of rotation:
Stop machine and push the switch 7 to the left or right.
When the direction switch is pushed to the left, the chuck will rotate clockwise.
When the switch is pushed to the right, the drive rotate anti-clockwise.
Before operation, check that the switch is set the required position. Do not change the direction of rotation until the driver comes to a complete stop.
When the wrench is not in use move the switch to neutral (middle position) in order to lock the trigger.
Note: Failure to use the neutral position may activate the trigger inadvertently. This inadvertent operation may damage the power tool.
Variable Speed Trigger (Fig.6)
When the trigger 2 is pressed the drive will rotate (provided the direction switch 7 is set in the forward or reverse position).
This trigger switch is electronic which enables the user to vary the speed continuously.
The speed varies according to how far the trigger switch is depressed.
The further it is pressed, the faster the drive spindle will rotate.
The lighter it pressed, the slower it will rotate.
Note: If the fastening is heavily corroded, or extremely tight, it may be necessary to release the fixing by hand before continuing with the wrench.
Note: Always tighten fixings to the correct torque as indicated by the manufacturer using a calibrated torque wrench. Failure to do so may result in the fixing to becoming damaged or insufficiently tightened.
Note: This product is equipped with an electric brake.
Installing And Removing Sockets (Fig.4)
This wrench is supplied with a 1/2″ Square Drive 1
Note: This product is equipped with an electric brake. Never use any sockets or accessories that are not hardened for impact use.
Never use standard chrome vanadium Steel sockets which can shatter and can cause personal injury.
To fit a socket:
Push fit the socket over the anvil. The friction based ring holds the socket securely in place.
To remove a socket:
Pull the socket away from the anvil to remove.
Note: Extra effort may be required when fitting and removing brand new sockets on their initial usage.
Belt Clip (Fig.7)
The spring steel belt clip 6 is convenient for hanging the drill temporarily. The clip can be installed on either side of the tool.
To install the clip:
Locate the clip 6 in position and fasten with screw 6.1 supplied, take care to not over-tighten and strip the thread.
LED Work-light (Fig.8)
To aid use in confined, and inadequately it spaces; the LED work-light 4 automatically illuminates when the trigger is activated.
Disposal
At the end of the machine’s working life or when it can no longer be repaired, ensure that it is disposed of according to national regulations.
Contact your local authority for details of collection schemes in your area.
In all circumstances:
- DO not dispose Of power tools with domestic waste.
- DO not incinerate.
- Do not dispose of WEEE as unsorted municipal waste.
![]()
