AUTOPHIX 5150 Car Auto Code Reader Manual
Safety precautions
To avoid body injury and damage to the device or your car,
please read this manual carefully before using 5150.
- The testing process described in the manual is generally the experience of technician.
- Safety precaution is required in most of the process to avoid body injury and damage to the device or your car.
- Read the vehicle maintenance manual before use this device and follow safety precautions.
- It generates CO and other poisonous air when engine is running. To avoid this kind of hurt, please repair the car in a well-air-ventilated place.
- When the engine is running, many parts (such as the coolant fan, pulleys, fan belt etc.) rotate at high speed. To avoid serious injury, always be aware of moving parts. Keep a safe distance from these parts as well as other potentially moving objects.
- Engine parts become very hot when the engine is running. Don’t touch hot engine parts to avoid severe burns.
- Fuel and battery vapours are highly flammable. To prevent an explosion. keep all sparks, heated items and open flames away from the battery and fuel/ fuel vapours. Do not smoke near the vehicle during testing.
Coverage
- Supports the vehicles of Ford, Lincoln and Mercury after 1996 with 16PIN Socket, including F150, Transit, VAN.
- Supports OBDII/EOBD Modes of operation
Product specification
2.4’LCD,320 X 240 pixels color screen
Operating Voltage: 8V-18V
Operating Temperature: -0°C-60°C(32-140°F)
Storage Temperature: -20°C-70°C(4-158°F)
Appearance and Key Descriptions
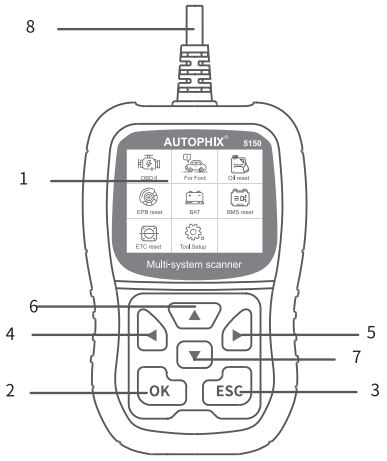
- LCD DISPLAY – Indicates test results. colourful, 320 x 240 pixels display.
- OK BUTTON – Confirms a selection (or action) from a menu.
- ESC BUTTON – Cancels a selection (or action) from a menu or returns to the menu.
- LEFT SCROLL BUTTON -Move to left menu in main menu mode; When more than one screen of data is retrieved, use the left button could move to previous screens.
- RIGHT SCROLL BUTTON -Move to right menu in main menu mode; When more than one screen of data is retrieved, use the right button could move to next screen for additional data.
- UP SCROLL BUTTON -Moves up through menu items in main menu mode; When more than one screen of data is retrieved, use the up button could move to previous screens.
- DOWN SCROLL BUTTON -Moves down through menu items in main menu mode; When more than one screen of data is retrieved, use the down button could move to next screen for additional data.
- OBD-16PIN CONNECTOR- Connects the scan tool to vehicle’s Data Link Connector (DLC).
OPERATION INSTRUCTIONS
1. Connect 5150
1.1 Turn the ignition on.
1.2 Locate the vehicle’s 16-pin Data Link Connector (DLC).

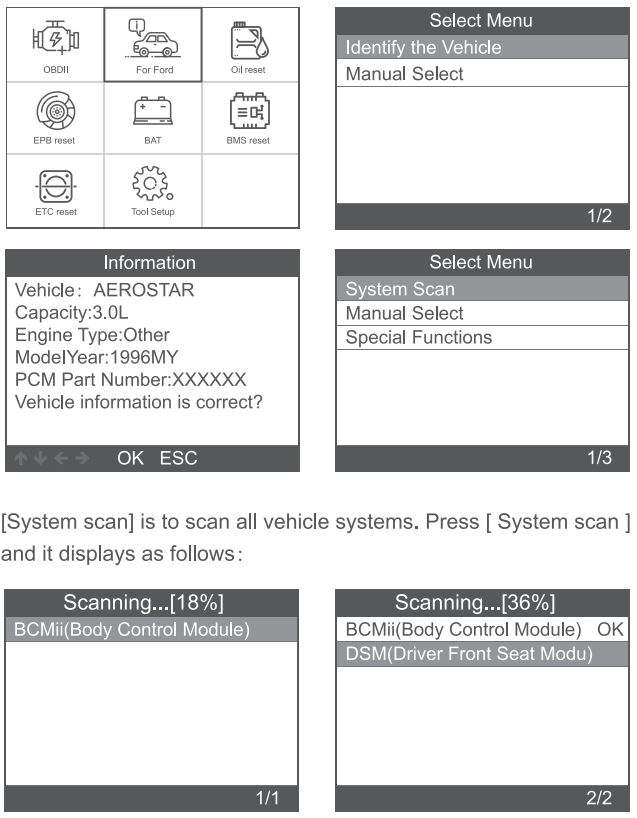
1.3 Main menu functions:
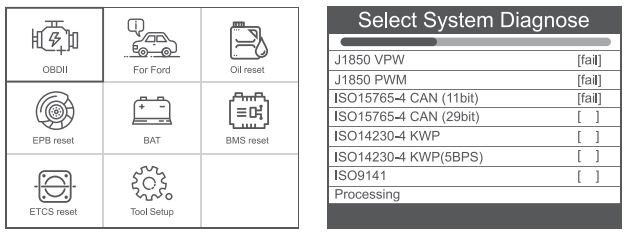
[OBDII]: Detect the engine system.
[For Ford]: Test all systems.
[Oil reset]: Oil change reset
[EPB reset]: EPB Brake pad reset
[BAT]: To read real Time Battery Voltage
[BMS reset]: Battery management system reset
[ETC reset]: Electric Throttle Control reset
[Tool Setup]: Language I Beeper/Instructions (Display at start-up )/Unit of Measure/Skin Style/Feedback the test result
2. 5150 Features
2.1 Basic Functions
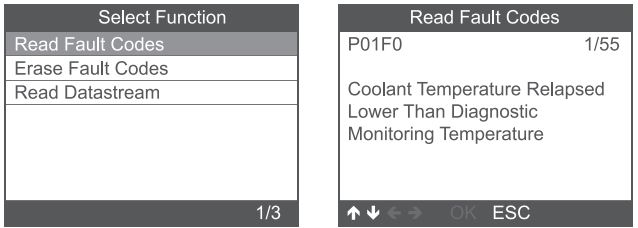
Choose [For Ford] and it displays as follows:
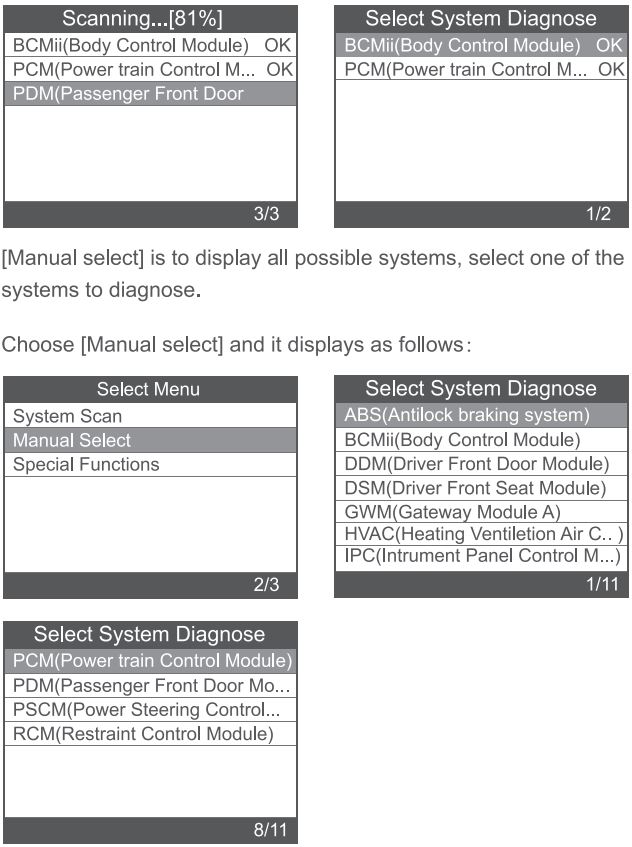
2.1.1 Read Fault Codes
Choose [Read Fault Codes]. Press up or down button to check each fault code as follows:
2.1.2 Erase Fault Codes
Choose [Erase Fault Codes] then press [OK] button, screen displays as follow:

2.1.3 Read DataStream
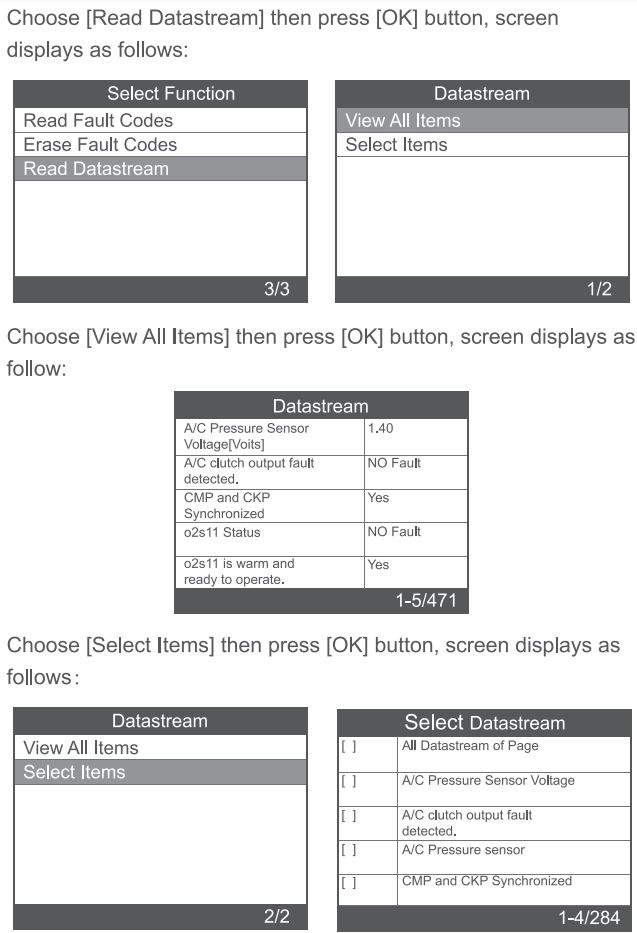
Press [LEFT] and [RIGHT] buttons to page.
Press [UP] and [DOWN] buttons to select one by one.
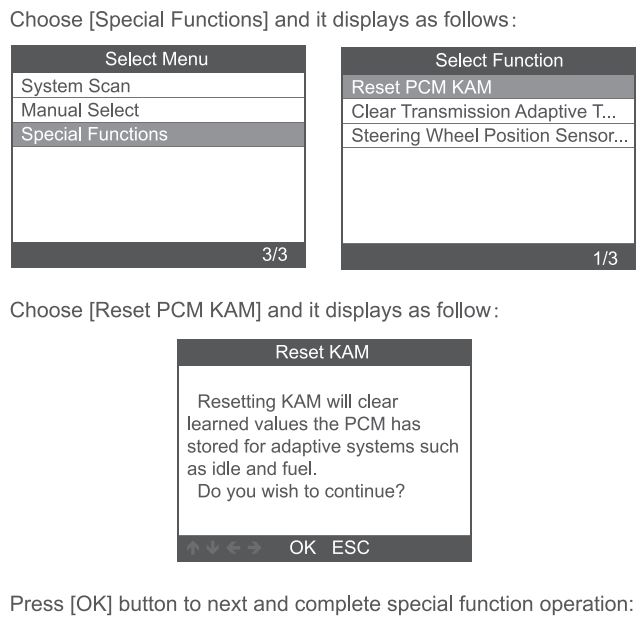
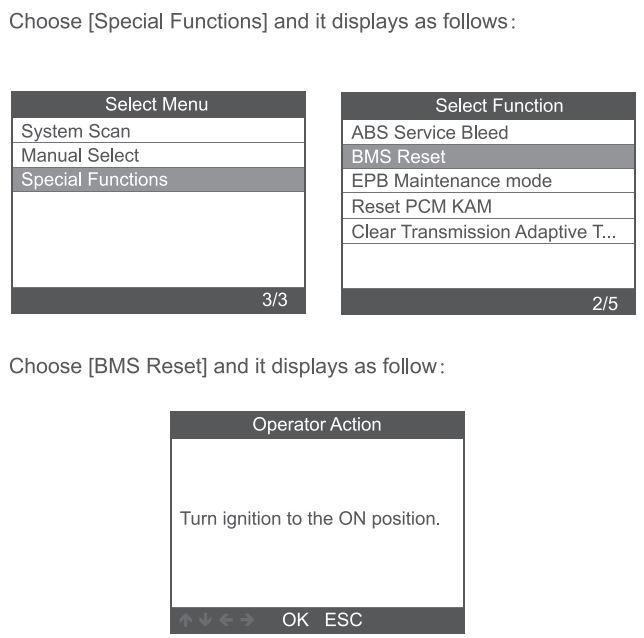
2.2 Main special functions
Different car models have different special functions.
(Here are some common special functions. If you want to learn more about the special features of the 5150, please call or email us.)
2.2.1 Reset PCM KAM

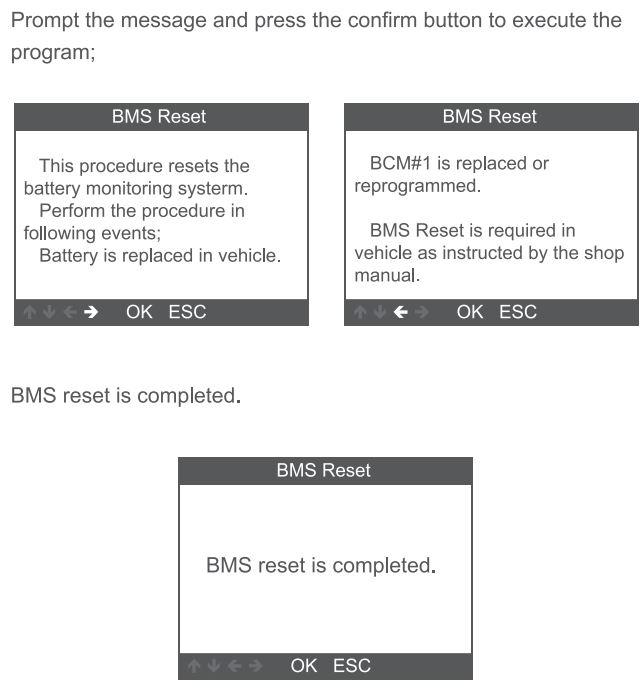
2.2.2 BMS Reset
3 OBDII Diagnose
Choose [OBDII ] and it displays as follows:
3.1 Read Codes
- Select [ Read Codes ] , then press [OK]

If there are no Diagnostic Trouble Codes present, the display indicates “No (pending) codes are stored in the module!” Wait a few seconds or press any key to return to the Diagnostic Menu.
2.View DTCs and their definitions on screen The control module number; Sequence of the DTCs; Total number of codes detected; Type of codes (Generic of Manufacturer specific)

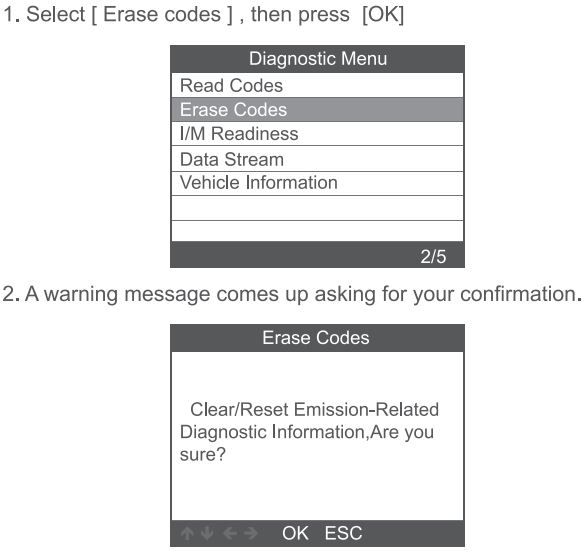
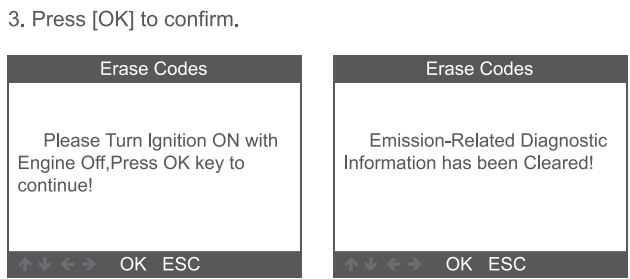
3.2 Erase Codes
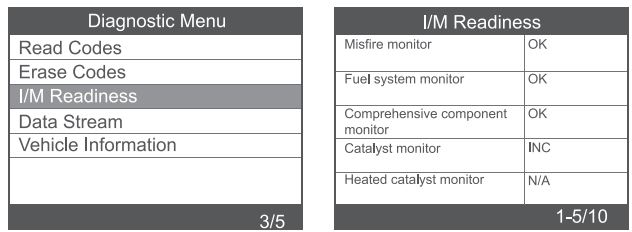
3.3 I/M Readiness
Select 1/M Readiness option, press [OK], the screen will display as follows:
3.4 Data Stream
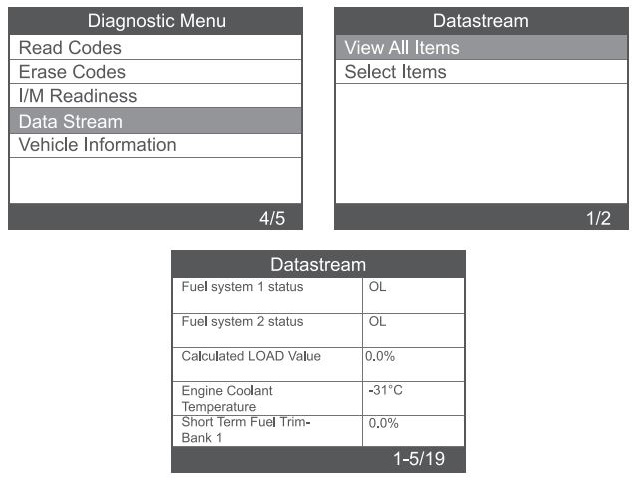
Choose [Data Stream] and it displays as follows:
3.5 Vehicle Information
Choose [Vehicle Information] and it displays as follows:

4. Tool Setup
4.1 Language
Choose [Language] and it displays as follows:

4.2 Instructions (Display at start-up)
Choose [Instructions (Display at start-up)] and it displays as follows: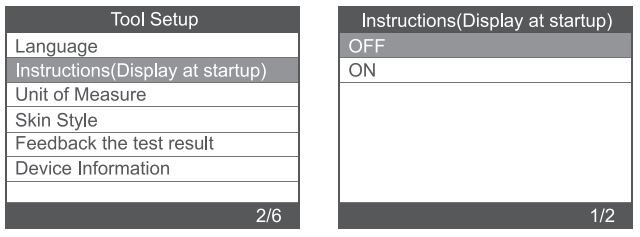
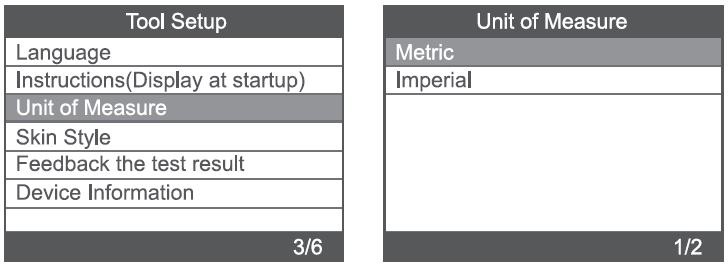
4.3 Unit of measure
Choose Unit of measure and it displays as follows:
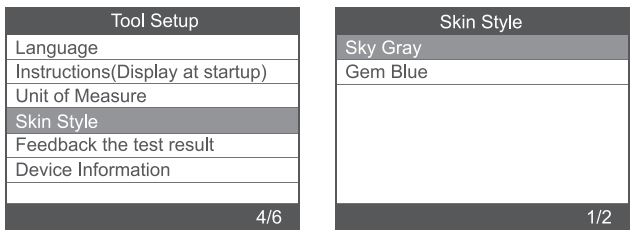
4.4 Skin Style
Choose Skin Style and it displays as follows:
4.5 Feedback
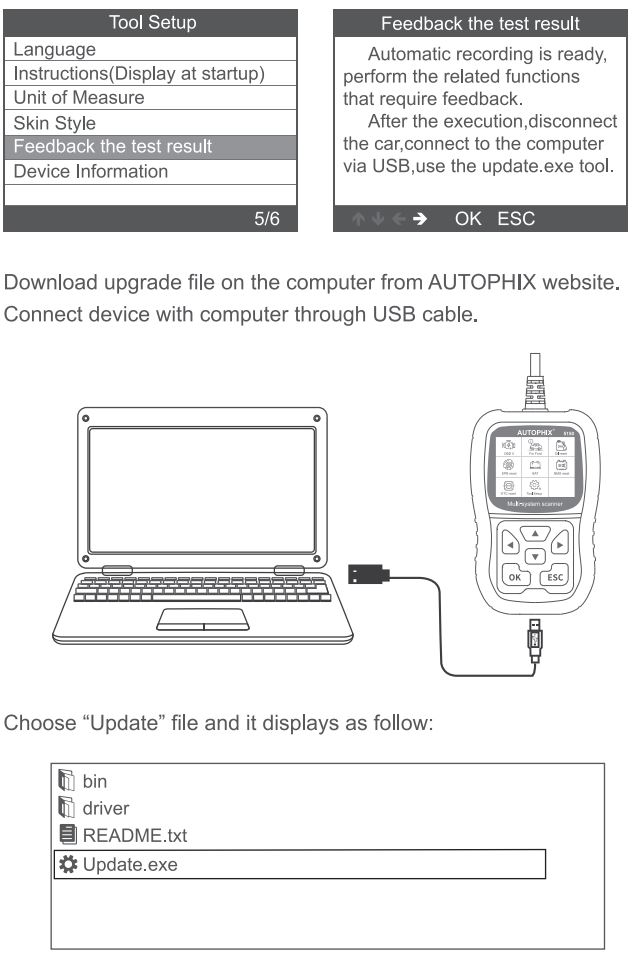
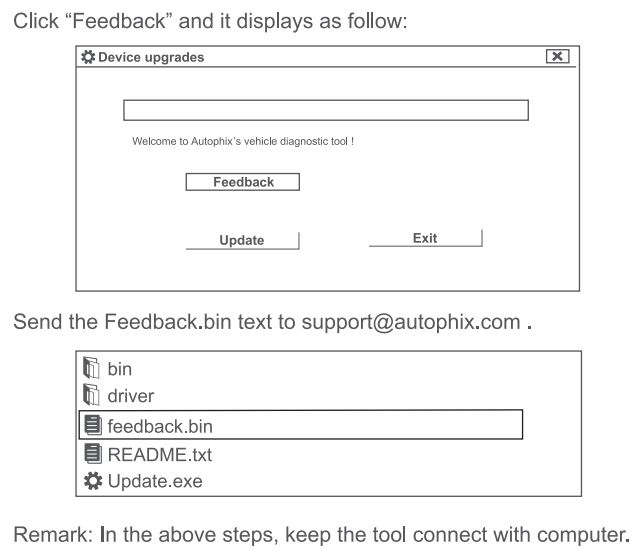
If it shows connected error with vehicle or other problem during using, please using the feedback function. Choose [Feedback the test result menu] and it displays as follows:
5. Update
The device is connected with computer through USB cable.
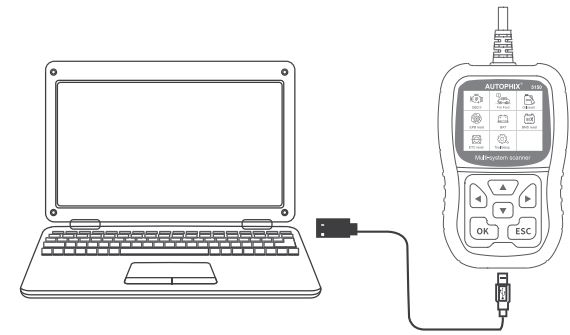
- When upgrade the device software, it only supports window 7/8/10 system.
- It can be updated directly on Windows 8 and windows 10 system.
- When the computer is windows 7 system, the device’s software driver is installed on the computer.
6. Warranty
- This warranty is limited to the person who purchases AUTO PH IX products.
- AUTOPHIX product is warranted against defects in materials and workmanship for one year (12 months) from date of delivery to the user.
7. Service Procedures
If you have any questions, please contact your local store distributor or visit our website www.autophix.com .
If it becomes necessary to return the scan tool for repair, contact your local distributor for more information.
AUTOPHIX TECH CO.,LTD
Floor4, Building2, Jinxicheng Industry park, Longhua District, Shenzhen, China
Phone: 0755-8528-1258
E-mail: support@autophix.com
Website: www.autophix.com
![]()
