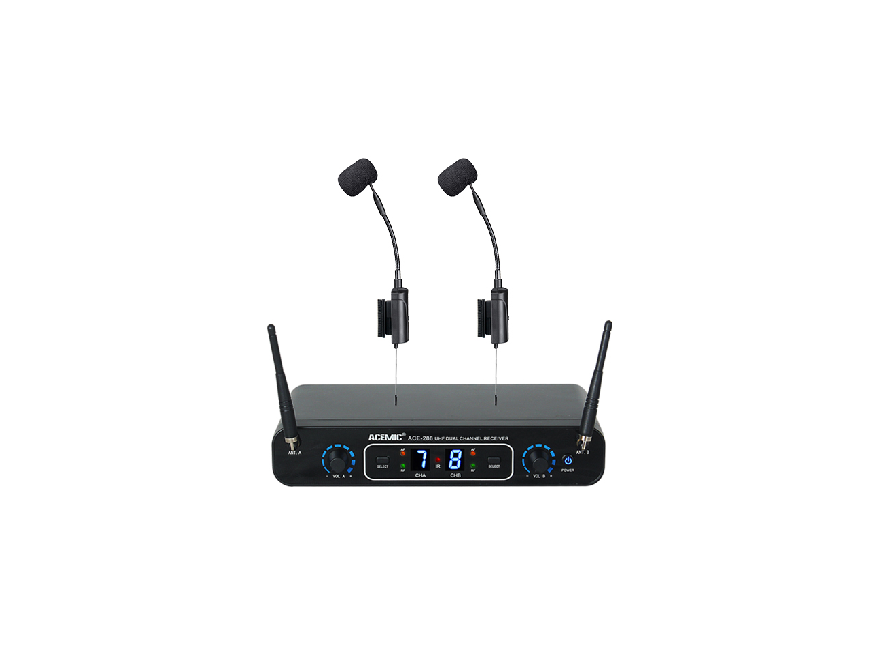
ACEMIC ACE-288 Wireless Microphone for Musical Instruments User Manual

ACE-288 Wireless Microphone for Musical Instruments User’s Manual
System Overview
Components
Transmitter 2pcs
Receiver 1pc
Power Adaptor 1pc
6.35mm Audio Cable 1pc
Charge Cable 1pc
User Manual 1pc
Warranty card 1pc
System Features
UHF 660-690 MHz frequency range
Digital wireless audio transmission
48KHz audio sampling mode
Pre-set 16*2 selectable frequencies
Digital ID code, completely solve the frequency interference
LED indicator for power, AF. RF signal,Channel
IR sync downloading the frequency from receiver
Up to 197 feet (60m) line-of-sight range
Suitable for musical instrument playing, stage performance etc.
Specifications
Receiver
Frequency Range: 660-690 MHz
Modulation Mode: pi/4 DQPSK
Sampling: 48KHz
Latency: 3ms
Dynamic Range: >96dB
Total Harmonic Distortion: <0.2%
Frequency Response: 30Hz-18KHz±2dB
Power Supply: DC12V/1A
Signal/Noise Ratio: >96dB
Receiving Sensitivity: -94dBm
Audio Output Level:
Unbalance 400mV, Balanced 400mV
Demensions: 205×115×37mm
Transmitter
Frequency Range: 660-690 MHz
Modulation Mode: pi/4 DQPSK
Transmitter Power: 10mW
Sensitivity: -47 db±2dB
Frequency Change: IR sync
Microphone Type: Condenser
Microphone Dimension: Φ14*5.0mm
Power Supply: 3.7V lithium battery
Battery Life: >6 hours
Dimension: 125×40×20mm
Receiver Features
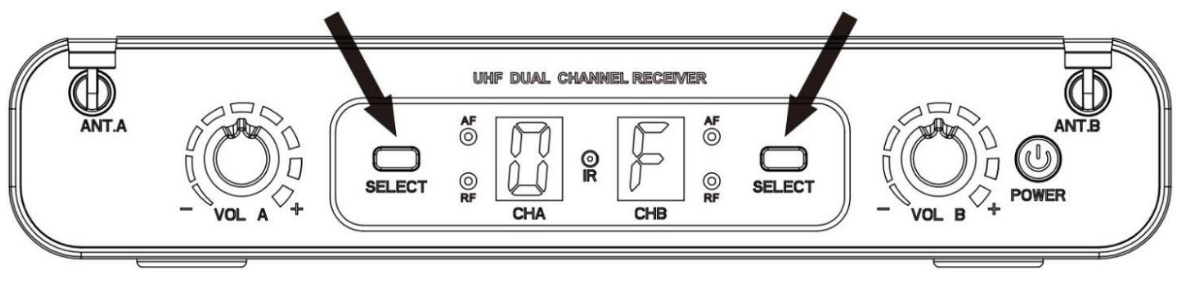
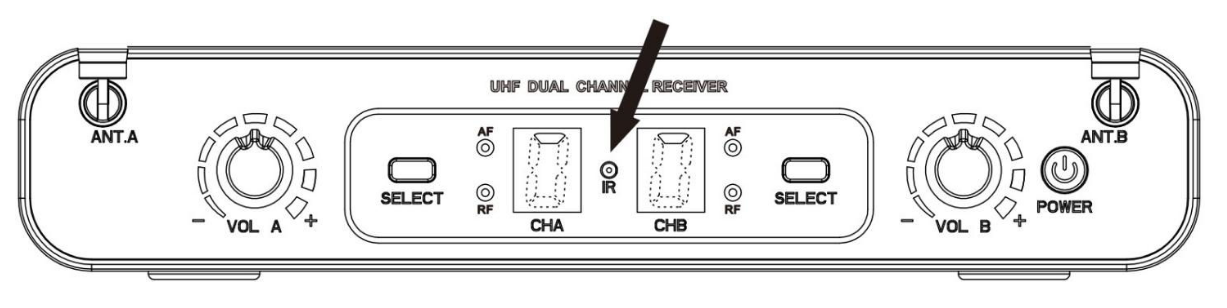
Front Panel
1. Power switch
Tap to turn on and off, light turns blue when system switched on
2. LED display
LED display shows the working channel
3. IR (Infrared) port
Send IR signal to transmitter for synchronization
4. SELECT button
Set channel and IR Sync
5. Volume control
Adjust the volume level
6. Antenna
Rear Panel
7. Power supply jack (DC12V/1000mA)
Connecting the power supply unit
8. 6.35mm (1/4”) unbalanced output jack
Connect the unbalanced input, e.g. of mixer or amplifier
9. Balanced XLR output jack
Connect the unbalanced input, e.g. of mixer or amplifier

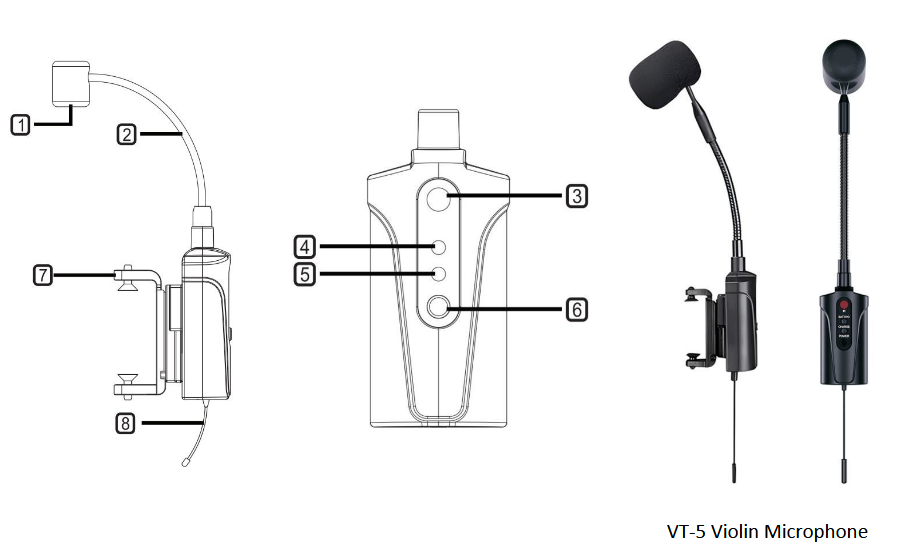
Transmitter Features
Transmitter
1. Condenser Capsule
Unidirectional Polar Pattern 14mm
2. Gooseneck hose
Multi-angle adjustable
3. IR sync window
When matching frequency through IR, put the IR sync window in front of the receiver’s window
4. Power indicator and low battery
Lights up after power on, when battery is low, indicator flickers every 0.5S.
5. Charge indicator
When it is charging, the indicator appears bright green, when it’s fully charged, the indicator light is off or slightly bright
6. Power button
Long-press to turn on or off
7. Spring clip
With sucker to protect the instrument from scratches. (VT-5)
7.1. Musical instrument fixing clips: Equipped with different musical instrument clips for different
musical instruments, such as spring clips, straps, Velcro etc.
8. Antenna
1/4 wave length antenna
System Setup
Receiver
1. Connect the included AC power supply to the rear of the receiver and turn on the receiver.
Channel
This system is 16 channels adjustable, press the “SELECT” button to select channel from 0–F, each channel represent a different frequency.
IR Sync
After setting the channel and the number stop flashing, press the “SELECT” button and hold for 1 second, the receiver start to send the infrared signals, then put the transmitter’s IR port close to the receiver’s IR port. After a successful sync, the RF light of receiver turns on.
Radio Frequencies in MHz
