HYUNDAI RAC 521 PLLBCH black clock radio
Instruction Manual

PRODUCT OVERVIEW

Thank you for buying our product. Please read through these operating instructions, so you will know how to operate your equipment properly. After you finished reading the instructions manual, put it away in a safe place for future reference.
SAFETY INSTRUCTIONS
- Minimum distances 5 cm around the apparatus for sufficient ventilations.
- The ventilation should not be impeded by covering the ventilation openings with items such as newspaper, table-cloths, curtains etc.
- No naked flame sources such as lighted candles should be placed on the apparatus.
- Attention should be drawn to the environmental aspects of battery disposal.
- The use of apparatus in moderate climates.
- Where the mains plug is used as the disconnect device, the disconnect device shall remain readily operable.
- Please refer the information on exterior bottom enclosure for electrical and safety information before installing or operating the apparatus.
- The batteries (battery pack or batteries installed) shall not be exposed to excessive heat such as sunshine, fire or the like.
- CAUTION – Danger of explosion if battery is incorrectly replaced. Replace only with the same or equivalent type.
![]() WARNING
WARNING
DO NOT INGEST BATTERY, CHEMICAL BURN HAZARD
This product contains a coin/button cell battery. If the coin/button cell battery is swallowed, it can cause severe internal burns in just 2 hours and can lead to death. Keep new and used batteries away from children. If the battery compartment does not close securely, stop using the product and keep it away from children. If you think batteries might have been swallowed or placed inside any part of the body, seek immediate medical attention.
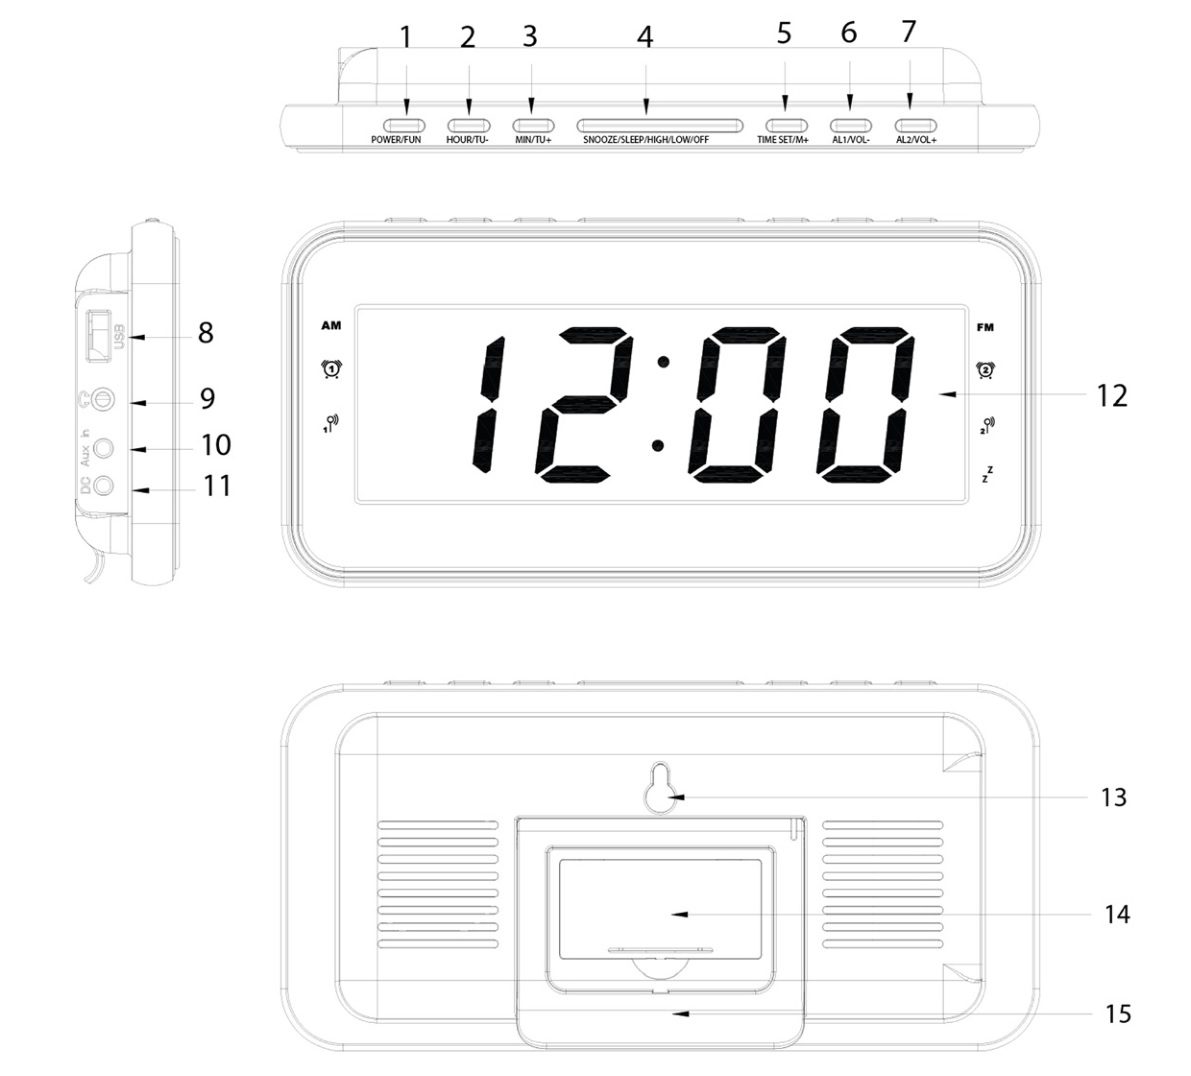
PRODUCT OVERVIEW AND BUTTONS
- POWER/FUN
- HOUR/TU
- MIN/TU+
- SNOOZE/SLEEP/HIGH/LOW/OFF
- TIME SET/M+
- AL1/VOL
- AL2/VOL+
- USB SLOT for charging
- Earphone jack
- AUX IN JACK
- DC 5V JACK
- LED display
- HOLE
- Battery door
- Holder
GETTING STARTED
Plug the DC adaptor inlet into the dc 5V jack (11). When electrical power has been interrupted and restored, if there are 2 AAA batteries in the radio and the power off and on again, the clock display will show the time. Make sure to reset both the correct time and alarm time for proper operation.
TIME SETTING
Press and hold the TIME SET/M+ (5), then the clock display will blink. press the HOUR/TU- (2) or MIN/TU+ (3) to set the clock display to the correct time. Press TIME SET/M+ (5) again when finished the setting, the time display will not blink.
DIMMER HIGH/LOW/OFF
On time display mode, long press HIGH/LOW/OFF (4) to set high or low of the LED display or turn off the LED display.
BATTERY BACKUP
This clock has a backup power system to ensure continuous operation during power failure. Insert two AAA batteries into battery compartment and the clock mechanism will continue to maintain the current time. Batteries provide no function other than the backup time. It does not allow you to listen to radio, sound an alarm or to display the time.
RADIO OPERATION
Long press POWER/FUN (1) to turn on the radio.
- Short press POWER/ FUN (1) to select AM band or FM band or AUX.
- Press HOUR / TU-(2) or MIN/TU+ (3) to adjust your desired frequency.
- Press AL 2/VOL + (7) to increase the volume, the maximum level up to level 16, the default volume is 12.
- Press AL 1/VOL- (6) to decrease the volume, the minimum level of volume is level 0.
MEMORY OPERATION
The clock radio can store 20 AM and 20 FM presets.
- On radio playing mode, select your desired band (FM/AM), press MIN/TU+ (3) or HOUR / TU- (2) to choose your desired frequency.
- Press and hold TIME SET/M+ (5) to enter into preset mode, the preset number will show and flash on the led display.
- Then short press HOUR/TU- (2) or MIN/TU+ (3) to select your desired memory numbers from P1 to P20.
- Press the TIME SET/M+ (2) to confirm your memory setting.
- Repeat the above steps, you can store your desired stations.
When the setting is correct, press TIME SET/M+ (5) to select your preset frequency to enjoy radio.
Press POWER /FUN (1) to turn off the radio.
ALARM FUNCTION
SETTING ALARM 1 / ALARM 2 BY BUZZER
In clock display mode, press AL 1/VOL- button (6) / AL 2/VOL+ button (7) once to select alarm by buzzer. The AL1 Buzzer / AL1 Buzzer icon and alarm time display will flash. Using HOUR/TU- button (2) and MIN/TU+ button (3) to set your desired alarm hour.
SETTING ALARM 1 / ALARM 2 BY RADIO
In clock display mode, press AL 1/VOL- button (6) / AL 2/VOL+ button (7) twice to select alarm by radio. The AL1 RAD / AL2 RAD icon and alarm time display will flash. Using HOUR/TU- button (2) and MIN/TU+ button (3) to set your desired alarm hour.
SLEEP FUNCTION
If you want to listening the radio while fall asleep. You can use sleep function by setting the sleep time. With the radio on, press THE SLEEP button (4) to enter into sleep mode. The 90 No. shows on the LED display. It states 90-minutes of sleep time and to be set in sequence 90-80-70-60-50-40-30- 20-10-OFF.
Press the SLEEP (4) to choose your desired sleep time, the sleep timer will change by 10 minutes each time you press the SLEEP button (4). The unit will stop playing when the timer countdowns from the preset sleep time to the end and then switch off by itself.
SNOOZE FUNCTION
On alarm sound mode, press POWER/FUN (1) to stop Alarm 1 or Alarm 2, the alarm will not resume. If you press the SNOOZE button (4) to stop the alarm, the al icon of the led display will blink, and the alarm will resume after 9 minutes.
CHARGING YOUR SMART PHONE OR PORTABLE DEVICE
The unit features a USB port for charging your portable device. When used with USB charging cord that came with device.
Plug one end of the USB cord (not included) into the USB port located on the back of the unit. Plug the other end of cord into the device you wish to charge. Observe the battery charge indicator on your device and the charging will start immediately. Unplug the cable when your device is charged.
CAUTION:
Before charging, please refer to the user manual of the device you wish to charge to make sure the charging current required does not exceed 1,5 A (1500 mA) of charging current. Overloading the charge circuit may damage the radio unit.
NOTE:
- Some smart phones and portable devices use proprietary USB connections and circuitry, so they may not charge when plugged into the USB port. Please refer to your device user manual before you attempt to charge them.
- It is normal for the radio unit to be warm while the USB port is in use and charging your smart phone or portable device.
SPECIFICATIONS

We reserve the right to change technical specifications.
![]() WARNING: DO NOT USE THIS PRODUCT NEAR WATER, IN WET AREAS TO AVOID FIRE OR INJURY OF ELECTRIC CURRENT. ALWAYS TURN OFF THE PRODUCT WHEN YOU DON’T USE IT OR BEFORE A REVISION. THERE AREN’T ANY PARTS IN THIS APPLIANCE WHICH ARE REPARABLE BY CONSUMER. ALWAYS APPEAL TO A QUALIFIED AUTHORIZED SERVICE. THE PRODUCT IS UNDER A DANGEROUS TENTION.
WARNING: DO NOT USE THIS PRODUCT NEAR WATER, IN WET AREAS TO AVOID FIRE OR INJURY OF ELECTRIC CURRENT. ALWAYS TURN OFF THE PRODUCT WHEN YOU DON’T USE IT OR BEFORE A REVISION. THERE AREN’T ANY PARTS IN THIS APPLIANCE WHICH ARE REPARABLE BY CONSUMER. ALWAYS APPEAL TO A QUALIFIED AUTHORIZED SERVICE. THE PRODUCT IS UNDER A DANGEROUS TENTION.
![]() TO AVOID DANGER OF SUFFOCATION, KEEP THE PLASTIC BAG AWAY FROM BABIES AND CHILDREN. DO NOT USE THIS BAG IN CRIBS, BEDS, CARRIAGES OR PLAYPENS. THIS BAG IS NOT A TOY.
TO AVOID DANGER OF SUFFOCATION, KEEP THE PLASTIC BAG AWAY FROM BABIES AND CHILDREN. DO NOT USE THIS BAG IN CRIBS, BEDS, CARRIAGES OR PLAYPENS. THIS BAG IS NOT A TOY.
Disposal of old Electrical & Electronic Equipment
(Applicable in the European Union and other European countries with separate collection systems)
![]() This symbol on the product or on its packaging indicates that this product shall not be treated as household waste. Instead it shall be handed over to the applicable collection point for the recycling of electrical and electronic equipment. By ensuring this product is disposed of correctly, you will help prevent potential negative consequences for the environment and human health, which could otherwise be caused by inappropriate waste handling of this product. The recycling of materials will help to conserve natural resources. For more detailed information about recycling of this product, please contact your local Civic Office, your household waste disposal service or the shop where you purchased the product.
This symbol on the product or on its packaging indicates that this product shall not be treated as household waste. Instead it shall be handed over to the applicable collection point for the recycling of electrical and electronic equipment. By ensuring this product is disposed of correctly, you will help prevent potential negative consequences for the environment and human health, which could otherwise be caused by inappropriate waste handling of this product. The recycling of materials will help to conserve natural resources. For more detailed information about recycling of this product, please contact your local Civic Office, your household waste disposal service or the shop where you purchased the product.
Hereby, ETA a.s. declares that the radio equipment type RAC521PLLBCH is in compliance with Directive 2014/53/EU. The full text of the EU declaration of conformity is available at the following internet address: http://www.hyundaielectronics.cz/declaration_of_conformity


Licensed by Hyundai Corporation Holdings, Korea
Imported by ETA a. s
