▷Safety Precautions
Please read the following Safety Precautions before you start using the device.
• Keep this user guide in a safe place for later reference.
• Read all warnings and follow all instructions.
• Sit at least 18″ (45 cm) away from the device.
• Allow at least 4″ (10 cm) clearance around the device to ensure proper ventilation.
• Place the device in a well-ventilated area. Do not place anything on the device that prevents heat dissipation.
• Do not use the device near water. To reduce the risk of fire or electric shock, do not expose the device to moisture.
• Avoid exposing the device to direct sunlight or other sources of sustained heat.
• Do not install near any heat sources such as radiators, heat registers, stoves, or other devices (including amplifiers) that may increase the temperature of the device to dangerous levels.
• Use a soft, dry cloth to clean the external housing. For more information, refer to the “Maintenance” section on page 51.
• Oil may collect on the screen as you touch it. To clean the greasy spots on the screen, refer to the “Maintenance” section on page 51.
• Do not touch the screen surface with sharp or hard objects, as it may cause damage to the screen.
• When moving the device, be careful not to drop or bump the device on anything.
• Do not place the device on an uneven or unstable surface. The device may fall over resulting in an injury or a malfunction.
• Do not place any heavy objects on the device or connection cables.
• If smoke, an abnormal noise, or a strange odor is present, immediately turn the device off and call your dealer or ViewSonic®. It is dangerous to continue using the device.
• Do not attempt to circumvent the safety provisions of the polarized or grounding-type plug. A polarized plug has two blades with one wider than the other. A grounding-type plug has two blades and a third grounding prong. The wide blade and the third prong are provided for your safety. If the plug does not fit into your outlet, obtain an adapter and do not attempt to force the plug into the outlet.
• When connecting to a power outlet, DO NOT remove the grounding prong. Please ensure grounding prongs are NEVER REMOVED.
• Protect the power cord from being treaded upon or pinched, particularly at the plug, and at the point where it emerges from the equipment. Ensure that the power outlet is located near the equipment so that it is easily accessible.
• Only use attachments/accessories specified by the manufacturer.
• When a cart is used, use with caution when moving the cart/equipment combination to avoid injury from tipping over.![]()
• Disconnect the power plug from the AC outlet if the device is not being used for a long period of time.
• Refer all servicing to qualified service personnel. Service will be required when the unit has been damaged in any way, such as:
» if the power supply cord or plug is damaged
» if liquid is spilled onto or objects fall in the unit
»if the unit is exposed to moisture
»if the unit does not operate normally or has been dropped.
• NOTICE: LISTENING THROUGH EAR-/HEADPHONES AT A HIGH VOLUME FOR EXTENDED PERIODS CAN CAUSE HEARING DAMAGE/HEARING LOSS. When using ear-/headphones, adjust the volume to appropriate levels, or hearing damage may result.
• NOTICE: THE MONITOR MAY OVERHEAT AND SHUTDOWN! If the device shuts down automatically, please turn on your monitor again. After rebooting, change your monitor’s resolution and refresh rate. For details, please refer to the graphics card’s user guide.
▷Introduction
Package Contents
• Monitor
• Power cord
• Video cable
• Quick start guide
NOTE: The power cord and video cables included in your package may vary depending on your country. Please contact your local reseller for more information.
Product Overview
Front View
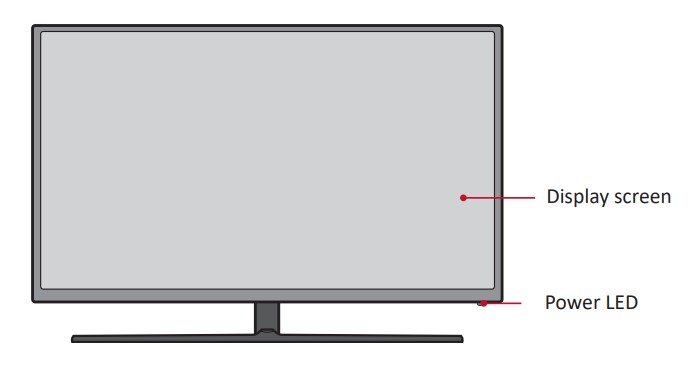 Rear View
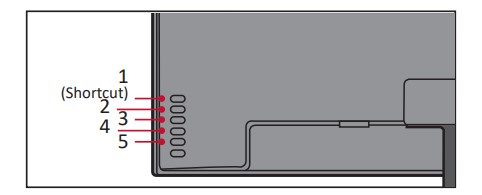
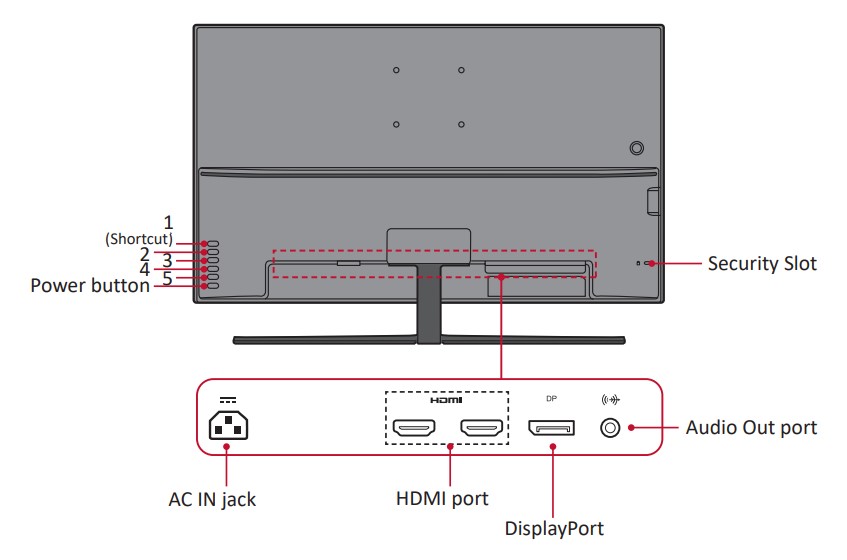 NOTE: For more information about the 1(Shortcut)/2/3/4/5 key and its functions, refer to page 18.
▷Initial Setup
This section provides instructions for setting up your monitor.
Wall Mounting
 Refer to the table below for the standard dimensions for wall mount kits.
NOTE: Wall mount kits are sold separately.
IMPORTANT! Due to the design of the monitor, it is recommended the user does not mount the monitor themselves. Please contact customer service for support.
Using the Security Slot
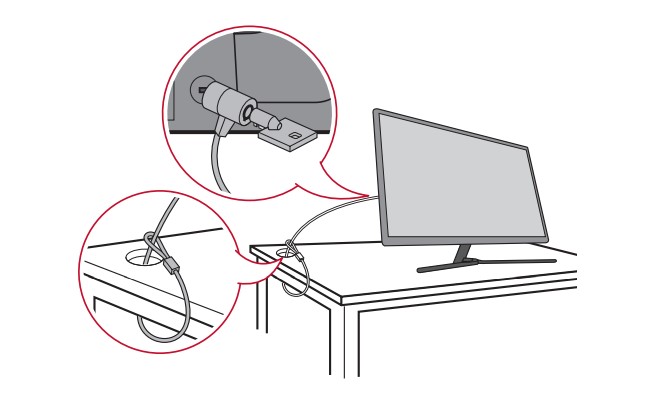
To help prevent the monitor from being stolen, use a security slot locking device to secure the monitor to a fixed object.
Below is an example of setting up a security slot locking device on a table.
▷Making Connections
This section guides you on how to connect the monitor with other equipment.
Connecting to Power

1. Connect the power cord to the AC IN jack at the rear of the device.
2. Connect the power cord plug to a power outlet.
Connecting External Devices
HDMI Connection
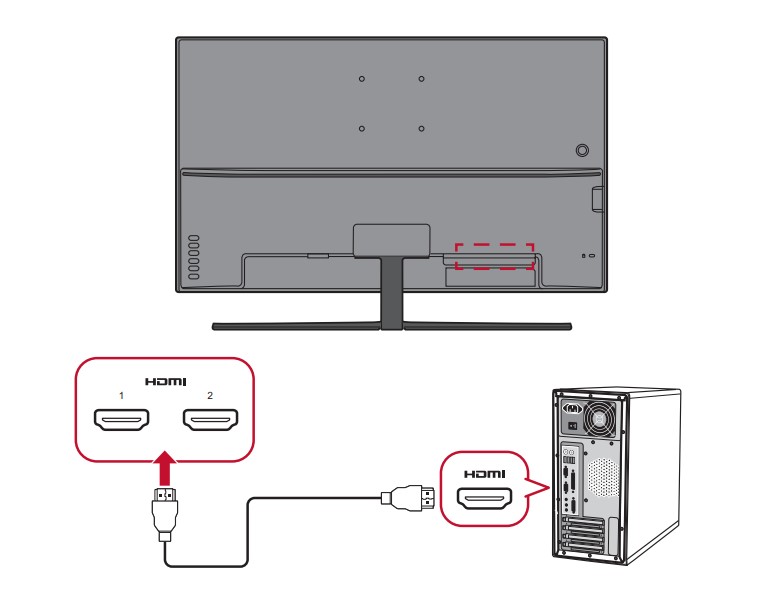 Connect one end of an HDMI cable to the HDMI port of your monitor. Then connect the other end of the cable to the HDMI port of your computer.
NOTE: The monitor is equipped with two HDMI 2.0 ports.
Display Port Connection
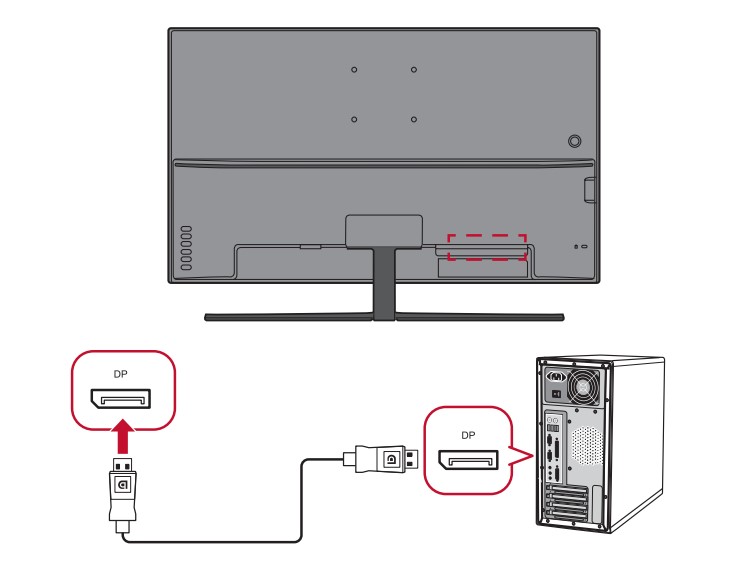 Connect one end of a Display Port cable to the Display Port port. Then connect the other end of the cable to the Display Port or mini DP port of your computer.
NOTE: To connect the monitor to the Thunderbolt port (v. 1&2) on you Mac, connect the mini DP end of the “mini DP to Display Port cable” to the Thunderbolt output of your Mac. Then connect the other end of the cable to the Display Port port of the monitor.
Audio Connection
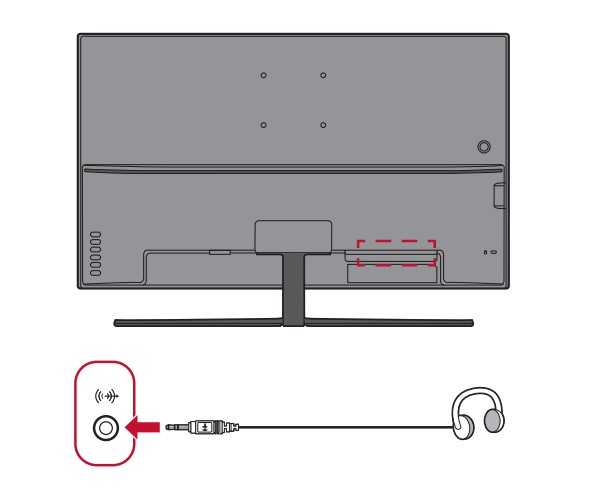
Plug the audio jack of the ear-/headphones into the Audio Out port of the monitor. Additionally, you can connect the monitor to a sound bar using an audio cable.
NOTE: The monitor is also equipped with dual speakers.
▷Using the Monitor
Adjusting the Viewing Angle
For optimal viewing, you can adjust the viewing angle using the following method:
Tilt Angle Adjustment

Tilt the monitor forwards or backwards to the desired viewing angle (-5˚ to 13˚).
NOTE: When making adjustments, support the stand firmly with one hand while tilting the monitor forwards or backwards with the other hand.
Turning the Device On/Off
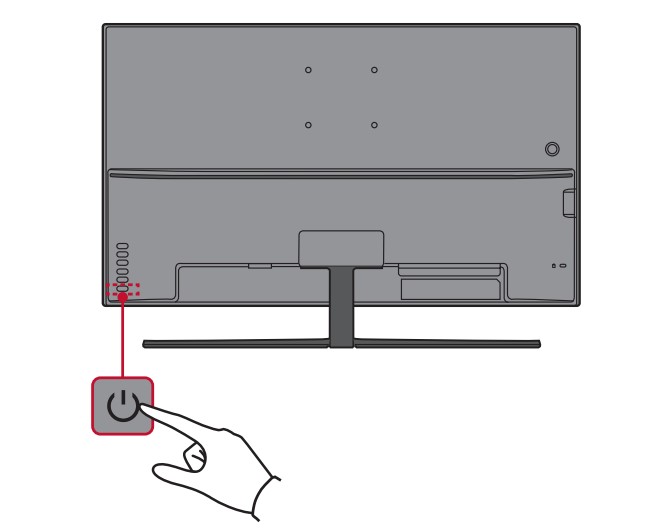
1. Plug the power cord into a power outlet.
2. Press the Power button to turn on the monitor.
3. To turn the monitor off, press the Power button again.
NOTE: The monitor will still consume some power as long as the power cord is connected to the power outlet. If the monitor is not being used for a long period of time, please disconnect the power plug from the power outlet.
Using the Control Panel Keys
Use the control panel keys to access the Quick Menu, activate Hot Keys, navigate the On-Screen Display (OSD) Menu, and change the settings.
Quick Menu
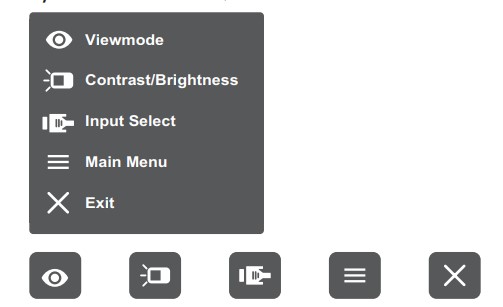
Press the 2/3/4/5 key to activate the Quick Menu.
NOTE: Follow the key guide that appears on the bottom of the screen to select the option or make adjustments.
![]() ViewMode
ViewMode
Select one of the preset color settings.
NOTE: The 1(Shortcut) key can be assigned to give you quick access to a preferred menu. For more information, see page 18
![]() Contrast/Brightness
Contrast/Brightness

Adjust the contrast or brightness level.
![]() Input Select
Input Select
Select the input source.
≡Main Menu
Enter the On-Screen Display (OSD) Menu.
❎Exit
Exit the Quick Menu.
NOTE: Use the 5 key to exit the Quick Menu.
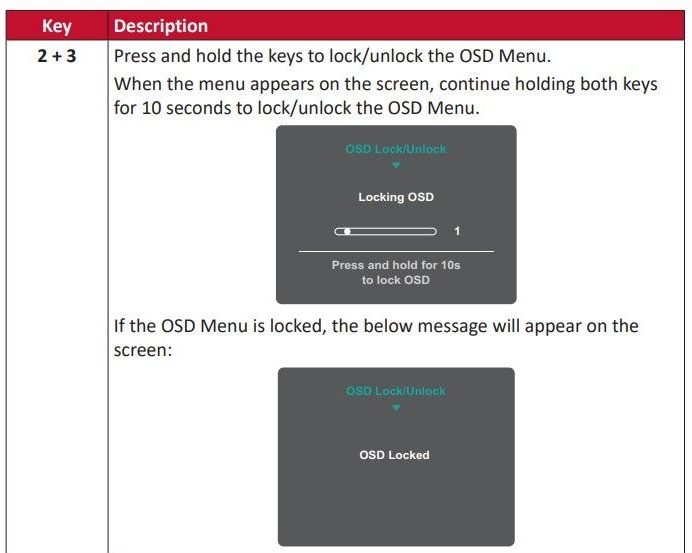
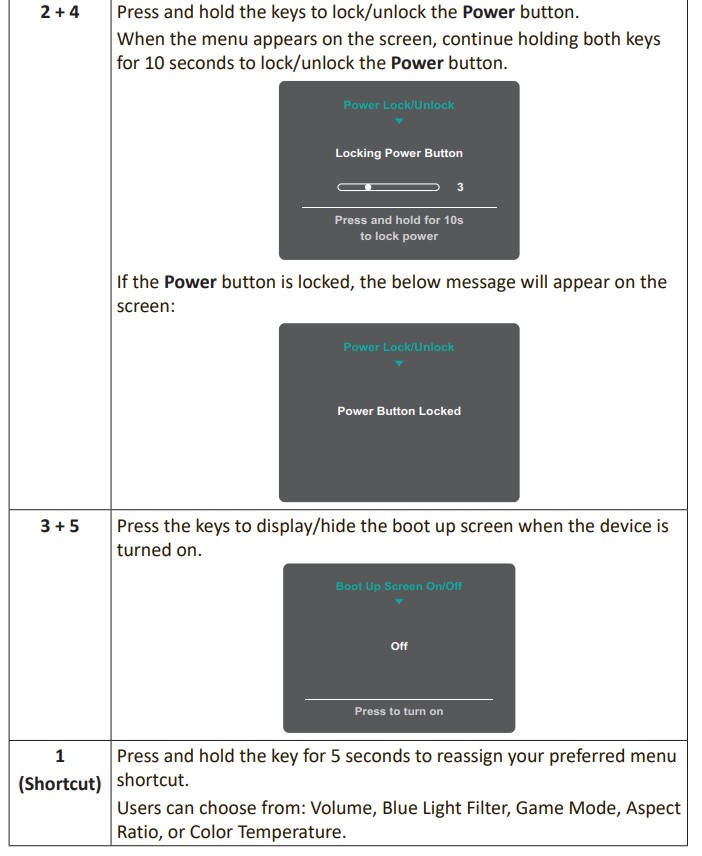
Hot Keys
When the On-Screen Display (OSD) Menu is off, you can quickly access special functions by using the control panel keys.
 Configuring the Settings
General Operations
1. Press the 2/3/4/5 key to display the Quick Menu. Then press the 4 key to display the OSD Menu.
2. Press the 1(Shortcut) or 2 key to select the main menu. Then press the 3 key to enter the selected menu.
3. Press the 1(Shortcut) or 2 key to select the desired menu option. Then press the 3 key to enter the sub-menu.
4. Press the 1(Shortcut) or 2 key to adjust/select the setting. Then press the 3 key to confirm.
NOTE: Certain menu option adjustments do not require the user to press the 3 key to confirm the selection. Follow the key guide that appears on the bottom of the screen to select the option or make adjustments.
5. Press the 4 key to return to the previous menu.
NOTE: To exit the OSD Menu, press the 4 key until the OSD Menu disappears.
On-Screen Display (OSD) Menu Tree

Menu Options
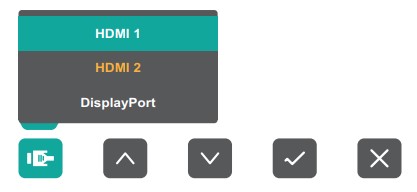
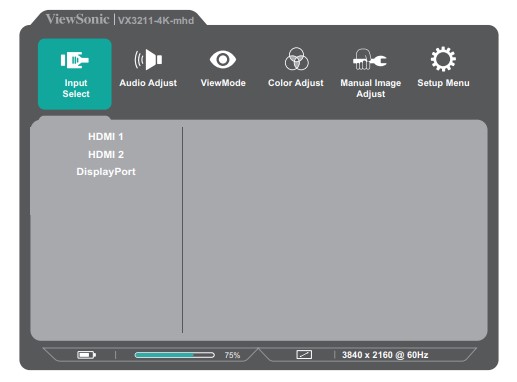
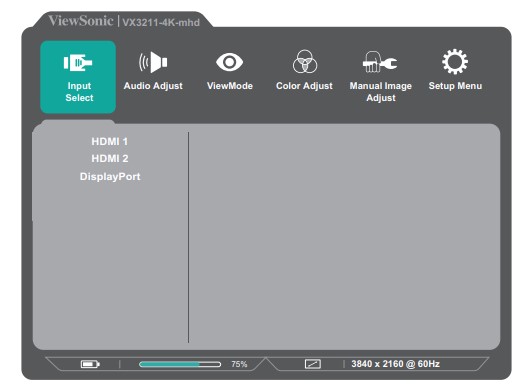
Input Select
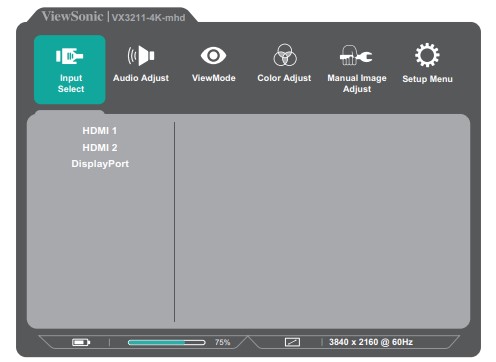
1. Press the 2/3/4/5 key to display the Quick Menu. Then press the 4 key to display the OSD Menu.
2. Press the 1(Shortcut) or 2 key to select Input Select. Then press the 3 key to enter the Input Select menu.
3. Press the 1(Shortcut) or 2 key to select the desired input source. Then press the 3key to confirm the selection.
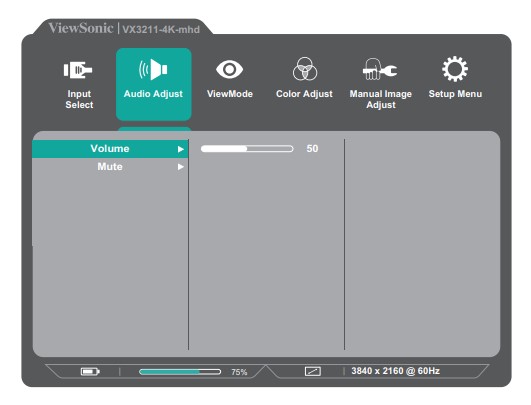
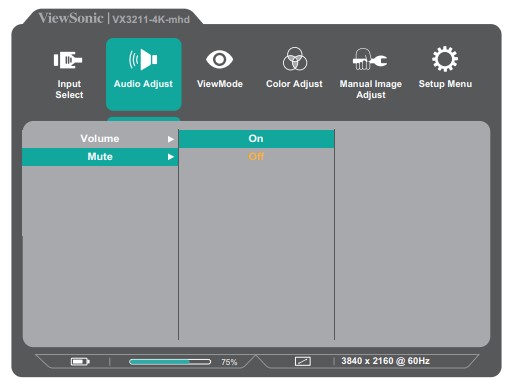
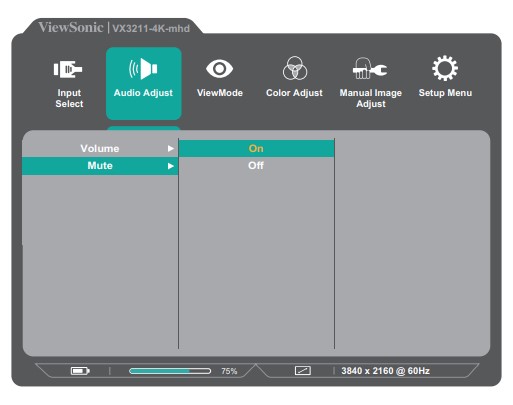
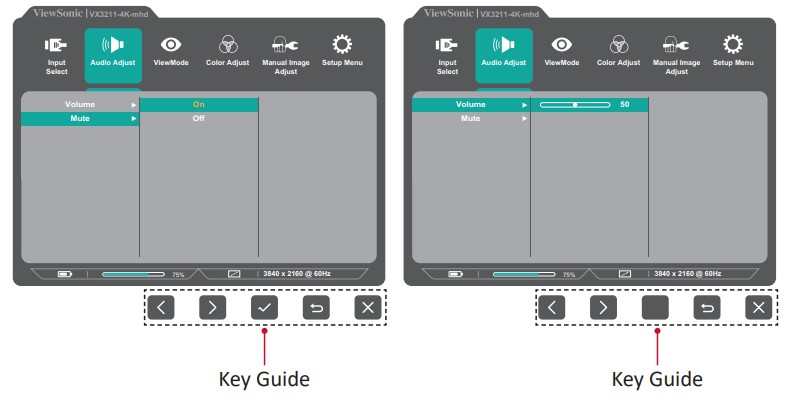
Audio Adjust

1. Press the 2/3/4/5 key to display the Quick Menu. Then press the 4 key to display the OSD Menu.
2. Press the 1(Shortcut) or 2 key to select Audio Adjust. Then press the 3 key to enter the Audio Adjust menu.
3. Press the 1(Shortcut) or 2 key to select the desired option. Then press the 3 key to enter its sub-menu.
4. Press the 1(Shortcut) or 2 key to adjust/select the setting, and press the 3 key to confirm the selection (if applicable).enter the Audio Adjust menu.
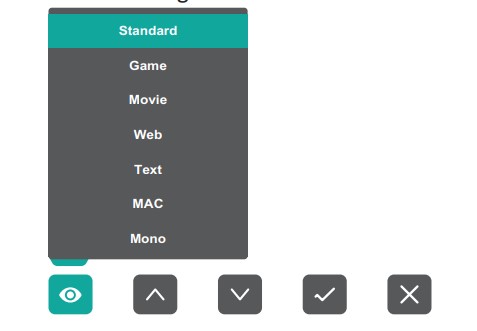
View Mode Menu
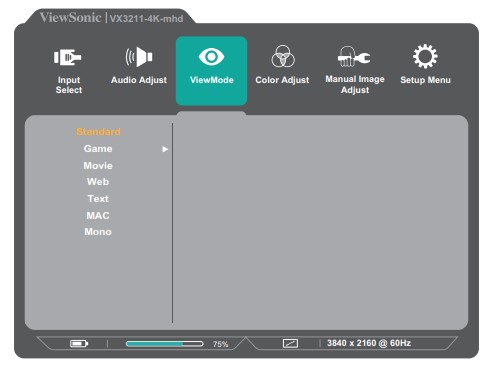
1. Press the 2/3/4/5 key to display the Quick Menu. Then press the 4 key to display the OSD Menu.
2. Press the 1(Shortcut) or 2 key to select View Mode. Then press the 3 key to enter the View Mode menu.
3. Press the 1(Shortcut) or 2 key to select the setting. Then press the 3 key to confirm the selection.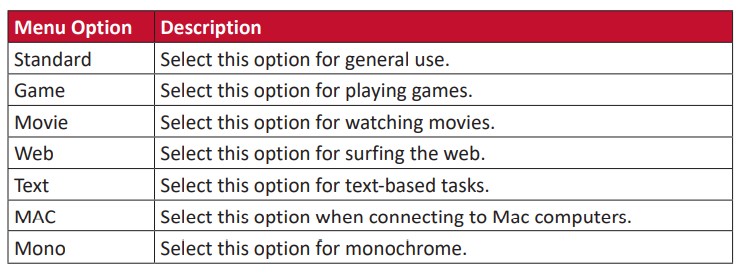
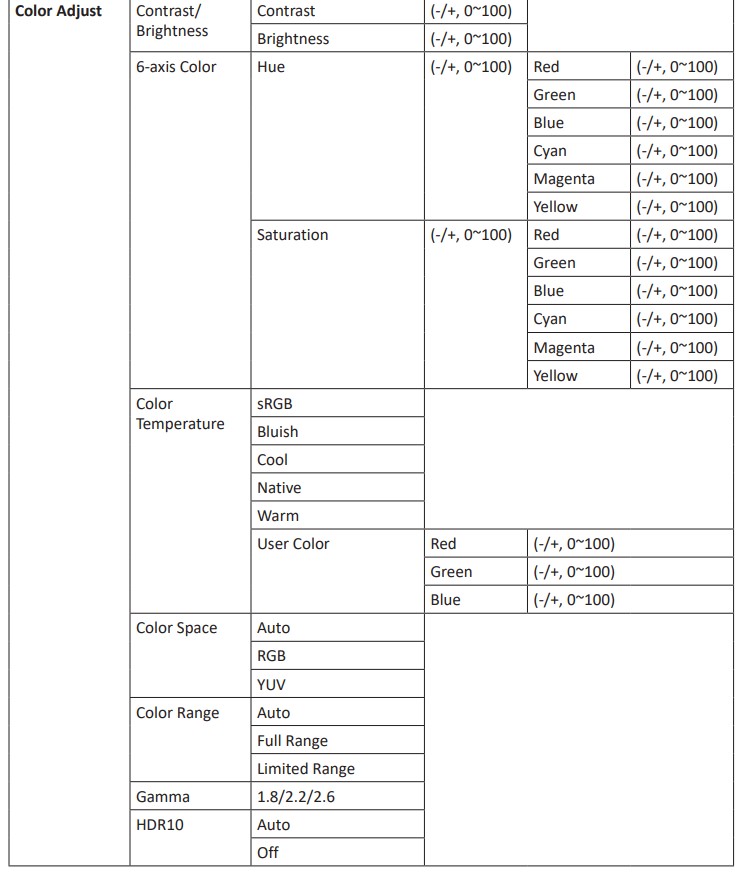
Color Adjust Menu
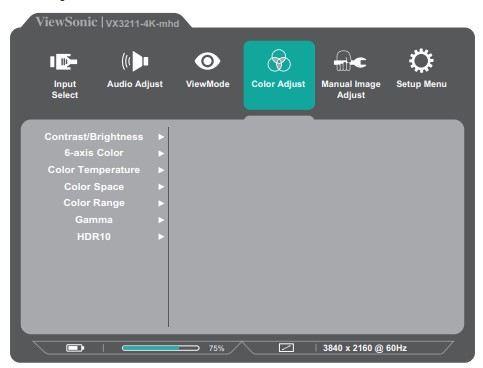
NOTE: Some sub-menus may not be adjustable depending on the user’s custom settings.
1. Press the 2/3/4/5 key to display the Quick Menu. Then press the 4 key to display the OSD Menu.
2. Press the 1(Shortcut) or 2 key to select Color Adjust. Then press the 3 key to enter the Color Adjust menu.
3. Press the 1(Shortcut) or 2 key to select the menu option. Then press the 3 key to enter its sub-menu.
4. Press the 1(Shortcut) or 2 key to select the setting. Then press the 3 key to confirm the selection.
NOTE: Some sub-menu options may have another sub-menu. To enter the respective sub-menu, press the 3 key. Follow the key guide that appears on the bottom of the screen to select the option or make adjustments.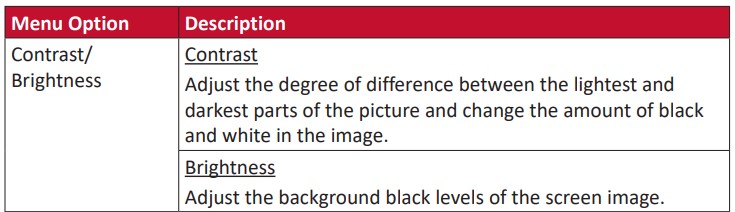
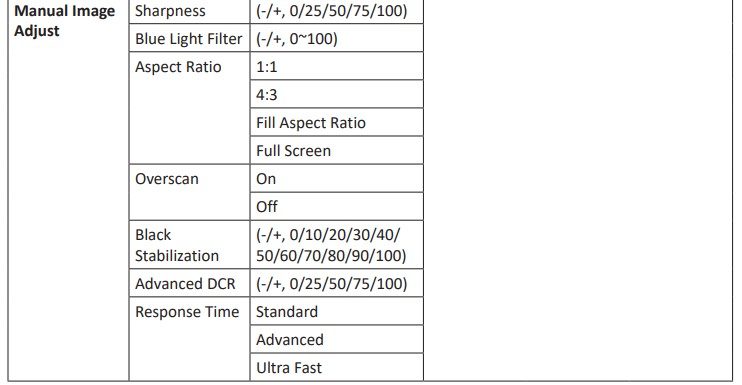
Manual Image Adjust Menu
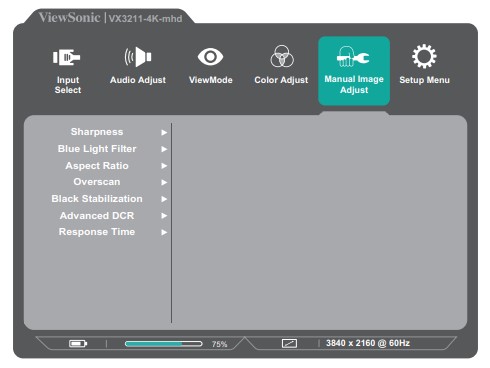
1. Press the 2/3/4/5 key to display the Quick Menu. Then press the 4 key to display the OSD Menu.
2. Press the 1(Shortcut) or 2 key to select Manual Image Adjust. Then press the 3key to enter the Manual Image Adjust menu.
3. Press the 1(Shortcut) or 2 key to select the menu option. Then press the 3 key to enter its sub-menu.
4. Press the 1(Shortcut) or 2 key to adjust/select the setting. Then press the 3 key to confirm (if applicable).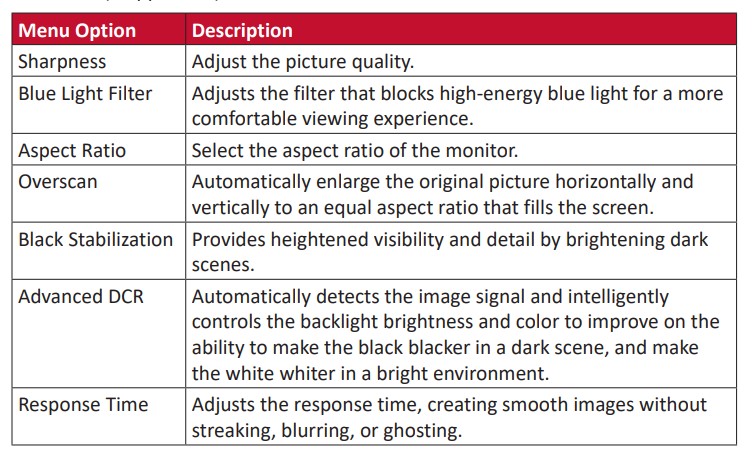
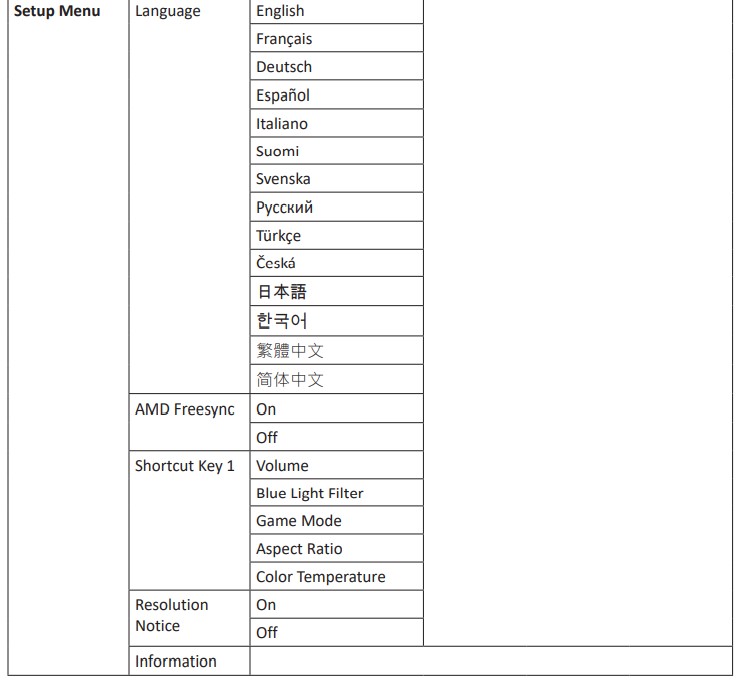
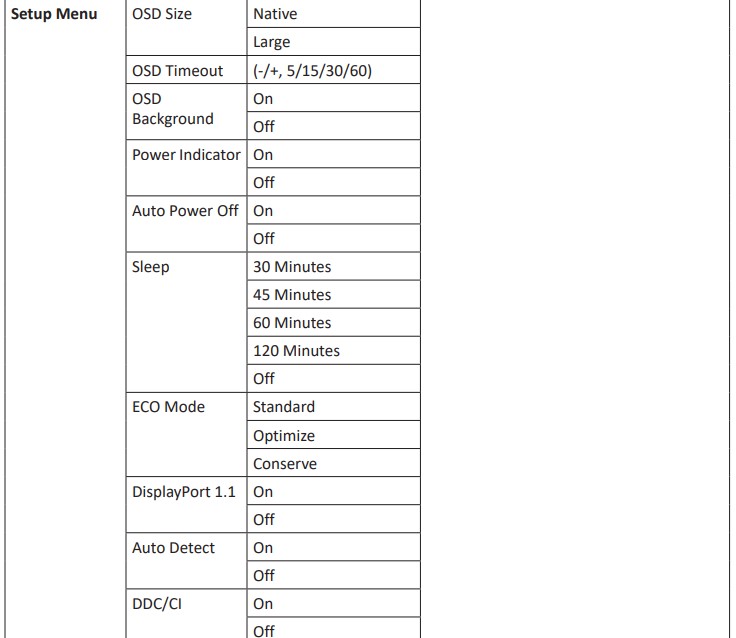
Setup Menu

1. Press the 2/3/4/5 key to display the Quick Menu. Then press the 4 key to display the OSD Menu.
2. Press the 1(Shortcut) or 2 key to select Setup Menu. Then press the 3 key to enter the Setup Menu menu.
3. Press the 1(Shortcut) or 2 key to select the menu option. Then press the 3 key to enter its sub-menu.
4. Press the 1(Shortcut) or 2 key to adjust/select the setting. Then press the 3 key to confirm (if applicable).
NOTE: Some sub-menu options may have another sub-menu. To enter the respective sub-menu, press the 3 key. Follow the key guide that appears on the bottom of the screen to select the option or make adjustments.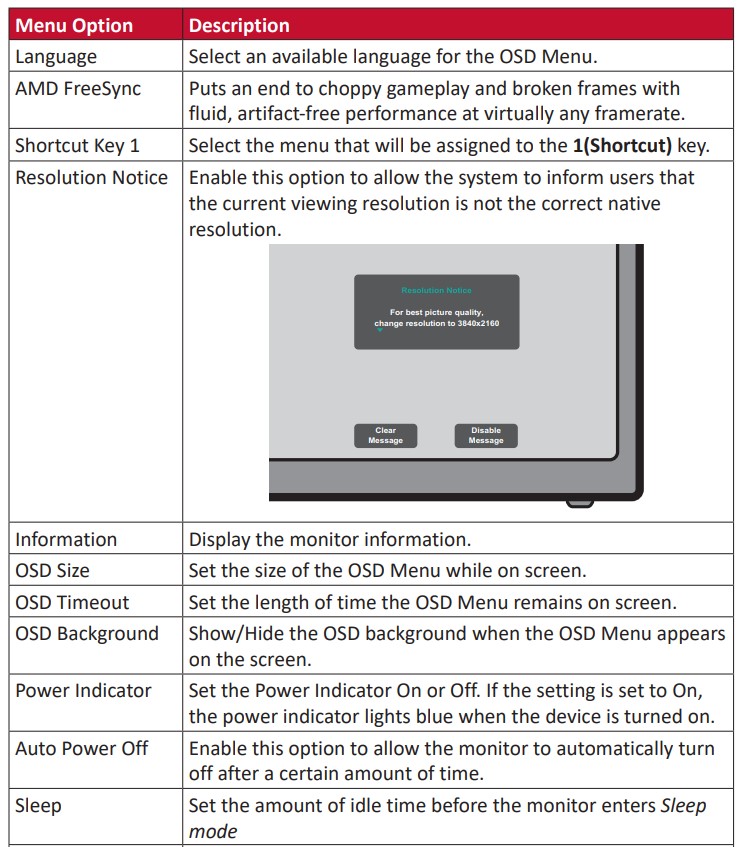
▷Advanced Features and Settings
This section describes advanced features of the monitor.
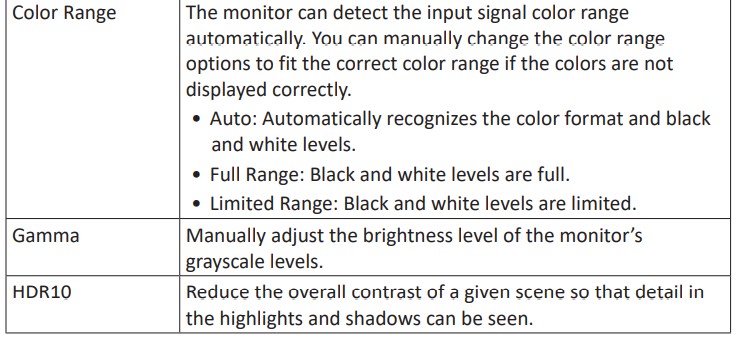
HDR10 (High-Dynamic-Range)
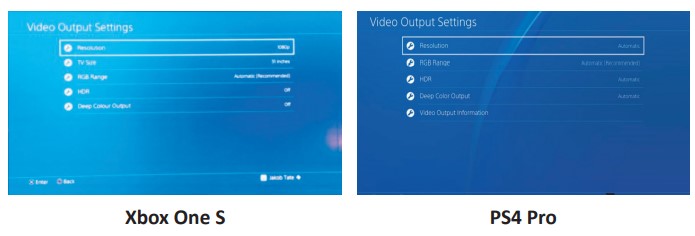 Reduces the overall contrast of a given scene so that detail in the highlights and shadows can be seen.
NOTE: Ensure the HDR setting is turned on on your device first before enabling the HDR10 on the monitor. For example, the HDR setting on a Xbox One S or PS4 Pro needs to be turned on first before enjoying your HDR10 video content.
To enable the HDR10 function: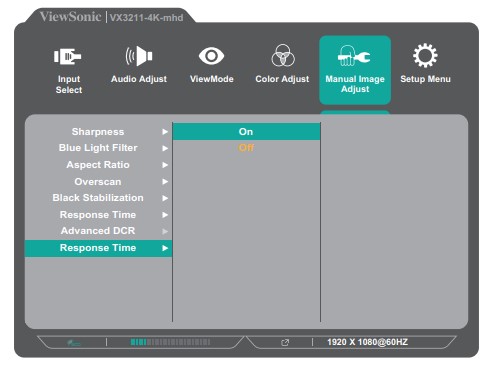
To enable the HDR10 function:
1. Press the 2/3/4/5 key to display the Quick Menu. Then press the 4 key to display the OSD Menu.
2. Press the 1(Shortcut) or 2 key to select Color Adjust. Then press the 3 key to enter the Color Adjust menu.
3. Press the 1(Shortcut) or 2 key to select HDR10. Then press the 3 key to enter its sub-menu.
4. Press the 1(Shortcut) or 2 key to select Auto. Then press the 3 key to confirm.
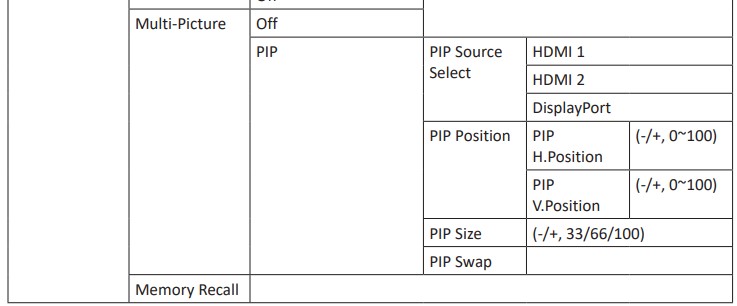
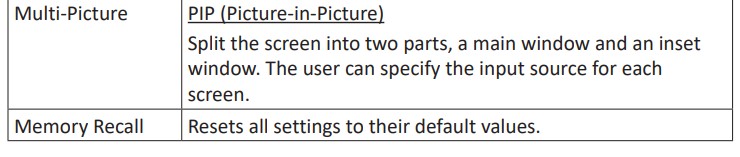
Multi-picture
Multi-picture allows users to further customize their work space by allowing up to two split windows from different inputs, displaying high resolution content with different aspect ratios, without distortion from the original input sources.
PIP (Picture-in-Picture)

To enter the PIP menu:
1. Press the 2/3/4/5 key to display the Quick Menu. Then press the 4 key to display the OSD Menu.
2. Press the 1(Shortcut) or 2 key to select Setup Menu. Then press the 3 key to enter the Setup Menu menu.
3. Press the 1(Shortcut) or 2 key to select Multi-Picture. Then press the 3 key to enter its sub-menu.
4. Press the 1(Shortcut) or 2 key to select PIP. Then press the 3 key to enter its submenu.
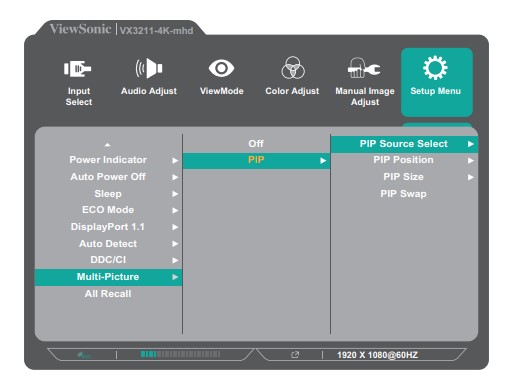
Once in the PIP menu:
• To change the input source for the inset window: select PIP Source Select and press the 3 key. Then press the 1(Shortcut) or 2 key to select the desired input source and press the 3 key to confirm.
• To adjust the inset window position: select PIP Position and press the 3 key.
• Press the 3 key to select PIP H.Position or PIP V.Position. Press the 1(Shortcut)or 2 key to adjust the setting and press the 3 key to confirm.
• To adjust the inset window size: select PIP Size and press the 3 key. Then press the 1(Shortcut) or 2 key to adjust the setting.
• To swap the two windows: select PIP Swap and press the 3 key to confirm.
NOTE: Only an HDMI with a Display Port connection can work in PIP. HDMI with HDMI will not work.
▷Appendix
Specifications

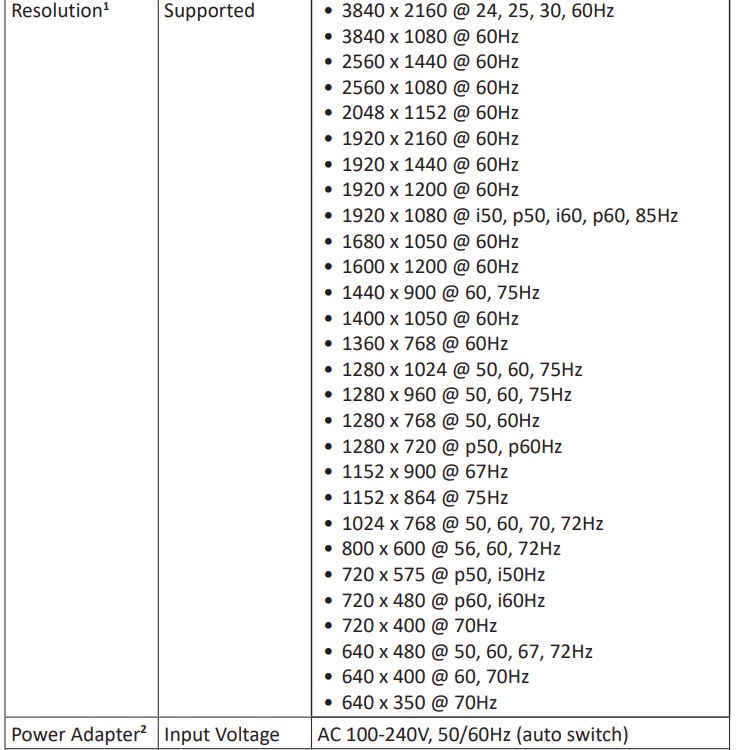


1.Do not set the graphics card in your computer to exceed these timing modes; doing so may result in permanent damage to the display.
2.Please use the power adapter from ViewSonic® or an authorized source only.
3.The test condition follows EEI standards.
Glossary
This section describes the standard glossary of terms used in all LCD display models. All terms are listed in alphabetical order.
NOTE: Some terms may not be applicable to your monitor.
A. Advanced DCR
Advanced DCR technology automatically detects the image signal and intelligently controls the backlight brightness and color to improve on the ability to make the black blacker in a dark scene, and make the white whiter in a bright environment.
AMD FreeSync
AMD FreeSync™ technology puts an end to choppy gameplay and broken frames with fluid, artifact-free performance at virtually any framerate. To utilize FreeSync, ensure that the monitor and GPU FreeSync options are activated.
Audio Adjust
Adjusts the volume, mutes the sound, or toggles between inputs if you have more than one source.
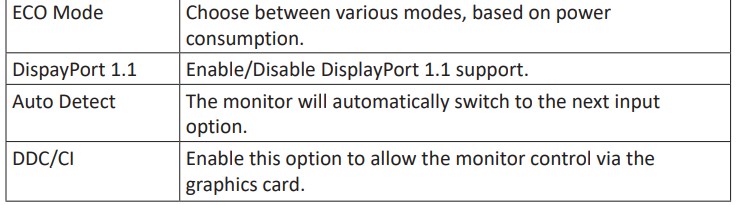
Auto Detect
If the current input source has no signal, the monitor will automatically switch to the next input option. This function, on some models, is disabled by default.
B. Black Stabilization
ViewSonic’s Black Stabilization provides heightened visibility and detail by brightening dark scenes.
Blue Light Filter
Adjusts the filter that blocks high-energy blue light for a more comfortable viewing experience.
Brightness
Adjusts background black levels of the screen image.
C. Color Adjust
Provides several color adjustment modes, to help adjust the color settings to fit the user’s needs.
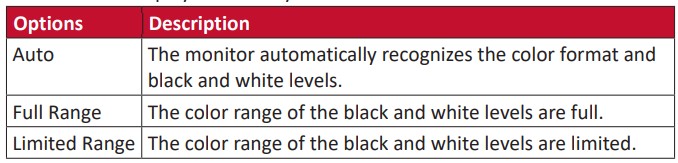
Color Range
The monitor can detect the input signal color range automatically. You can manually change the color range options to fit the correct color range if the colors are not displayed correctly.
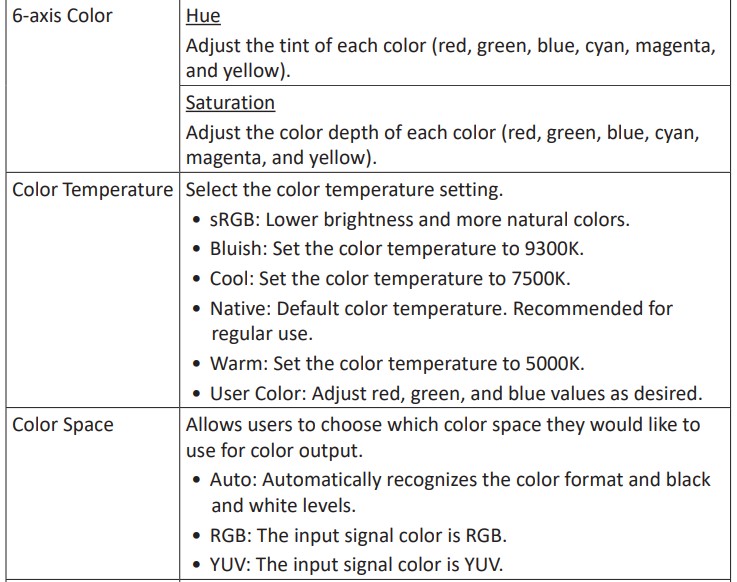
 Color Space
Allows users to choose which color space they would like to use for monitor color output (RGB, YUV).
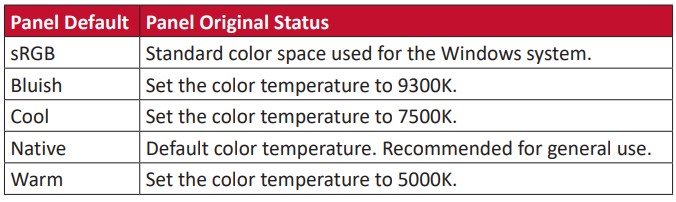
Color Temperature
Allows users to select specific color temperature settings to further customize their viewing experience.
 Contrast
Adjusts the difference between the image background (black level) and the foreground (white level).
G. Game Mode
Integrating a gaming-oriented OSD design including pre-calibrated FPS, RTS, and MOBA gaming settings. Each mode is functionally customized with in-game testing and adjustments made for the best blend of color and technology.
Gamma
Allows users to manually adjust the brightness level of the monitor’s grayscale levels. There are three selections: 1.8, 2.2, and 2.6.
H. HDR10 (High-Dynamic-Range)
Reduces the overall contrast of a given scene so that detail in the highlights and shadows can be seen.
NOTE: Only available on HDR10 video content.
Hue
Adjusts the tint of each color (red, green, blue, cyan, magenta, and yellow).
I. Information
Displays the timing mode (video signal input) coming from the graphics card in the computer, the LCD model number, the serial number, and the ViewSonic® website URL. See your graphics cards’s user guide for instructions on changing the resolution and refersh rate (vertical frequency).
NOTE: VESA 1024 x 768 @ 60Hz, for example, means that the resolution is 1024 x 768 and the refresh rate is 60Hz.
Input Select
Toggles between the various input options that are available for the monitor.
L. Low Input Lag
ViewSonic® offers low input lag, utilizing a monitor process reducer, which decreases signal latency. Under the “Low Input Lag” sub-menu, you can select the appropriate speed for your desired use from the options.
M. Manual Image Adjust
Displays the “Manual Image Adjust” menu. You can manually set a variety of image quality adjustments.
Memory Recall
Returns the adjustments back to factory settings if the display is operating in a factory preset timing mode listed in the “Specifications” of this manual.
NOTE: (Exception) This control does not affect changes made in the “Language Select” or “Power Lock Setting”.
O. Overscan
Refers to a cropped image on your monitor’s screen. A setting on your monitor zooms in on movie content, so that you cannot see the outermost edges of the film.
P. PIP (Picture-in-Picture)
Split the screen into two parts, a main window and an inset window. The user can specify the input source for each screen.
PIP Swap
This exchanges the main-picture source with the sub-picture source.
R. Recall
Resets the View Mode monitor settings.
Resolution Notice
The notice tells users that the current viewing resolution is not the correct native resolution. This notice will appear in the display settings window when setting up the display resolution.
Response Time
Adjusts the response time, creating smooth images without streaking, blurring, or ghosting. A low response time is perfect for the most graphicintense gaming, and provides amazing visual quality while watching sports or action movies.
S. Setup Menu
Adjusts On-Screen Display (OSD) Menu settings. Many of these settings can activate on-screen display notifications so users do not have to reopen the menu.
Sharpness
Adjusts the picture quality of the monitor.
V. ViewMode
ViewSonic’s unique ViewMode feature offers “Game”, “Movie”, “Web”, “Text”, “MAC”, and “Mono” presets. These presets are specifically designed to deliver an optimized viewing experience for different screen applications.
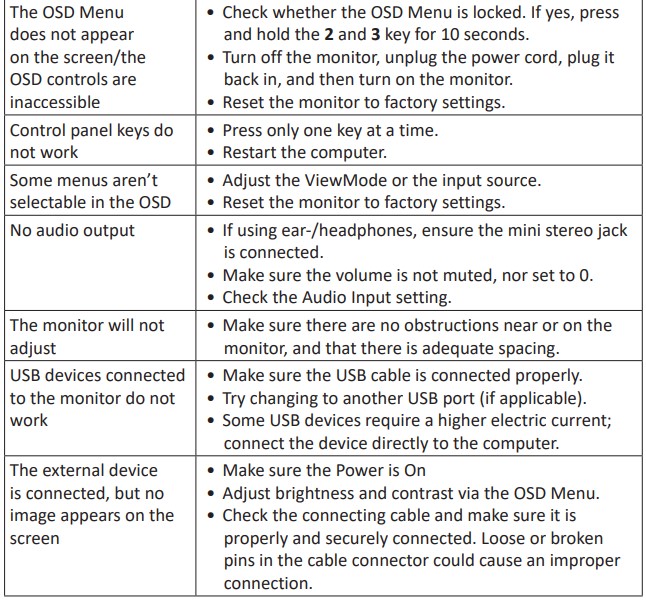
Troubleshooting
This section describes some common problems that you may experience when using the monitor.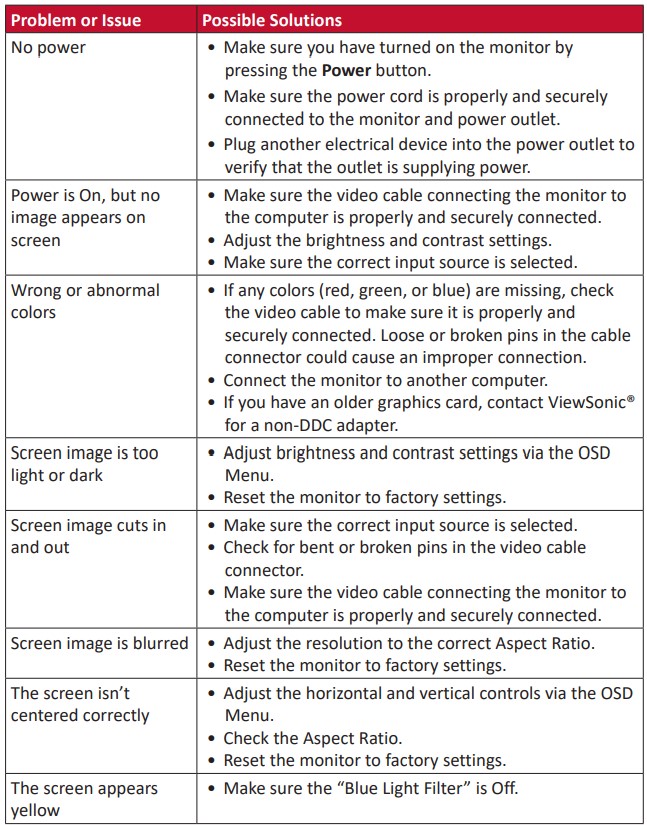
Maintenance
General Precautions
• Make sure the monitor is turned off and the power cable is unplugged from the power outlet.
• Never spray or pour any liquid directly onto the screen or case.
• Handle the monitor with care, as a darker-colored monitor, if scuffed, may show marks more clearly than a lighter-colored monitor.
Cleaning the Screen
• Wipe the screen with a clean, soft, lint-free cloth. This removes dust and other particles.
• If the screen is still not clean, apply a small amount of non-ammonia, nonalcohol based glass cleaner onto a clean, soft, lint free cloth; then wipe the screen.
Cleaning the Case
• Use a soft, dry cloth.
• If the case is still not clean, apply a small amount of non-ammonia, non-alcohol based, mild non-abrasive detergent onto a clean, soft, lint-free cloth, then wipe the surface.
Disclaimer
• ViewSonic® does not recommend the use of any ammonia or alcohol-based cleaners on the display screen or case. Some chemical cleaners have been reported to damage the screen and/or case of the monitor.
• ViewSonic® will not be liable for damage resulting from use of any ammonia or alcohol-based cleaners.
▷Regulatory and Service Information
Compliance Information
This section addresses all connected requirements and statements regarding regulations. Confirmed corresponding applications shall refer to nameplate labels and relevant markings on the unit.
FCC Compliance Statement
This device complies with part 15 of FCC Rules. Operation is subject to the following two conditions: (1) this device may not cause harmful interference, and (2) this device must accept any interference received, including interference that may cause undesired operation. This equipment has been tested and found to comply with the limits for a Class B digital device, pursuant to part 15 of the FCC Rules.
These limits are designed to provide reasonable protection against harmful interference in a residential installation. This equipment generates, uses, and can radiate radio frequency energy, and if not installed and used in accordance with the instructions, may cause harmful interference to radio communications. However, there is no guarantee that interference will not occur in a particular installation. If this equipment does cause harmful interference to radio or television reception, which can be determined by turning the equipment off and on, the user is encouraged to try to correct the interference by one or more of the following measures:
• Reorient or relocate the receiving antenna.
• Increase the separation between the equipment and receiver.
• Connect the equipment into an outlet on a circuit different from that to which the receiver is connected.
• Consult the dealer or an experienced radio/TV technician for help.
Warning: You are cautioned that changes or modifications not expressly approved by the party responsible for compliance could void your authority to operate the equipment.
Industry Canada Statement
CAN ICES-3 (B)/NMB-3(B)
CE Conformity for European Countries
![]()
The device complies with the EMC Directive 2014/30/EU and Low Voltage Directive 2014/35/EU.
The following information is only for EU-member states:
The mark shown to the right is in compliance with the Waste Electrical and Electronic Equipment Directive 2012/19/EU ![]() (WEEE). The mark indicates the requirement NOT to dispose of the equipment as unsorted municipal waste, but use the return and collection systems according to local law.
(WEEE). The mark indicates the requirement NOT to dispose of the equipment as unsorted municipal waste, but use the return and collection systems according to local law.
Declaration of RoHS2 Compliance
This product has been designed and manufactured in compliance with Directive 2011/65/EU of the European Parliament and the Council on restriction of the use of certain hazardous substances in electrical and electronic equipment (RoHS2 Directive) and is deemed to comply with the maximum concentration values issued by the European Technical Adaptation Committee (TAC) as shown below:
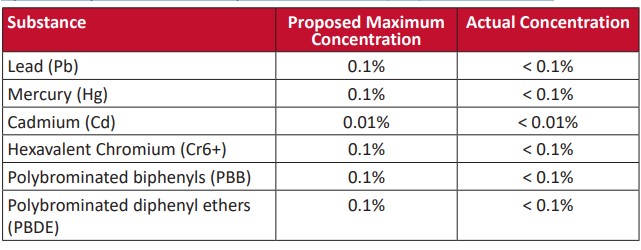
Certain components of products as stated above are exempted under the Annex III of the RoHS2 Directives as noted below:
• Mercury in cold cathode fluorescent lamps and external electrode fluorescent lamps (CCFL and EEFL) for special purposes not exceeding (per lamp):
»Short length (500 mm): maximum 3.5 mg per lamp.
»Medium length (> 500 mm and 1,500 mm): maximum 5 mg per lamp.
»Long length (> 1,500 mm): maximum 13 mg per lamp.
• Lead in glass of cathode ray tubes.
• Lead in glass of fluorescent tubes not exceeding 0.2% by weight.
• Lead as an alloying element in aluminum containing up to 0.4% lead by weight.
• Copper alloy containing up to 4% lead by weight.
• Lead in high melting temperature type solders (i.e. lead-based alloys containing 85% by weight or more lead).
• Electrical and electronic components containing lead in a glass or ceramic other than dielectric ceramic in capacitors, e.g. piezoelectronic devices, or in a glass or ceramic matrix compound.
Indian Restriction of Hazardous Substances
Restriction on Hazardous Substances statement (India). This product complies with the “India E-waste Rule 2011” and prohibits use of lead, mercury, hexavalent chromium, polybrominated biphenyls or polybrominated diphenyl ethers in concentrations exceeding 0.1 weight % and 0.01 weight % for cadmium, except for the exemptions set in Schedule 2 of the Rule.
Product Disposal at End of Product Life
ViewSonic® respects the environment and is committed to working and living green. Thank you for being part of Smarter, Greener Computing. Please visit theViewSonic® website to learn more.
USA & Canada:
http://www.viewsonic.com/company/green/recycle-program/
Europe:
http://www.viewsoniceurope.com/eu/support/call-desk/
Taiwan:
https://recycle.epa.gov.tw/